How To Store Your Unused Pickups
So, you just bought some Fralin Pickups and installed them on your guitar. Congratulations! What do you do with your old pickups? What’s the best way to store your unused […]

Hey there! Today, we’re tackling Telecasters and the many unique ways to wire one up. Our goal in this article is to provide a one-stop shop for all different types of Telecaster wiring configurations and explain their subtle differences along the way. Let’s dig in!
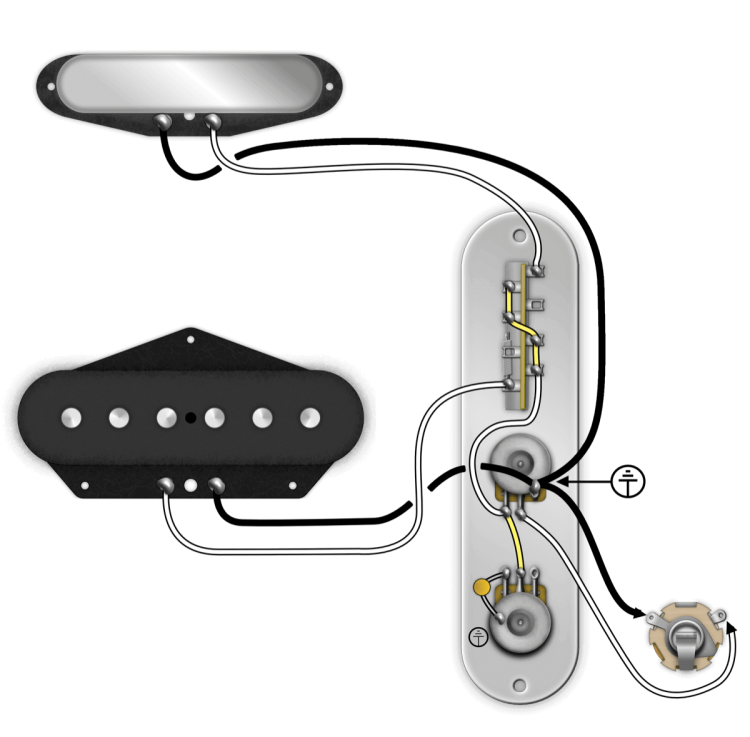
We can’t discuss Telecaster Wiring without discussing the gold standard: Modern Telecaster Wiring. The modern wiring is ubiquitous in all forms of music and playing styles, and you should know it well. Most Telecasters made post-1967 come standard with this wiring by default. It comprises a 3-Way Blade Switch, Master Volume, and Master Tone. Here’s a diagram:
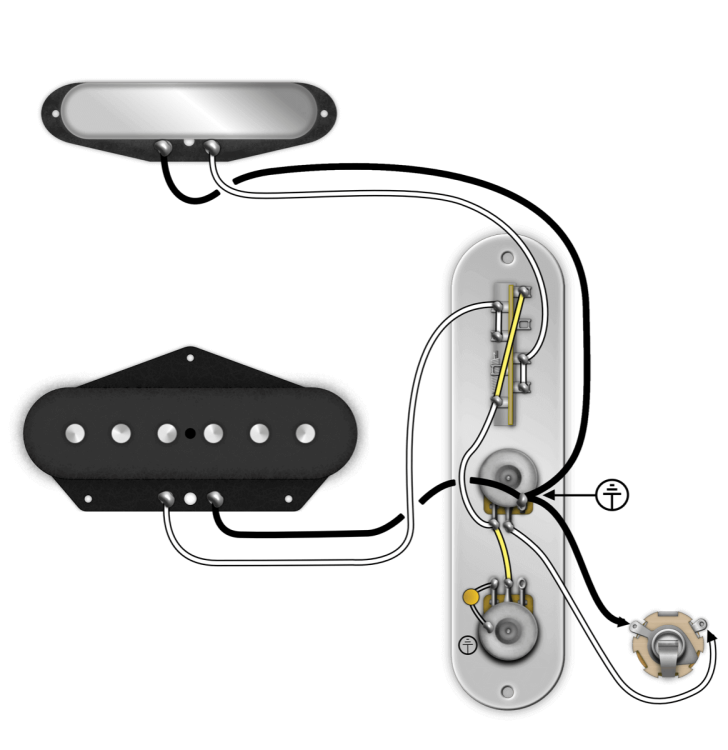
Did you know you can wire the 3-way Blade Switch up differently? This version works exactly the same as the above version, and I believe it’s a bit easier to wire up. I find it more accessible as you don’t have to solder the “S”-shaped jumper on the switch. Here’s Version 2:
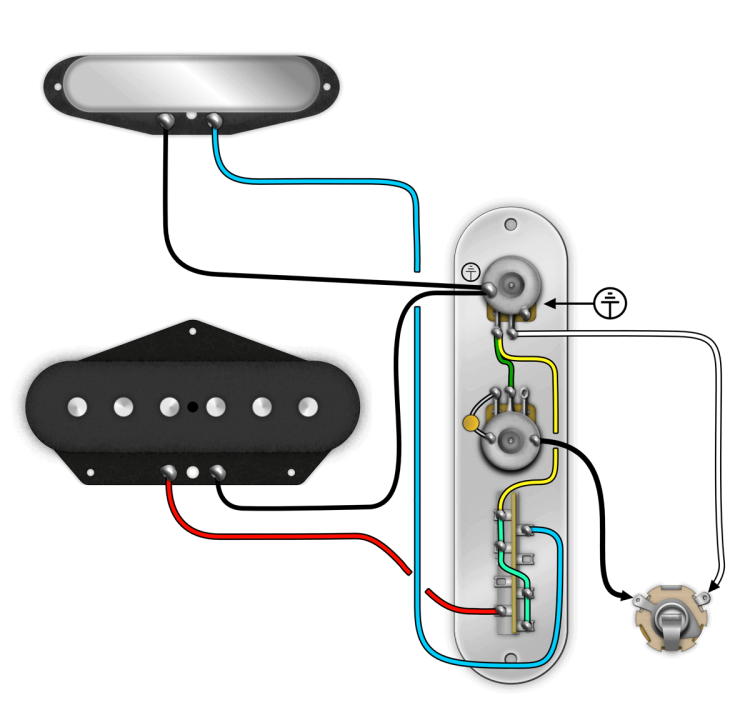
Your strumming hand is closest to the 3-way Blade Switch in a traditional Telecaster wiring setup. If you want more control over your volume, making subtle adjustments with the blade switch in the way can be difficult. That’s where the “Flipped” Telecaster Control Plate comes in!
The Flipped Telecaster Wiring reorders the controls on the control plate by putting the Volume Pot first, the Tone second, and the Blade Switch last. This configuration allows you to grab the Volume Pot with your pinky for volume swells, etc. You can read our full article on this subject, or just follow our diagram below:
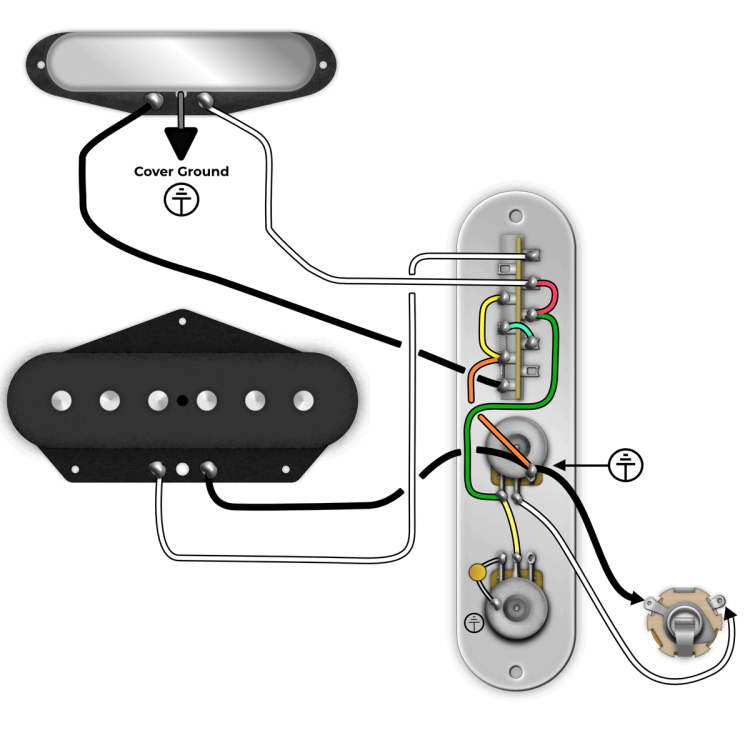
Having three positions on your Telecaster to play with is cool, but what about four positions? That’s when 4-Way Switching comes in! Commonly found on the Fender Baja 60’s Telecaster, this Telecaster wiring configuration gives you a whole new sonic world to explore.
What does the 4th position (series) sound achieve? It provides a thicker, warmer, and louder tone, and it does this by turning both pickups into a humbucker. If you want to learn more about this, check out our post on 4-Way Switching for Telecaster here!
Mod, Drop In, Plug In, Play
Customize and upgrade your Telecaster instantly with our Prewired Telecaster Wiring Harness! With over 150 combinations available, you can select your options, and we’ll wire it up just how you like it. Installation involves soldering a few wires into place. As always, we only use the finest-quality USA-Made parts we can find.
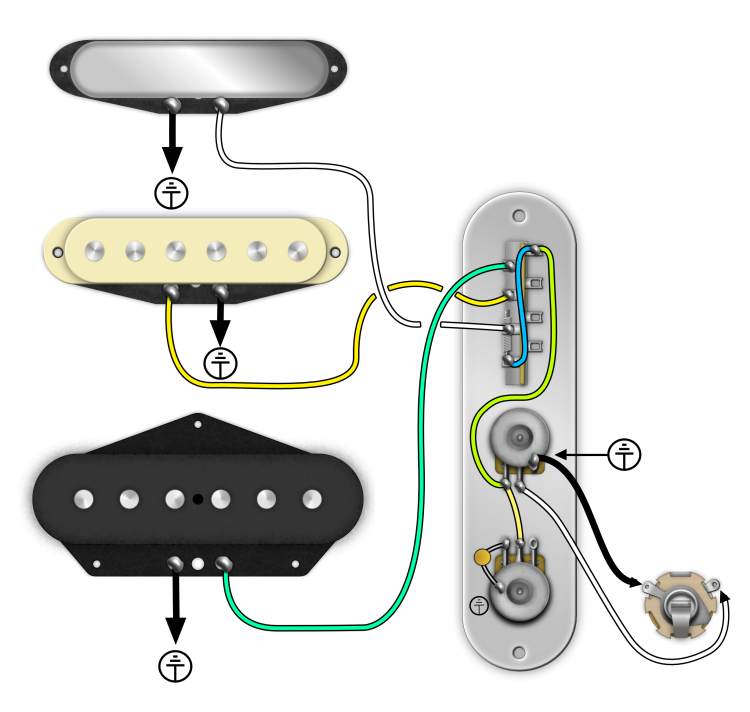
Nashville Telecasters features a middle pickup between the Neck and Bridge. This is traditionally a Stratocaster pickup, and the wiring closely resembles Stratocaster Wiring. In traditional Nashville Telecasters, the switching looks like this:
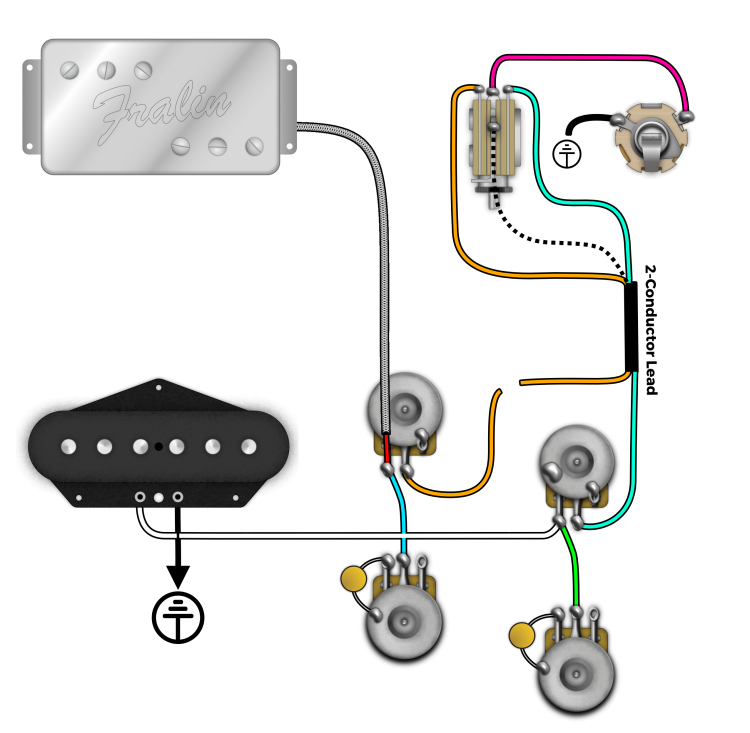
The Telecaster Custom combines the best of both worlds – the Telecaster form and function, and Les Paul-style wiring. This allows you to achieve an incredible array of tones while keeping all electronics optimized for the pickups you select.
What’s great about the Telecaster Custom is that you can select a 250K pot for the Bridge, and a 500K pot for the Wide Range Humbucker Neck.
Mixing Humbuckers and Single Coils can be tricky – Humbuckers tend to sound best on a 500K pot, and Single Coils sound best on a 250K pot, to tame their brightness. Like a Telecaster, this is made more difficult on a guitar with a single volume pot (which makes up most of the tonal difference).
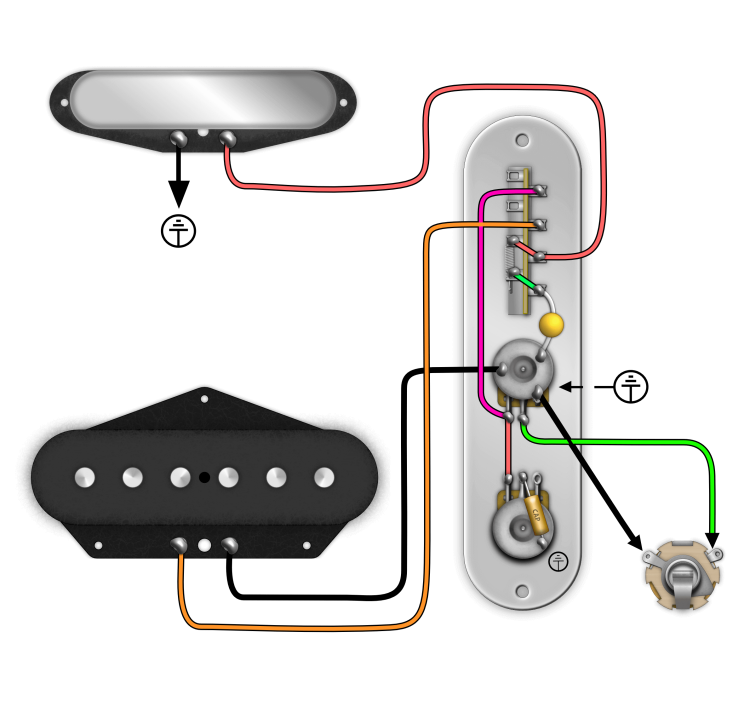
Fortunately, we can “fake out” the guitar’s pot value using a resistor! To achieve this, we want to use the recommend pot value for the darkest pickup as our volume pot. Since we have a Humbucker in the Neck position, we’ll use a 500K pot for our volume pot. Then, we’ll need a 500K resistor from the Bridge pickup to Ground. This will “fake out” the Bridge pickup, so it sounds like it’s going through a 250K pot. Check out this diagram here:
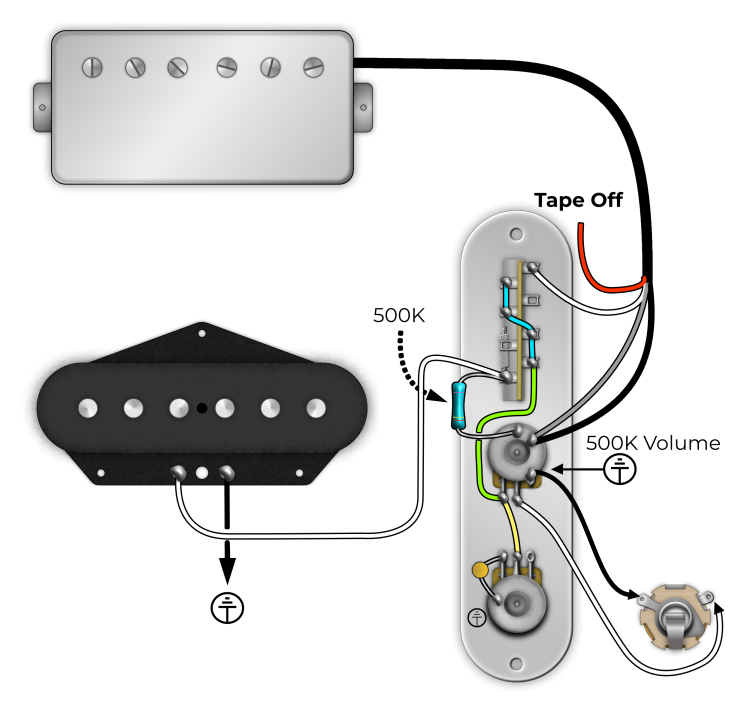
As you can see from the diagram above, the 500K Resistor is soldered to the Bridge connection on the Switch, and then soldered to ground. If you had a reverse setup, like a Single Coil in the Neck and a Humbucker or P90 in the Bridge, you would solder the 500K resistor to the Neck pickup’s position on the switch.
While the Esquire is certainly a cool (and very versatile) guitar, the original ’50s wiring left a few Esquire players wanting something more out of the 3rd position. The original wiring yielded a very dark tone in position 3. The Eldred modification aimed to solve this by removing the fixed treble roll-off circuit from the original ’50s wiring and replacing it with a low-value capacitor instead. The original Eldred modification uses a 0.0047uf Cap. However, you can easily and quickly experiment with different cap values to achieve the right tone you’re looking for.
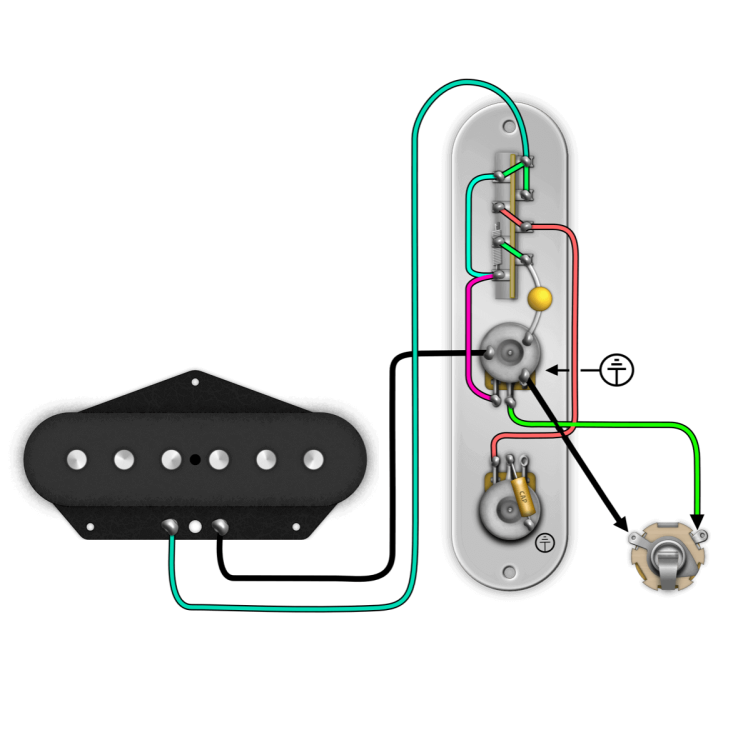
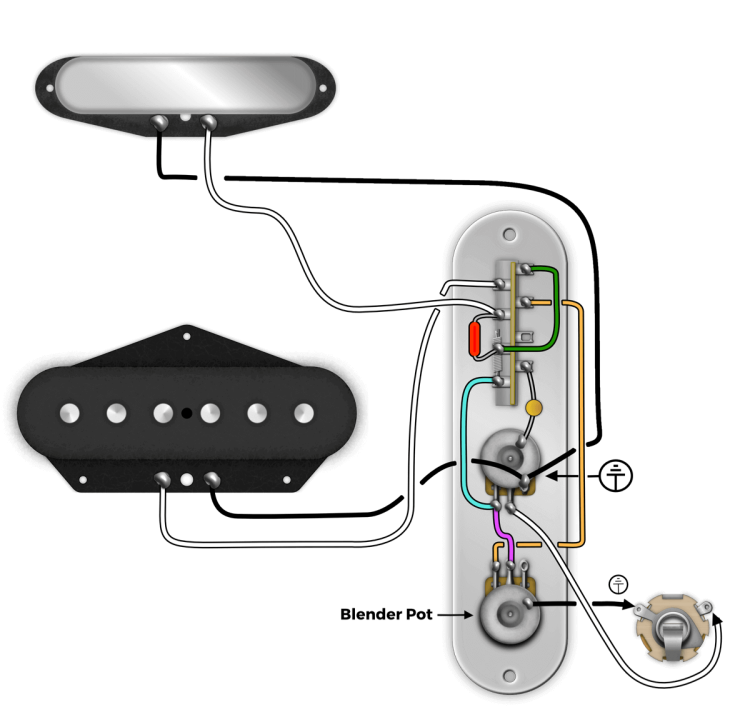
Similar to the Esquire Wiring, the Broadcaster now introduces a Neck pickup as well as a Blender pot for the following positions:
The Blender Pot gradually brings in the Neck Pickup for a wide sweep of tonal variation – super cool! For the resistor and capacitor value, we’ve seen a few different values – 15k for the resistor, and 0.05mfd for the capacitor. That said, you can certainly experiment with the capacitor value. 0.05mfd is very dark and to some, unusable in a modern setting. Going with a lower capacitance value will not darken your tone as much and make it more musical.
At last, we’ve arrived at the first Telecaster Wiring – the early 50’s, pre-CBS wiring. While this wiring isn’t very useful anymore (we’ve gone through a ton of variations since the early days), we aimed for completeness when writing this article. So, here it is:
Whew, that was a marathon of Telecaster wiring configurations! Did you know? We can prewire a Telecaster Control Plate for you! We have a ton more diagrams on our wiring diagrams page, so check that out as well!

15 Comments For This Post
Want to chime in to the conversation? Please do so! Please respect others.
Great article. Thank you. It would be great to hear the difference with audio clips. Do you guys have any?
Thanks, unfortunately, we don’t – sorry! Hopefully one day.
How can I wire up a Telecaster control panel with both a 4way switch for series wiring and a push pull for coil splitting a Artic Hot Rails humbucker in the bridge position? I’m new to modding so please make it simple lol you know like Tele wiring for Dummies lol. Thanks
Tyler / Lindy:
Thank you for the Tele wiring 101 schemes. Question: for two single coils, is there a way to obtain series wiring without a 4-way switch? In other words replace parallel wiring with series in the “both” position. I cannot locate any such info anywhere. Thank you kindly,
Hello, Just a mod on the Esquire wiring. Is it possible to by pass completely the circuit, I mean, direct output in the first position?
Thank you so much in advance. Enrico
This is a great resource, thanks very much. Had a question- can the Broadcaster/blend mod be done with a LP-style 3 way toggle instead of a blade switch?
I’d like to wire a SSH Telecaster, with the standard telecaster bridge pickup, a standard neck pickup in the middle, and a humbucker in the neck position so that the switch positions are:
4.) Humbucker (Neck)
3.) Humbucker/Bridge pickup (Parallel)
2.) Middle (Solo)
1.) Humbucker Neck/Bridge pickup (In Series)
Any ideas?
For the humbucker + single coil tele wiring, what value pot is used for the tone? It only mentions a 500k volume pot and a 500k resistor.
Hey Matt, you can go either 500K or 250K as the Volume Pot makes the biggest difference in terms of tone. I’d start with a 250K tone pot and if you need a slightly brighter tone, go with a 500K pot.
In response to Tim Brennan’s question, yes, there is a way to eliminate the hum if you touch the neck humbucker’s cover, but it will involve you removing the cover if your humbucker does not have four-wires plus a shielded conductor in the cable from the pickup.
The problem is that, with two-wire cables, the cover is connected to the ground wire. When you reverse the phase of the neck humbucker, the cover goes live, so when you touch it, you are touching the signal, not a grounded cover.
You can remove the cover and you will see that one very fine wire from a pickup coil is soldered to the base plate. You don’t want that; you want to unsolder that wire so it can be extended to go all the way to your controls. Replace the single-conductor shielded cable with a two-conductor shielded cable with the shield soldered to the pickup plate and the two conductors soldered to the two wires coming from the two coils. When you reinstall the cover, it will be grounded and you won’t get noise whenever you touch it.
Yesterday, I modded a Telecaster with half out of phase wiring. I had to break the ground connection of the cover on the Telecaster neck pickup and run a third wire from the pickup to a ground point in the control cavity. Otherwise, I’d get the same noise you get when touching the cover.
Or…
You could leave the neck pickup alone and reverse the phase (with the appropriate capacitor) of the bridge pickup so you don’t have to mess with possibly destroying your humbucker! That’s what I would do – and I’ve been modding guitars for 65 years.
Hallo liebe Freunde. Ich komme bei meiner Idee nicht weiter. Ich jabe eine nashville telecaster, möchte aber nur einen strat Sound haben, weil ich nur diesen brauche. Mit 4 way switch. Meine idee: Neck, Neck/Bridge, Bridge, bridge/middle ( stratcoil ).
Aber ich weiss nicht wie ich es verkabeln soll.
Könnt ihr helfen?
I’m an aspiring builder/modder so every tip or trick I can glean from your articles is a big bonus. I’m reading and rereading everything. So thanks for sharing, and please keep it coming!
I’d like to see a 5 way tele alt nashville like this
1 BR
2 BR Mid Series
3 Mid
4 Mid Neck Series
5 Neck
Is there a way? I have never been a fan of 2 or 4 strat sounds and the mid pos 5 way is so close to the Br/ Nk tele it could suffice. thoughts?
Interesting information here! I enjoy seeing these tech notes! Keep them coming.
Great piece! Any thoughts on 5-way “Lawrence” half-out-of-phase wiring? I have it and like it in a Tele with a covered humbucker in the neck and (Fralin vintage) in the bridge. But when I touch the neck pickup in positions 4-5, I get a ground hum. I can be careful, but if there’s an easy wiring solution, I’m all ears. Thanks,