
Push-Pull Pot Power!
A Push-Pull Pot can add a ton of versatility to your guitar! They are a great way to add a switch, or other cool mods without modifying your guitar too much. You can use them to reverse the phase, split a Humbucker, or trick your guitar out in a fresh way. They can be a little tricky to wrap your head around, but once you get the basics, they are easy to understand.
A Push-Pull Pot, in its most basic definition, is a Potentiometer, attached on top of a Switch.
We refer to the switch as a DPDT (Double Pole, Double Throw) Switch. ‘DPDT’ means the switch has two separate “poles”, or sides to it.
If you’re not familiar with how pots work, we recommend going back to Part 1 and check out our article on pots here.
The Basics of Push-Pull Pots:
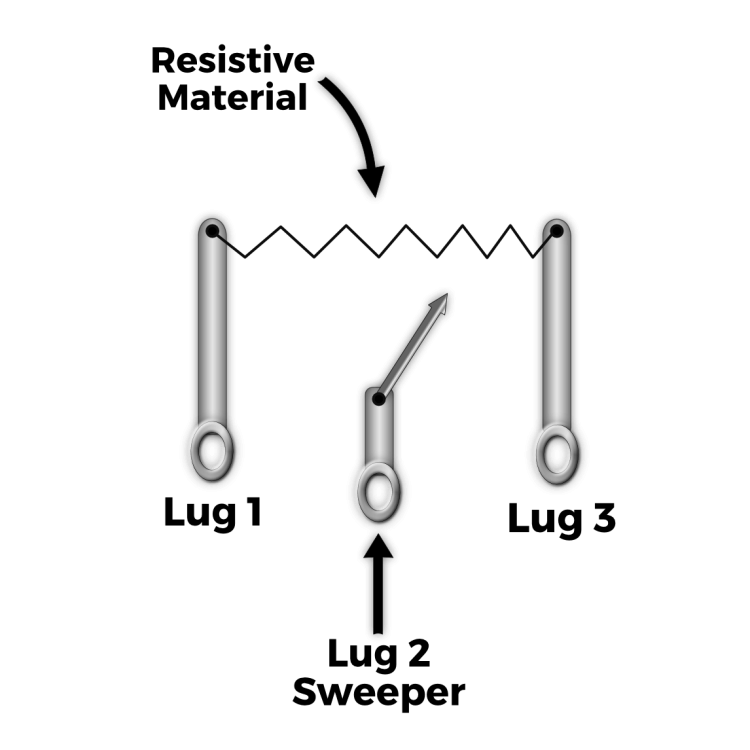
There are two components of a Push-Pull Pot: the Pot and the Switch. Even though they look combined, they are actually separate. As described in our previous article, the Pot is a variable resistor. It has a resistance strip and a sweeper to choose the resistance. Lug 1 is the start of the resistance strip, and Lug 3 is the end. Lug 2, or the middle lug, is the sweeper.

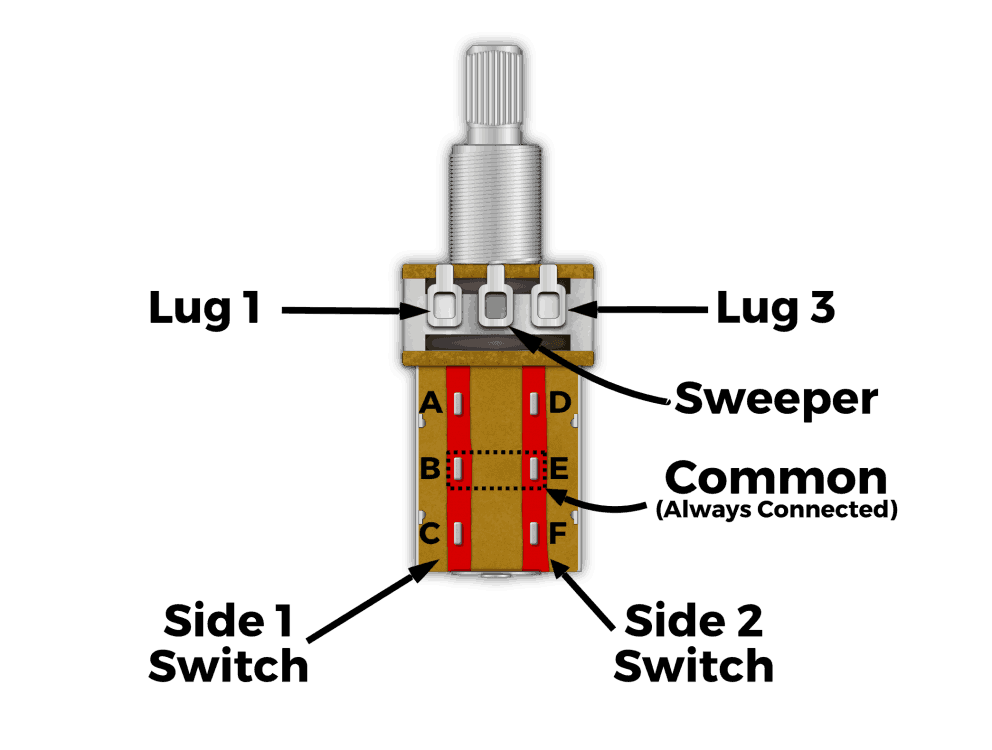
The other part of the Push-Pull pot is the Switch. The DPDT switch has two sides. Side 1 (A – B – C) is entirely independent of Side 2 (D – E – F).
We refer to the center lugs, B and E, as the “common” or inputs of the switch – they stay connected all the time. See below for an illustration of the Commons:
THE DPDT SWITCH:
There are two separate sides of the switch (hence the ‘double’ in Double Pole, Double Throw). We can call them Side A & Side B. The Selector connects the different terminals on each side. Check it out:
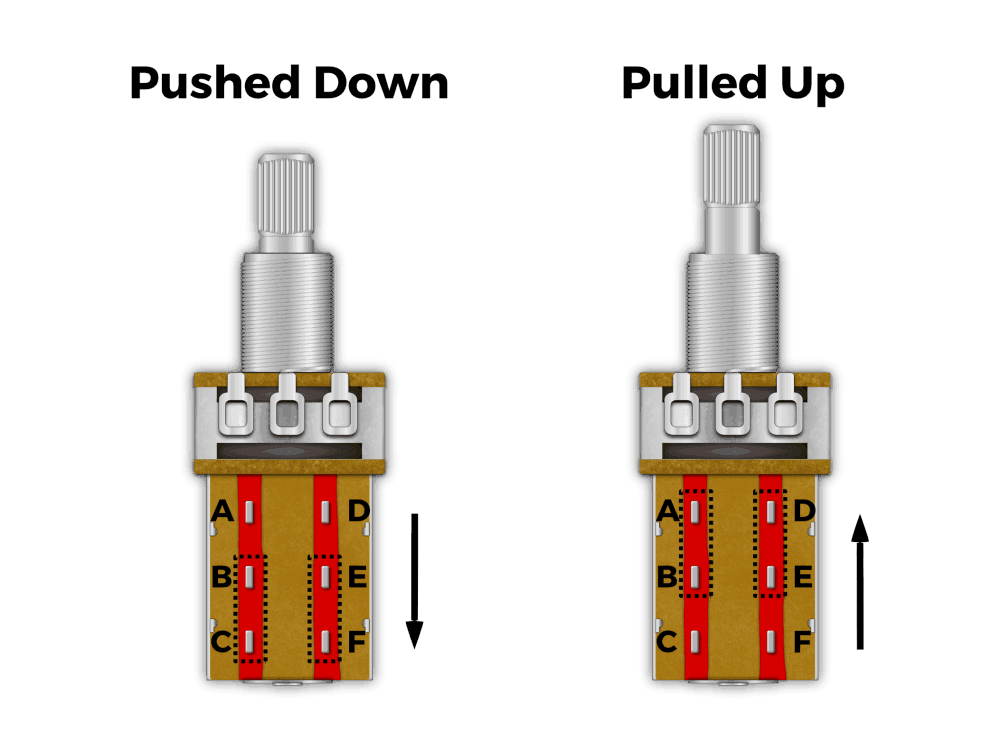
When pushed down, the Selector is selecting the bottom four lugs (B-C-E-F).
- B connects to C
- E connects to F
When pulled up, the Selector slides up and is now selecting the top four lugs (A-B-D-E).
- B connects to A
- E connects to D.
- As you can see, B and E stay connected.
Coil Splitting:
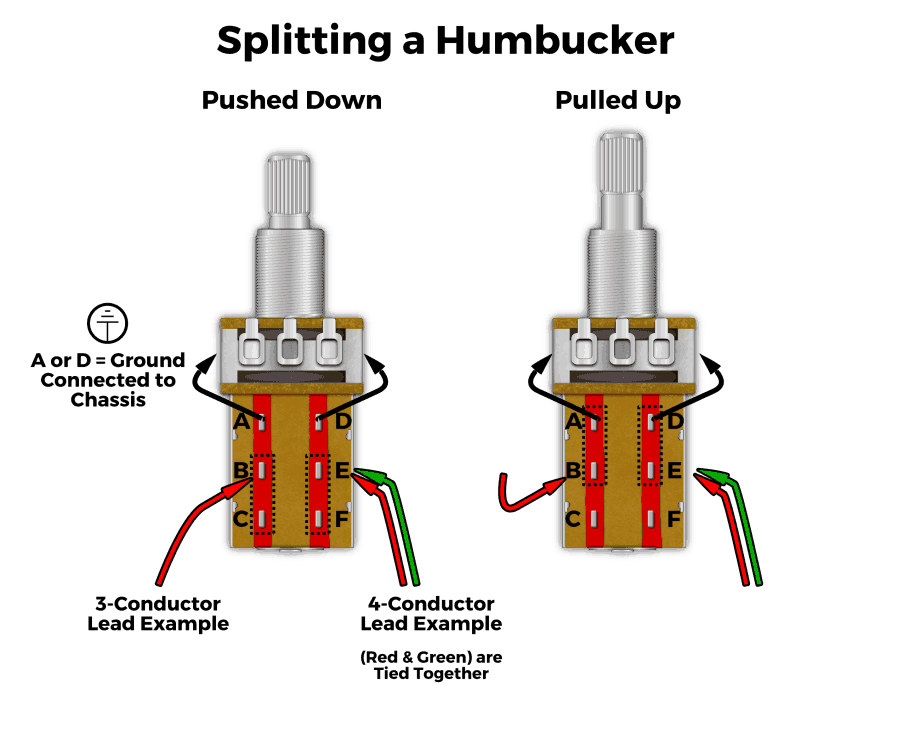
Coil Splitting is just one of the many things you can do with a push-pull pot and is a great place to start our understanding of them. You can use Coil Splitting to turn a Humbucker into a Single Coil by sending one of its coils to ground.
For illustration, we drew this out for you below. We used both sides of the switch to illustrate two points:
- It shows how to wire up 3-Conductor and 4-Conductor, and
- It shows that you can tap two separate humbuckers with the same switch, by using both sides.
HOW IT WORKS:
- When the Push-Pull Pot is pushed down, The humbucker is working like normal.
- When the Push-Pull Pot is pulled up, the “Tap” (Red on 3 Conductor, Red, and Green Tied Together on 4-Conductor) is sent to ground, “Shorting out” the coil. The entire Casing of the pot should be grounded, so theoretically, you can ground any wire off of the switch by just running a jumper to the casing.
Partial Coil Splitting:
Coil Splitting can sound great on higher output humbuckers, like our Modern P.A.F., and our High Output Humbucker. But what if you have a low-output humbucker, like our Pure P.A.F.? Fear not. You can “Partially Split” the coil, with our Partial Tap Resistor.
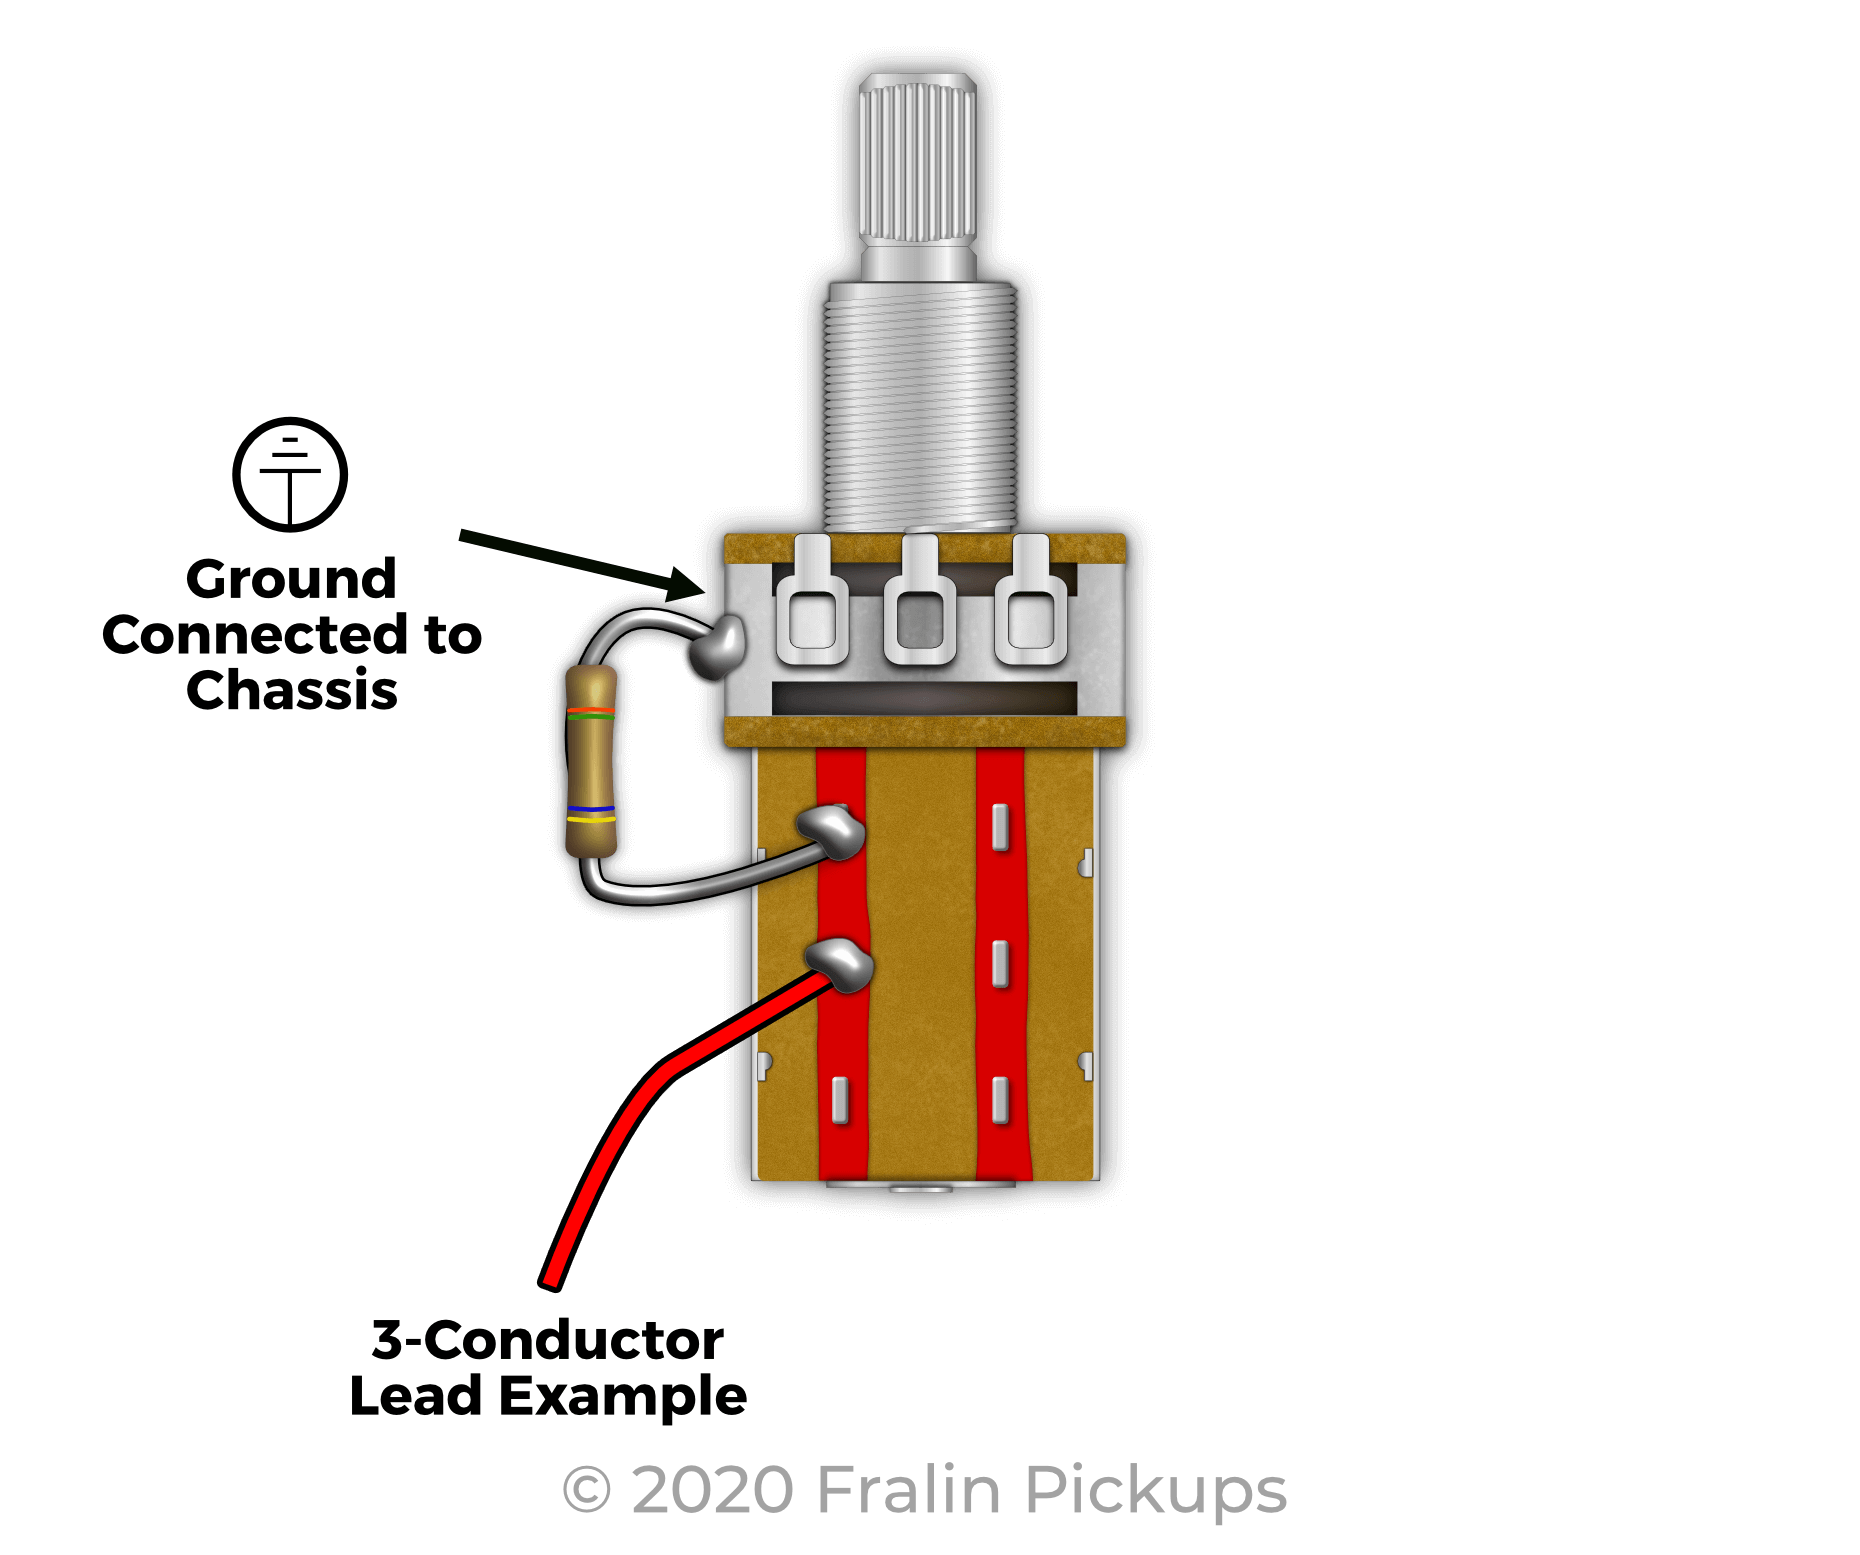
How it Works:
When you pull up on the push-pull pot, B connects to A, and your Slug Coil will be sent to ground, only this time, it goes through a resistor. This prevents the whole signal from being grounded by putting a partial short across the coil, instead of a full short. In turn, you’re getting a stronger single-coil sound from your humbucker when split.
PHASE REVERSING:
Phase Reversing is a neat little trick when you want to reverse the coil direction of your pickup.
Some find this sonically pleasing, mainly when used with a Blender Pot, which will roll in the pickup’s phase – pretty cool! To do this, you need 2-Conductor Wire. Remember to ground the Shield (Bare). Here’s how to wire this up:
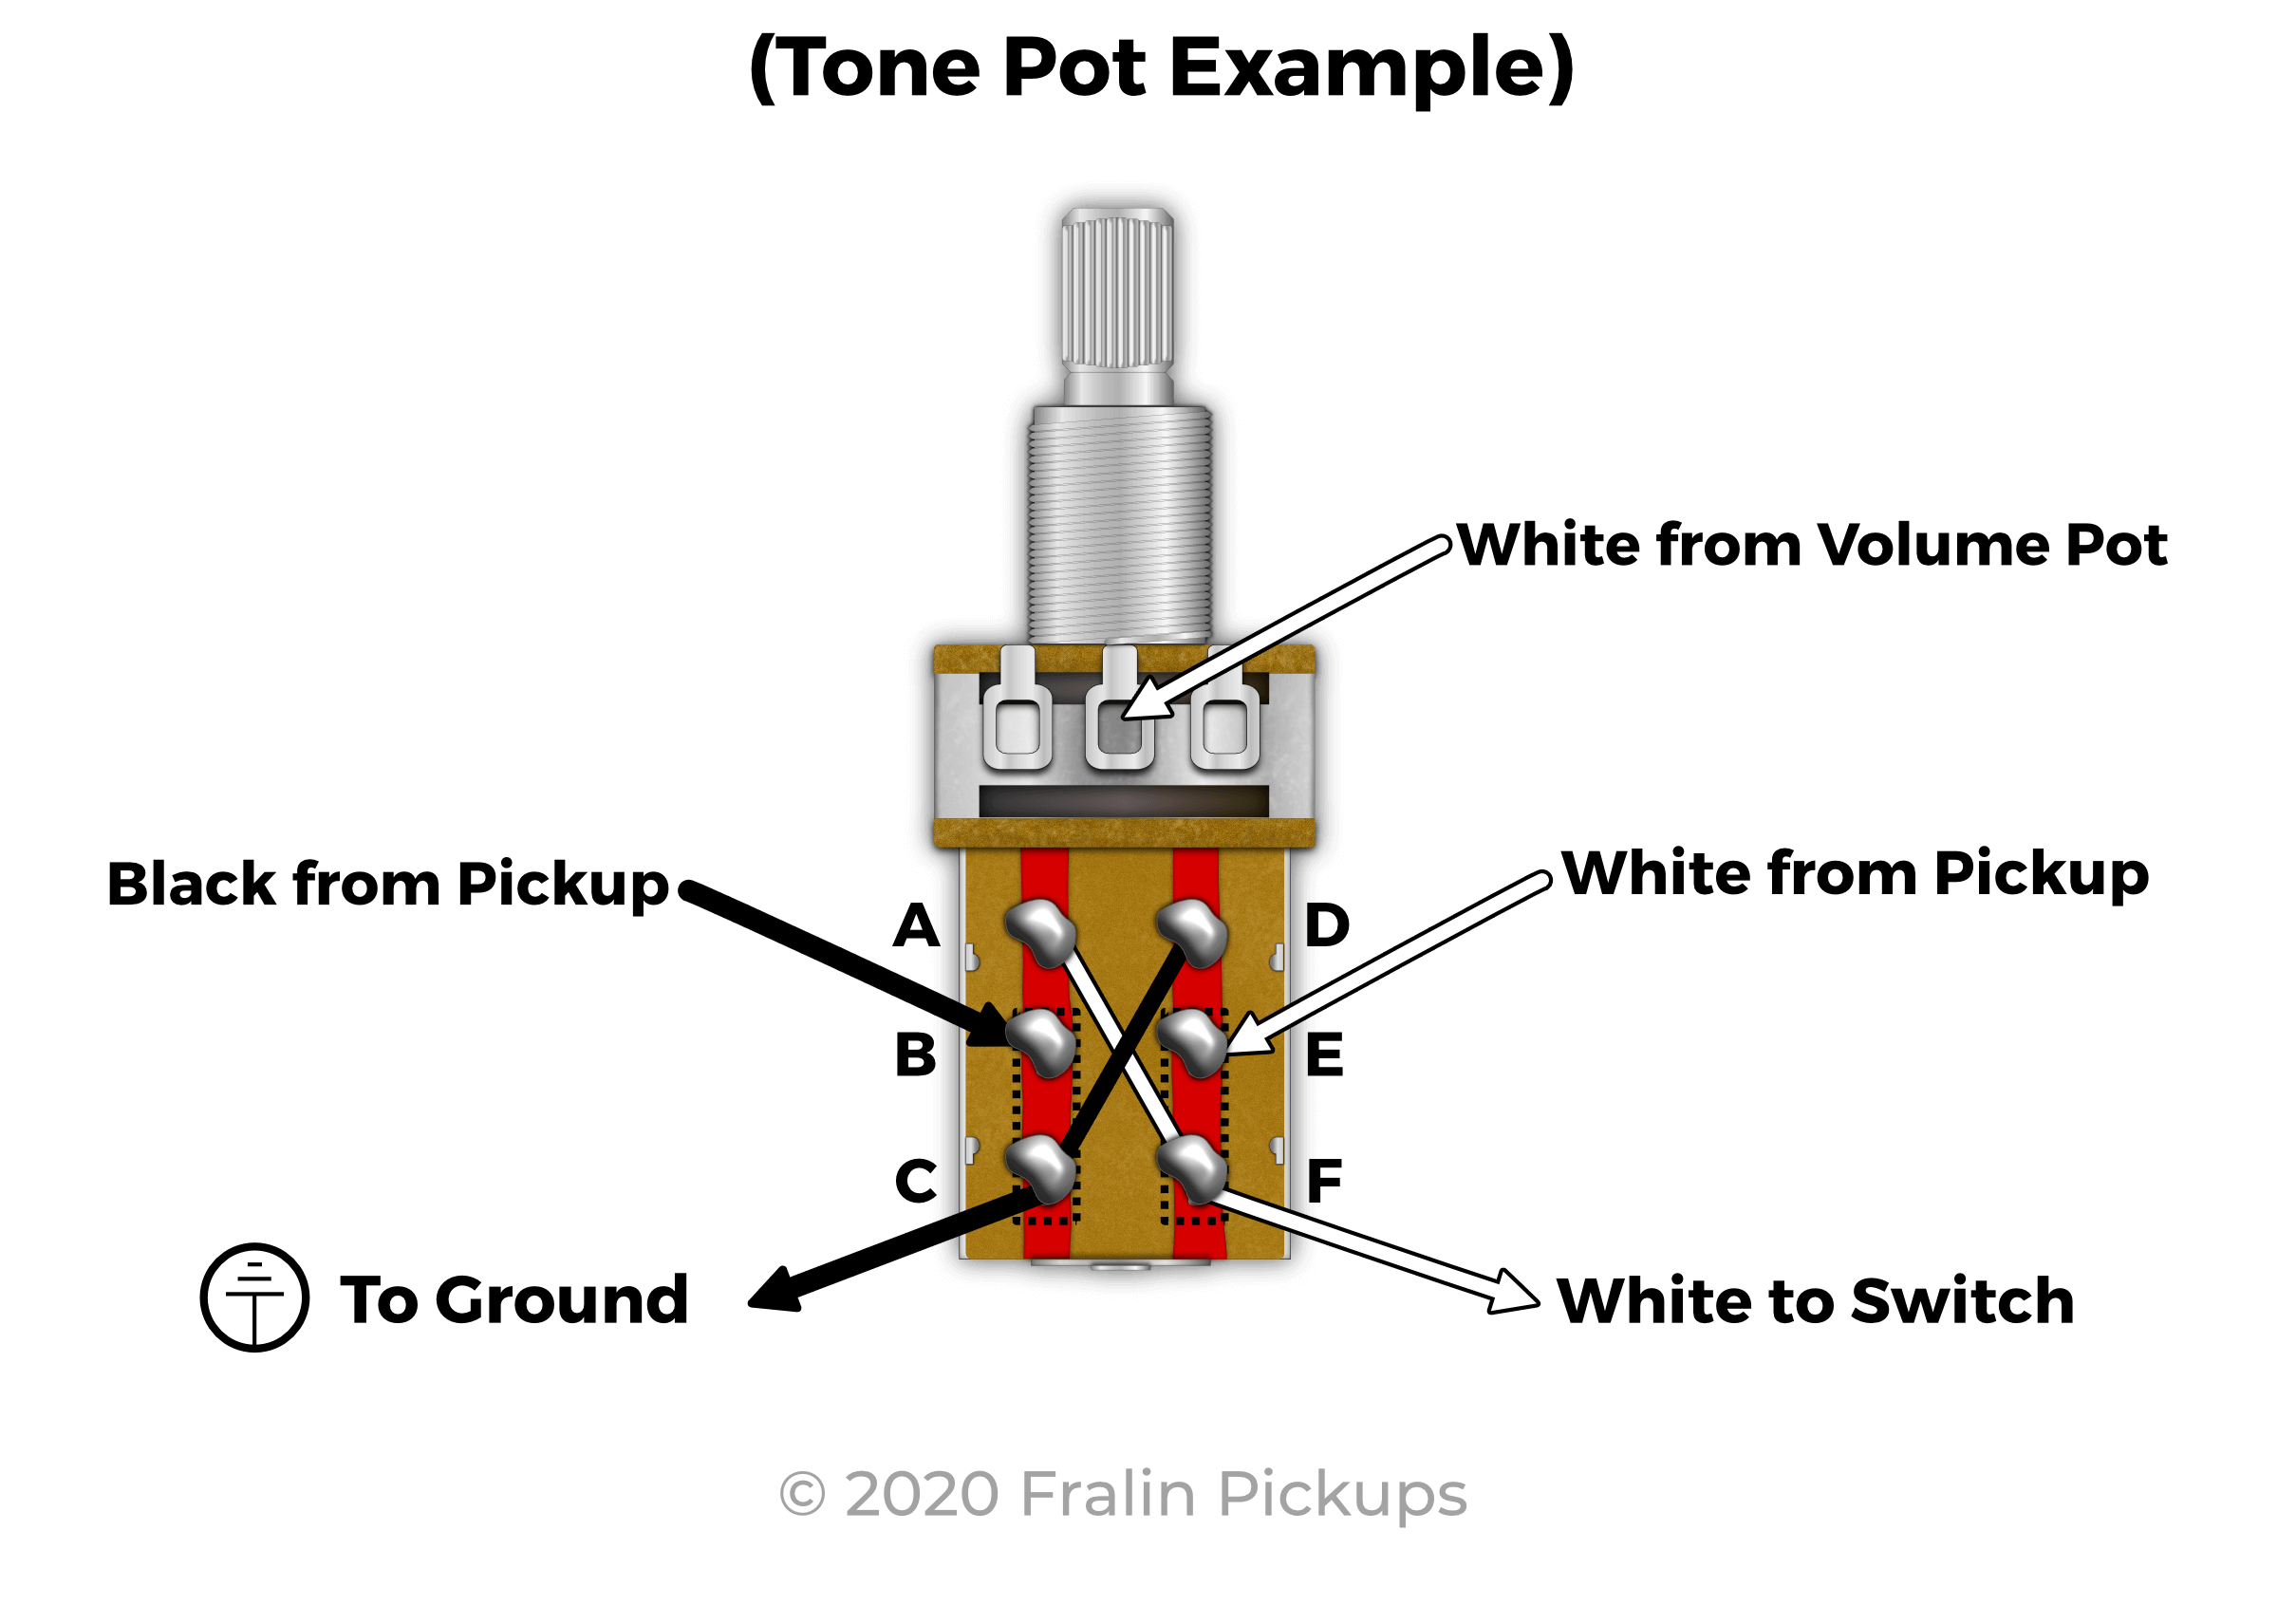
How it Works:
When the switch is in the down position, White connects to White (Terminals E > F), Black connects to Black on Terminals B > C. When pulled up, The phase reverses!
Mods:
Mod 1: Two-Tone Caps, One Push-Pull Pot:
This mod is pretty cool! With this mod, you can use two different tone caps with one push-pull pot. When pushed down, you can have to say, a .02mfd Cap, and when pulled up, you can have a Fralin Magic Cap, or vice-versa!
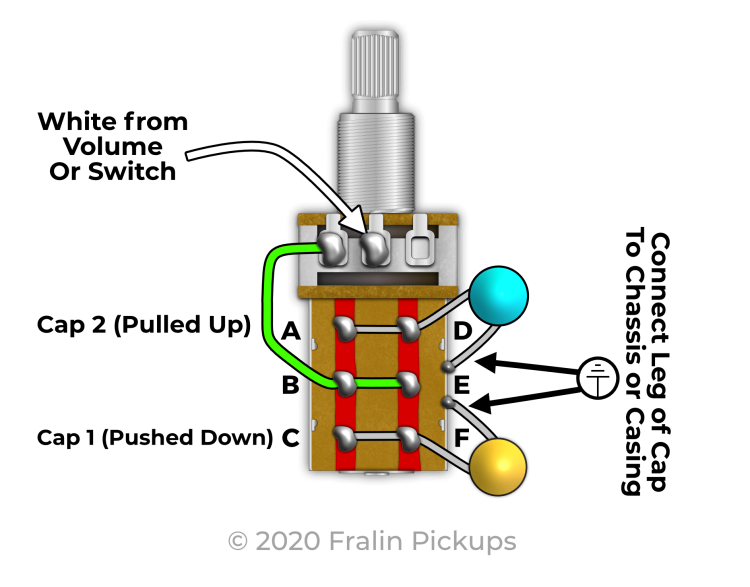
How it works:
- The Signal enters the Pot at Lug 2.
- The Sweeper, Lug 2, is connected to one side of the switch, at point E. (This whole thing can be reversed).
- When Pushed Down, the Signal is being sent through Terminal F. When Pulled Up, the Signal is being sent through Terminal D.
- The other side of the switch is Grounded. When you roll the Tone Pot, more of your highs are being sent to Ground, via whichever cap value you choose.
Push-Pull Pot Mod #2: Engage Treble Bleed
Our Fralin Volume Kit is a great Treble Bleed circuit. If you’re not familiar, the Volume Kit keeps your high frequencies intact as you roll the volume down.
Country, Blues, and Rock guitarists love this as it keeps their crisp highs when they roll down the volume. But what if you need more versatility? Here’s how you can engage it by pulling up on the Push-Pull Pot: When pushed down, your volume knob will act like normal – it will bleed treble to ground. Pulling up on your Push Pull Pot sends your signal through the Volume Kit – your guitar keeps its shimmer!
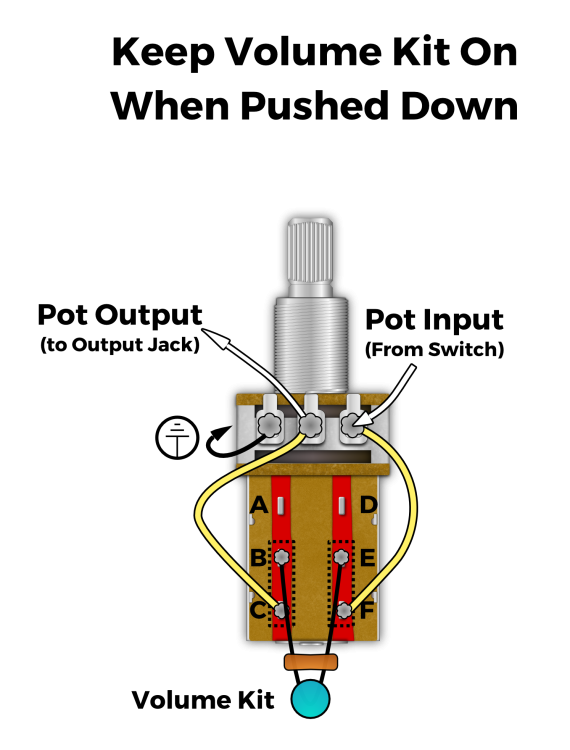
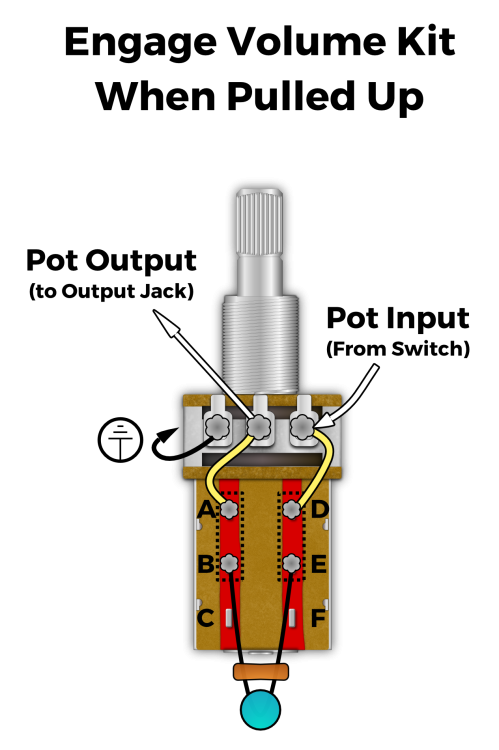
How it works:
- When pushed down, your signal is entering through lug A, but it ends there, as it doesn’t have anywhere to go.
- Pulling up, A > B connect, and E > D are now connected, connecting the Volume Kit to your circuit.
If you want to reverse this, simply move the Connector Wires (two cream wires in the photo above) to Lugs C & F. This will remove the Volume Kit when you pull up.
Push-Pull Pot Mod #3: Bright Switch
The “Bright Switch” is a simple mod that adds a little extra Treble to your signal.
The Bright Switch works by removing your Volume Pot and Tone Pot from your signal path, which always “load” your signal. Mostly, it’s connecting your guitar’s pickups directly to the output jack. It’s a pretty crazy difference – your guitar sounds bigger, brighter, and louder.
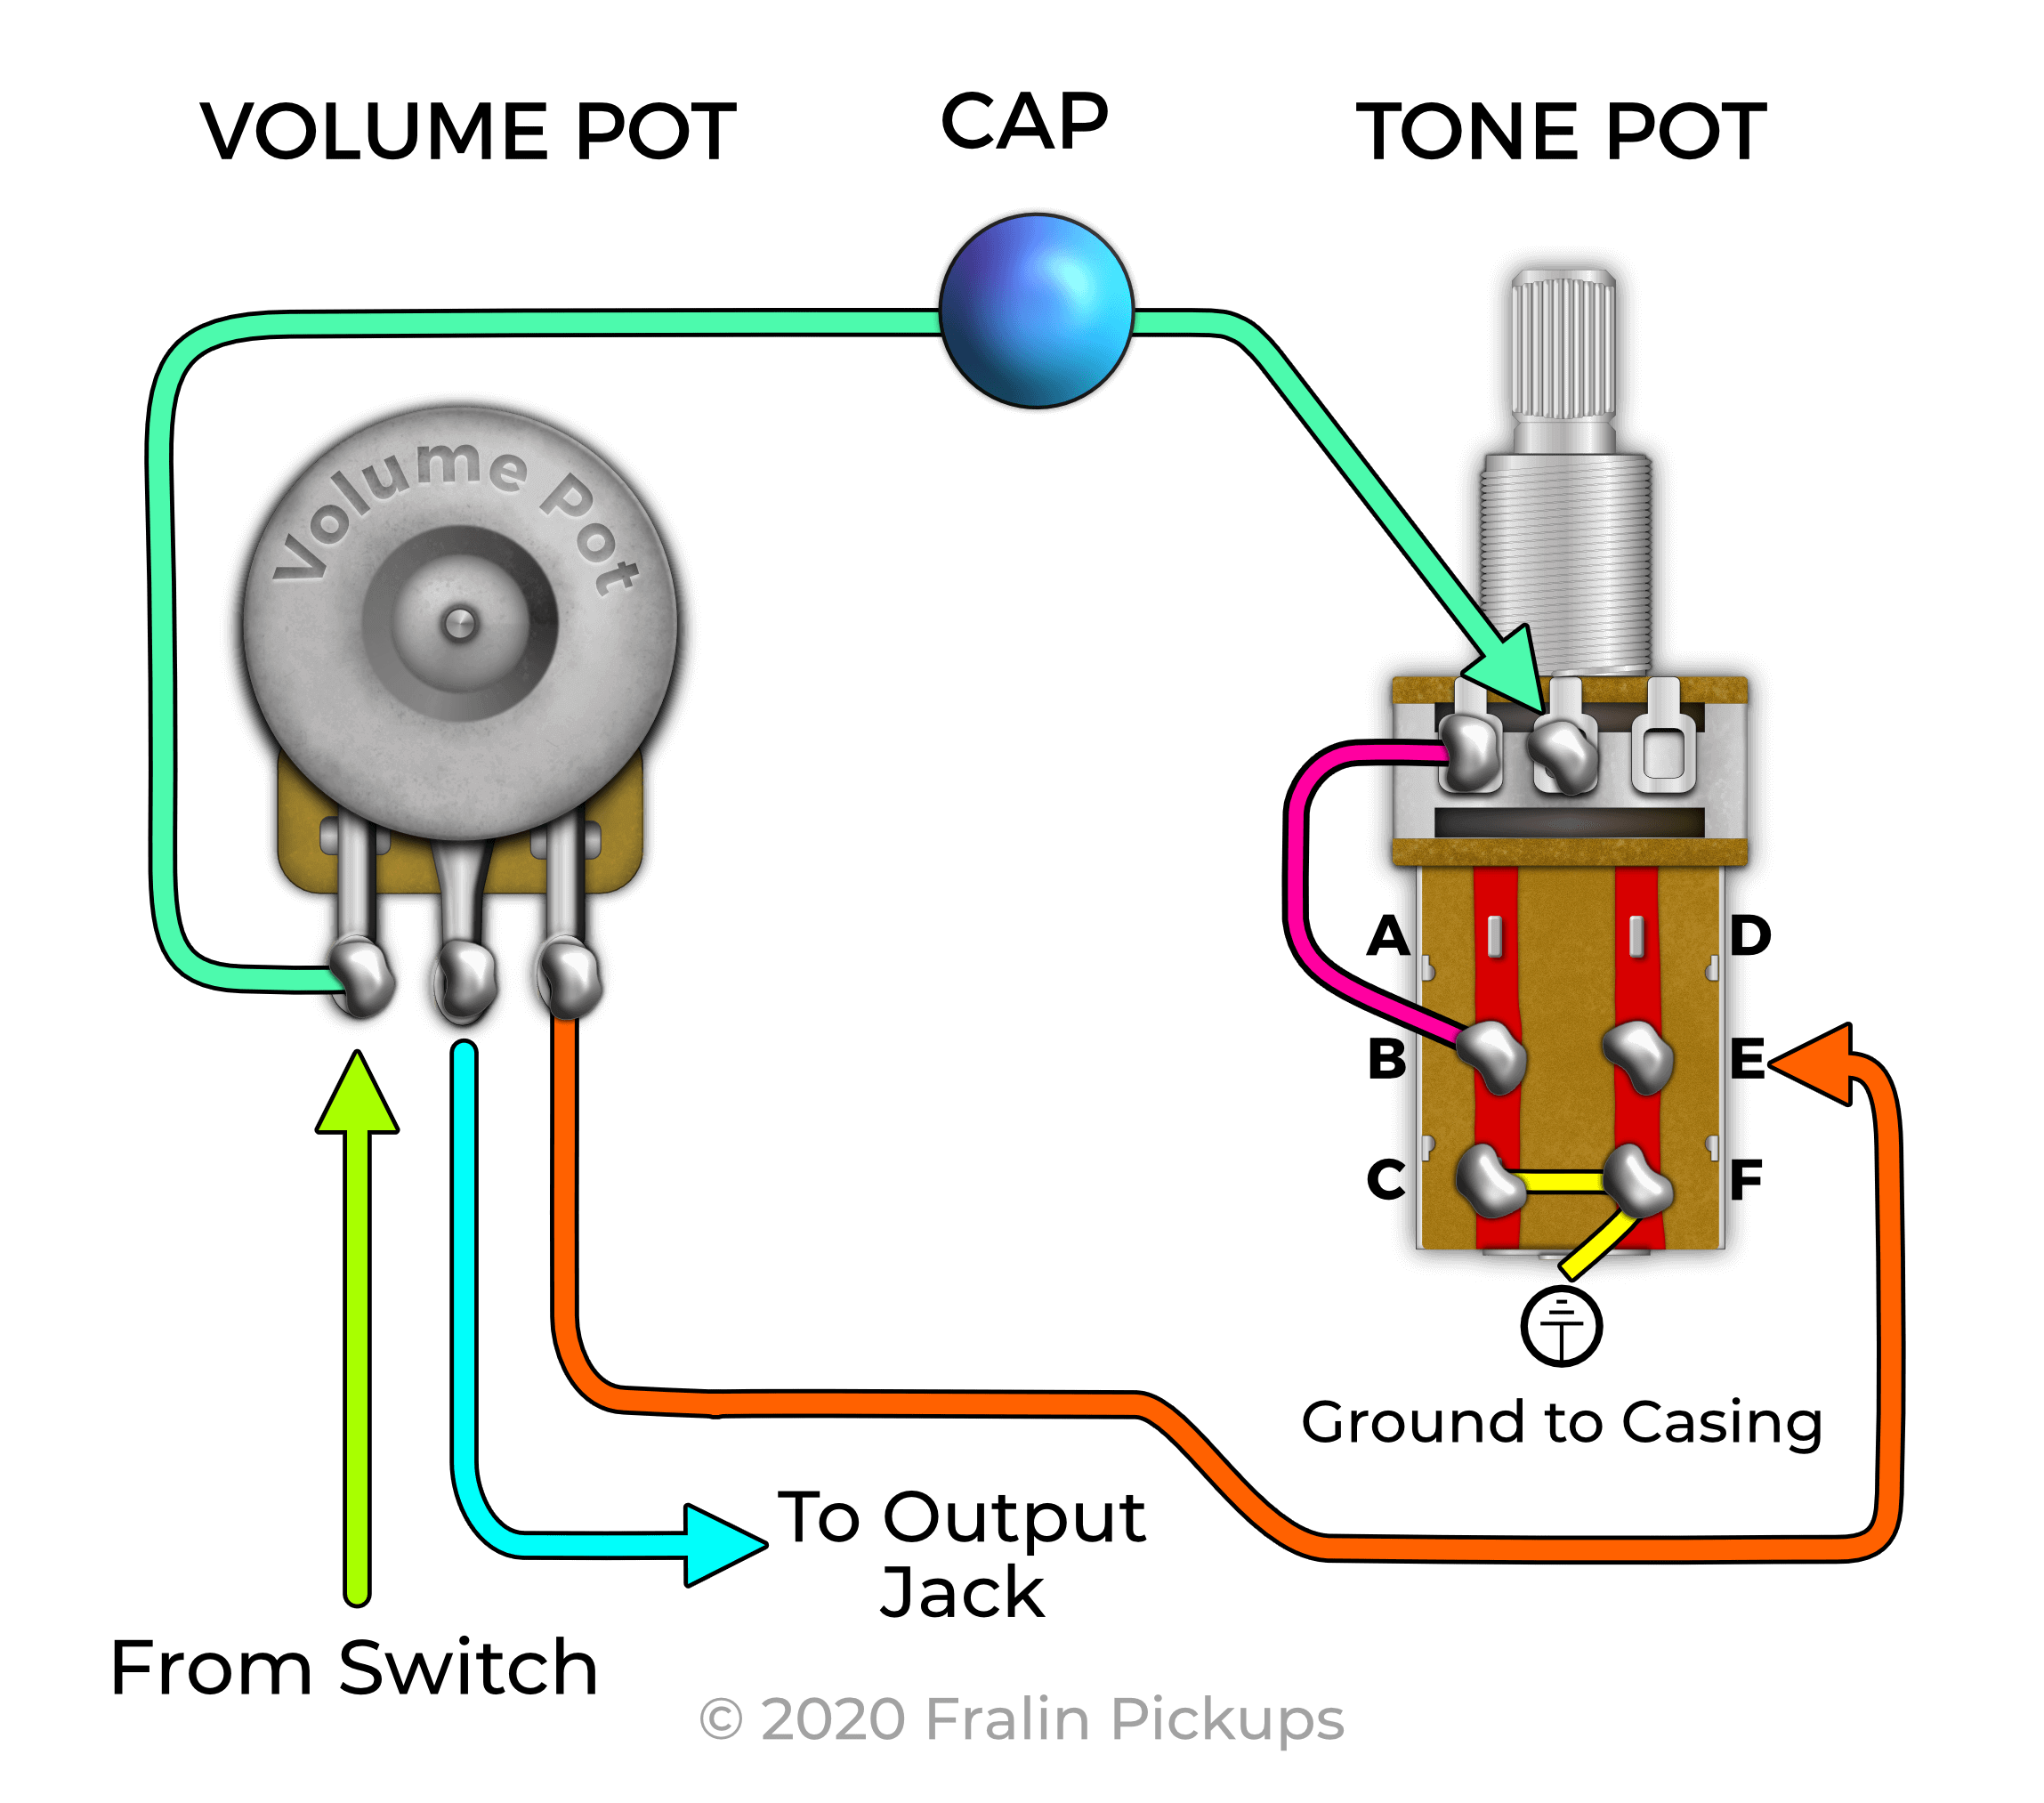
How it works:
The Bright Switch has more parts involved, thus it is a bit more complicated. When your Push-Pull pot is down, all the wiring is the same as a Strat or a Tele. The Signal enters Lug 1 of the Volume Pot, and Lug 1 is also connected to the input of the Tone Pot.
When the Push-Pull Pot is down, Lug 3 and the Cap are both connected to Ground. They connect to ground via connecting to terminals C & E of the Push-Pull pot.
When the switch is up, the ground lifts off of the tone pot and the volume pot. This allows your signal to connect directly to the output jack, with no Load.
Note: Pickups and other electronics get grounded to the back of the volume pot, just like normal. The 3rd Lug just isn’t connected.
Mod #4: Series / Parallel Switching For Humbuckers:
Changing your humbuckers from Series to Parallel works well for some humbuckers, especially some higher output humbuckers. You can get some of that “Strat Quack,” and it opens up a whole new dimension for your humbucker. To accomplish this mod, you’ll need a humbucker with a 4-conductor lead. Please note that the color codes are for Fralin Humbuckers only.
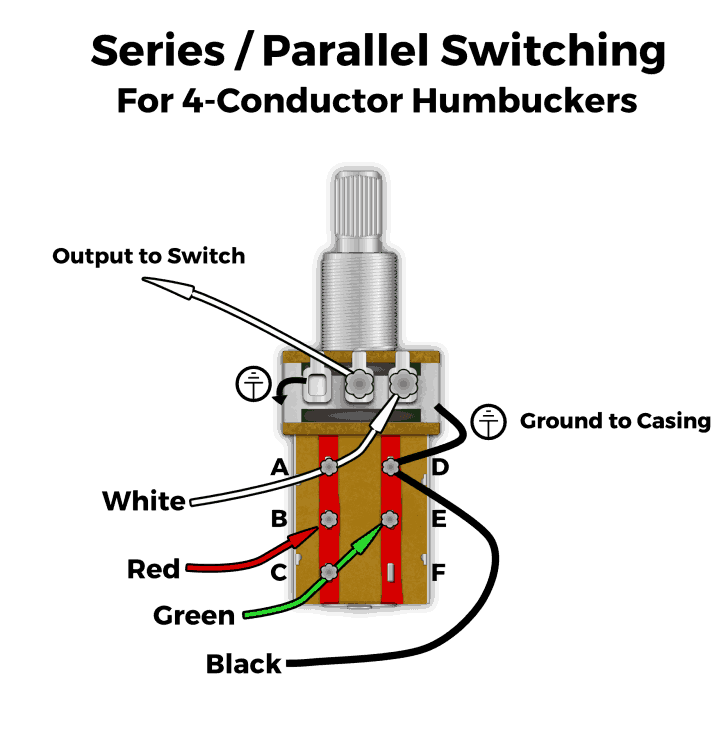
How it works:
Red connects to green Green when the switch is down. This is a regular “series” humbucker operation. By pulling up on the switch, Red is now connected to White, and Green is now connected to Black. The “hots” connect, and the “starts” connect together – giving you your parallel.
Push-Pull Pot Odds n’ Ends:
Before we wrap up, here are a few things we want to clear up.
Notes On Grounding:
You can use anywhere on the Pot’s chassis to ground a signal. So, when grounding wire, you can run it to the metal housing that houses the DPDT switch, or the side of the Pot itself. A neat little trick is to ground wire on the bottom tab at the very bottom of the Switch. (See the image at the top of the page to see what we’re talking about here).
CTS Pots:
CTS® has a new type of Push-Pull pot, which can make wiring a little easier. CTS made these contact points easier to reach so that you can fit this pot in more guitars. However, if you’re not familiar with how it’s all connected, it can be a little confusing. Here’s what it looks like:
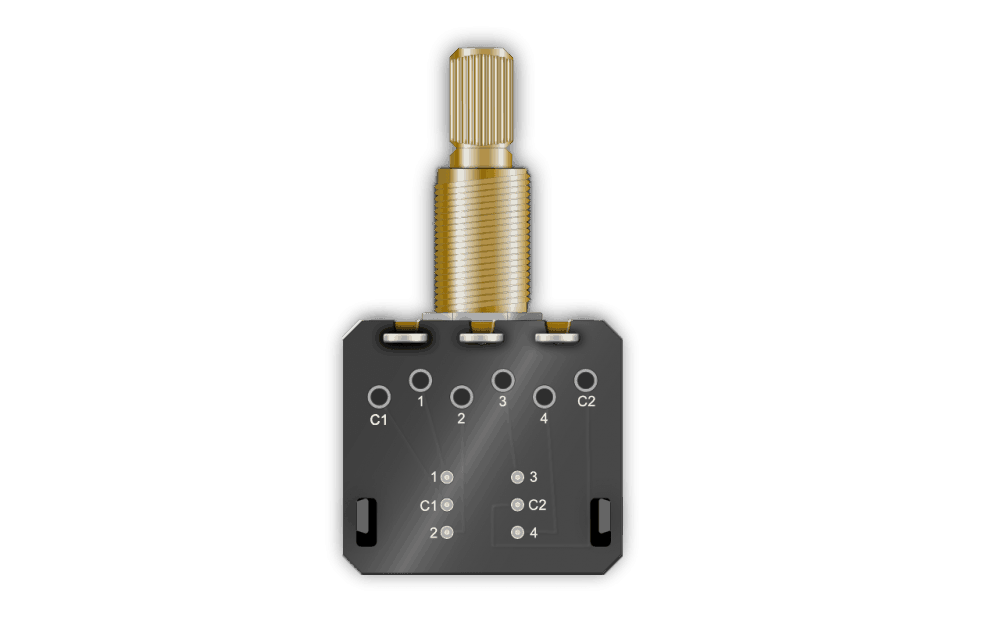
Instead of running your jumper wires to small lugs, you can run them to full-size holes. The order is a little different, but all the concepts are the same.
Well, that’s all for now. I hope that this article has been helpful and informative. We have Push-Pull pots available on our website here. Now, grab some and get to modding!
Want more posts like this?
Subscribe for tone tips, tricks, and more.




How would I wire to choose between 2 pickups
This is a great article and clears up many of my questions, except …… I believe PRS uses resistors for its coil tap so that it doesn’t send the full signal to ground. The bridge pickup is connected (two wires) to B and a 2.2 K resistor to A, which gets soldered to pot casing.
The neck is wired to E and a 1.1K resistor goes between D and the pot casing.
1) if I still want to use a treble bleed should I connect it to volume pot?
2) If I want to use a .022mfd Cap as well, how is that wired?
Any help or clarification is appreciated.
Thanks, Dave-O
You don’t show you can use a push/pull pot to switch between pickups. Like using it as a toggle switch between a single coil pickup and a humbucker.
Great fantastically informative. This info will help so much . I only wish I had found you two years ago when I started to alter my guitars.
Have an LTD EC256fm that has a 2hb 2v 1t 3way. The 1 tone is a push pull (pp). This is a learning guitar for me and I am new to the whole wiring push pull etc.. When switching pups the wiring was different from anything I had seen anywhere when researching. I’ll try my best to describe the sorcery within. The pp was wired as follows. The capacitor was soldered to the side of the pot and to tab E and tab B was connected across to E. Then the 2 wires from each pup wete soldered to tabs A and D. Nothing was connected to C or F. The PP pot worked as the tones altered when in up or down position. I have no clue how to rewire it to get the push pull to work. Sorry if this makes no sense, lol. Trying to learn here.
Is better for two humbuckers (neck -bridge) to use separate push pull pots? (If i have some issues.. The side 1 and side 2 of the switch (Connectors E and B if touch together or is independent)
You want two Push Pulls if you want independent control over which humbuckers get split when. For instance, you can split the Neck and blend with a full humbucker bridge.
I’d like to mod my Nashville deluxe telecaster (5 way selector) into a Nashville player plus telecaster by adding the push pull switch to the tone knob but the player plus is so new that they don’t have the wiring diagram out yet.. any ideas on how I can accomplish this?
I’m confused on a volume/treble boost for a four wire Seymour Duncan Humbucker. In all the diagrams I see they only show 1 wire and the ground with the push pull pot. So do I just use the Black HOT and wire the Red and White together and sleeve it with a shrink wrap? Could you please let me know if what I’m thinking is correct and if possible show me a diagram with the 4 wires from the Humbucker and how each of the 4 connect? I would be very grateful! Thank you, Sean Mackenzie
Will a SPST work as volume and coil split on a 4 conductor humbucker?
Thanks?
Tom
Yes. You would run the Series Link to the common terminal. Then, you would connect either A or C to ground, depending on the orientation of the switch.
Hi.
I am having some fun doing some mods. I am running all SD’s, HSS, in a strat.
I have push pulls for all three locations.
The pickups are all humbuckers.
I like the idea of the bright switch.
Can you provide me a diagram(s) of where best to start with regard to this customization?
Is there a way to make it so the humbucker is split when the pot is pushed down? Could I ground C/F instead of A/D?
Absolutely. Just reverse the ground connection and it will stay split until pulled up.
Very nice read. But, on the “bright switch” diagram, which are the value(s) of the CAP ?
Hey Mats,
They can be anything you want, as cap values are very subjective. Take a look at our article about caps here.
i have replaced all the pickups and pots adding a push pull volume pot for coil splitting my neck pickup. when i plugged in everything sounded fine , it was quiet but my volume wont go down. it stays on 10 and will not turn down.Does anyone have any idea what the problem may be? everything is new.
I’m embarrassed to ask this question as it is probably answered somewhere on this website….or elsewhere….I can’t find this answer anywhere.
My question is this: Is there a diagram that uses the second tone control( bridge) on a strat to dial in the middle pickup ( RWRP) to dial in a fatter sound when in the bridge pickup position?
In other words if I’m on the bridge position PU ( single coil Strat) is there a way to use the second tone control to dial in the middle pickup as needed?
My goal is to have all three single coils doing their “ thing” but when I engage the bridge pickup ( the weakest) fatten it up as needed by a rolling in the middle pickup as needed.
Again, I apologize if this is a redundant question. PJ
Hi, basic question, can a push pull pot be used as an on/off for a pickup… as well as volume, of course.
Regards,
Tom
Omg this article is a god send as I am rewiring an LTD EC-1000 running SD 59 in the neck and SD JB in bridge. The two capacitor wiring cleared up a big question, however now we are running two single coils now through two 500k volume pots and a 500k tone, should I be running any kind of resistor to compensate for the higher pots? I even thought about running stacked volumes but at this point the only thing I’m doing is running my brain in circles in the hopes of getting it right the time or with in the first couple of times. It just seems to me I’ve always had more of a small headroom issue when we get into cutting coils. In both directions, like we lose something with the split whether in double or single mode. Any thoughts here would be certainly appreciated.
Also one more question, I pulled the small (size wise) pots that were originally in this guitar and replaced with Emerson CTS, both were spot on at 500k. In your opinion Does the size of the sweeper resistive strip make a different In tonal quality ? I picked up some Boron pots that measure actually 2-3% over but I’m hesitant to use because frankly they remind me of the cheaper pots that were already in here. These Seymour Duncan’s just sounded so this with the original that I was fairly surprised, I’ve never had a Seymore fail to impress me and these two pickups should have a great sound. Maybe not using Fralins is my first mistake. Those are next. Again any insight would be so appreciated. Thank you I advance for listening.
what about the bare wire? We alwys talk about 4 wires, but there are 5. In the case of MOD #4: SERIES / PARALLEL SWITCHING FOR HUMBUCKERS. Is the bare wire solder together with the ground wire or solder directly to the pot casing?
Herve, the Bare Wire is always soldered to ground. You can solder it to the casing of a push pull pot, as long as the push pull pot is properly grounded.
Hi, I have a one pickup passive bass with just a volume and an output, and wanted to make a new setup using just a push pull pot and an output jack. I was thinking in down position would just be volume and in the up position the tone would change to take out mids and highs by incorporating a capacitor while also being able to adjust volume. How would the wiring go and are there any resources or diagrams available as this type of wiring is new to me.
Good morning. I think that “Mod 1: Two-Tone Caps, One Push-Pull Pot” isn’t drawed correct. I think the Volume wire should be connected to the LUG 1 and the sweeper (lug 2) should be connected to the common of the switch. Or am I in error?
Hey Giacomo, you can wire it both ways and it will work. There are multiple ways to wire a tone pot.
I’d like to make the treble bleed active at all times, would I just use the lugs on the potentiometer?