How Do Humbuckers Work?
We all know the sound – that pesky buzz that can ruin a perfect take in the studio, or distract your audience when playing live. We’re talking about 50-60 Cycle […]

Have you ever tried following a wiring diagram and instantly became confused by the colored wires on humbuckers? Have you ever been confused looking at humbucker color codes online? Are you looking at different colors than what your humbucker currently has? Have you followed the installation perfectly but got a different result than you expected?
If any of the above situations sound familiar to you, we can help. The solution is straightforward, but instead of simply giving you the answer (we intend to do just that later), let’s also learn a bit about humbuckers while we’re at it! So, without further ado, let’s start by demystifying humbucker color codes.
Let’s get this out of the way: there is no industry standard regarding humbucker color codes. Each manufacturer has a coding system that works best for them – and that’s cool! Except, there are a million different wiring diagrams out there, each from other manufacturers – so confusion will undoubtedly happen.
We hope to dispel this confusion in this article by showing you the basics of humbucker construction and wiring. Let’s first take a quick step back and give a refresher on how we wire humbuckers up:
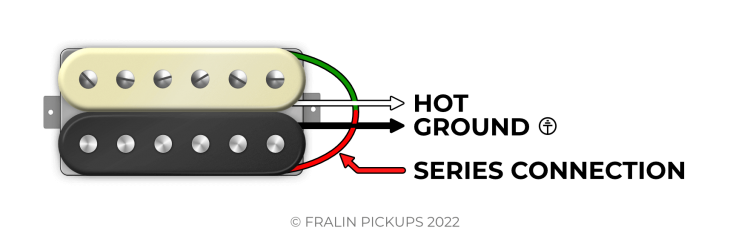
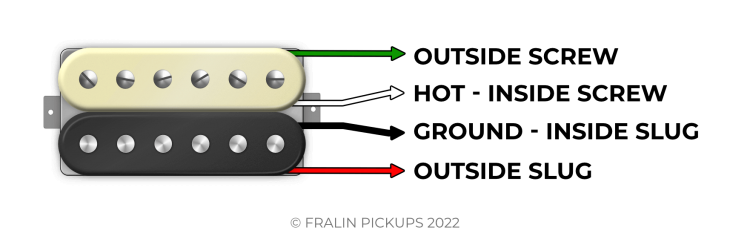
A standard humbucker features a Screw coil (indicated by the screw pole pieces) and the Slug coil. In order for a humbucker to work, these coils need to be wired in series. In the example above, we are indicating the series connection with the Green and Red lead. This connection is usually soldered together close to the pickup and carefully taped off.
These wires actually have names! Since each coil has a “Start” and a “Finish” we use terms like “Inside Screw” and “Outside Slug” to indicate the different leads. In our terms, the “Inside” is the Start, and the “Outside” is the finish – the last wire turn of the coil. See below for an example:
Don’t glaze over just yet! Stick with us, as understanding this concept will make everything easier.
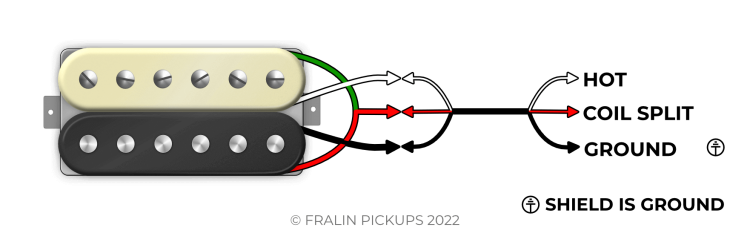
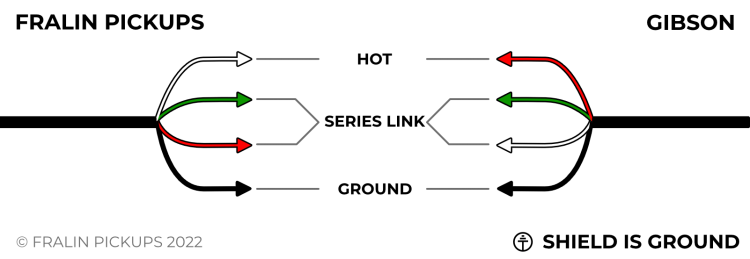
Before we get into humbucker color codes, it’s helpful to understand how a humbucker is wired using Gibson braided lead. Gibson Braided lead is, fortunately, an industry standard. It is a single-conductor lead, meaning there is only one “hot” signal. The metal braiding around the lead should connect to ground. See below for an example of how we wire this up:
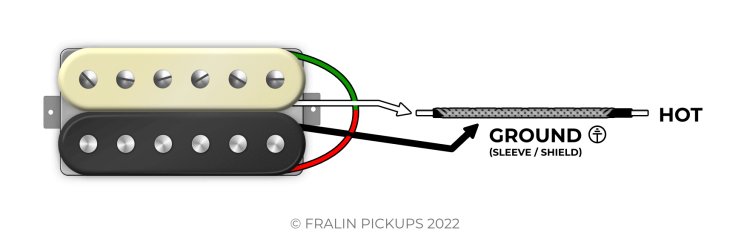
In the Gibson Braided Lead example, we use the Inside Screw as our Hot, and the Inside Slug as our Ground. The series link connects at the pickup, is wrapped in tape, and tucked neatly under a cover, or protective tape. If you’ve used our Pure P.A.F. or Modern P.A.F. before, you might have used this lead.
While Gibson Braided lead has its strengths as an easy lead to install and work with, it certainly has drawbacks. For one, you cannot reverse the pickup phase or coil direction with Gibson Braided lead. This can leave you in a tricky spot if you ever plan on mixing two different manufacturers’ humbuckers together. If they are out of phase, you cannot simply reverse the polarity of one to fix the issue. More on that topic here. That’s where 2-Conductor with shield comes in.
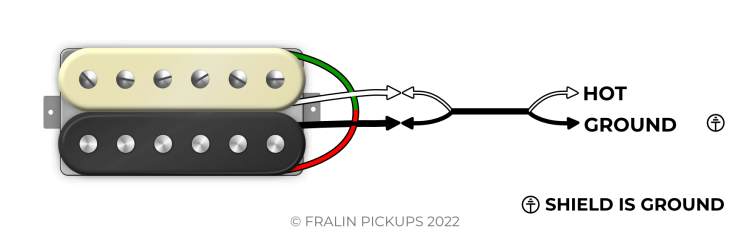
This lead is very similar to Gibson Braided Shield, except White & Black are reversible, allowing you to reverse the phase. Again, the series link connects together at the pickup, similar to Gibson Lead.
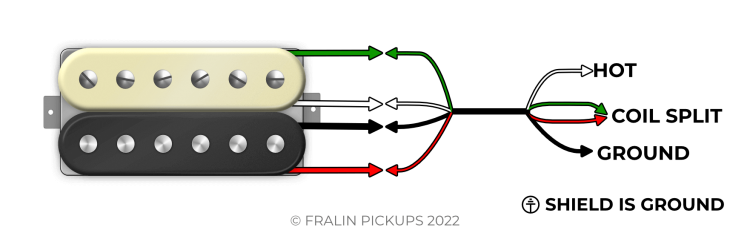
Okay, so…phase reversing is cool and all, but what about coil splitting? Well, that’s where 3-Conductor Lead comes in! See below how we hook this lead to a humbucker. It’s important to note that our 3-conductor lead has a White (hot), Black (ground), and a Red (coil split). If you’re not sure how coil-splitting works, check out our in-depth guide here!
In this lead, the series link gets soldered at the pickup, but travels the length of the lead, allowing you to coil split the Humbucker. When not in use, simply use some masking tape on the Coil Split (Red) Lead to make sure the series link doesn’t short out on anything.
Now that you’ve made it this far, 4-Conductor should be easy to understand:
4-Conductor lead gives you infinite control over how your humbuckers are wired. Meaning, you can actually re-wire the humbucker without cutting into the tape and changing the way the humbucker is wired at the actual pickup.
Also, 4-Conductor gives you the ability to perform the Series-Parallel Modification. If you need to use this lead, make sure that the series link still connects together – or else, your humbucker will not work.
Whew. Hopefully, that wasn’t too difficult to understand. In essence, every Humbucker has a minimum of 4 Leads, and the different lead choices give the user as much control over that wiring as they desire. Now that we have a firm understanding of how humbucker leads are wired, let’s get into how to match them up.
See below for some examples of color matching different manufacturers humbucker color codes:
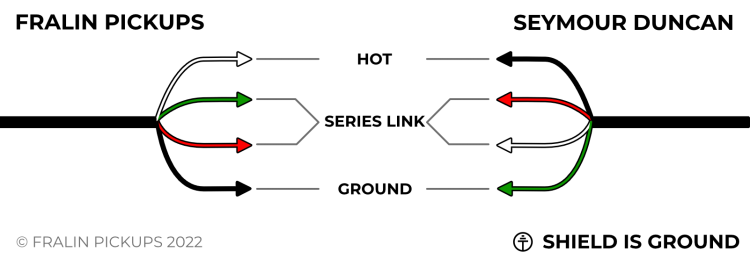
In the above example, Seymour Duncan’s Black is our White. The color codes are widely different, but learning how to match the humbucker color codes assures us that everything will work correctly.
What if you had a 3-Conductor Lead? Well, it’s simple! See below:
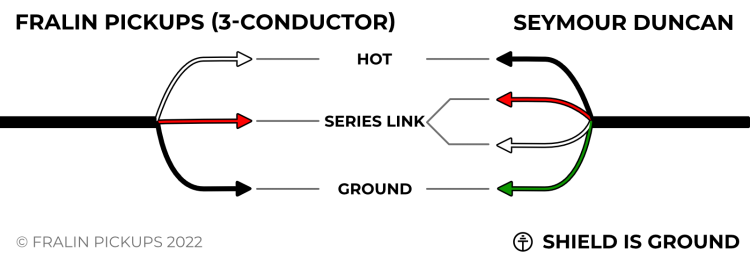
As you can see, it’s not difficult to match these humbucker color codes together, but it does require a bit of research to see what codes are what. Bookmark this guide and the following guides below!
Well, I hope that helps. Leave us a comment if anything confused you, and we’ll do our best to help you understand it. Until next time!

7 Comments For This Post
Want to chime in to the conversation? Please do so! Please respect others.
Coil splits are meh. My custom wiring harness has neck/bridge series/parallel switching using push-pull de-coupled B500k p/u volume pots. Meaning I don’t do coil splits. I pull a pot in my humbuckers go from internally in series to internally in parallel, and still humbucking noise canceling. I use the four conductor wire to have neck phase switching. Also, I use the four conductor wire to have master series, parallel, switching, meaning that I can change the relationship between the two pick ups relative to the output between the normal which is parallel and the altered state which is in series. I also only have a master tone pot using a 682 capacitor, meaning 6.8 nF significantly give usable sweep, with no darkness/muddiness. I also utilize a master volume pot decoupled as well because in the middle position, the volume pots act like blenders. Paired with Lindy Fralin’s Pure PAFs in an SG, it’s the most versatile best sounding guitar. Best sounding pick ups I’ve ever owned thank you Lindy and the whole crew. It was reading articles like this that taught me how to design my own harnesses again thank you.
Thanks for this very helpful info. But I gotta say, when it comes to describing the path of the coil wires, start and finish seems clearer than inside/outside. Before I read this, I thought “inside” meant the coil closest to the center of the the guitar.
The term ‘Coil Tap’, used frequently throughout the list of the ‘Holy Grail’ of HB wiring conventions is incorrect.
A humbucker comprises of two independent coils place either side of a bar magnet. They always have four conductors, two of which are connected either at their start or finish to place the two coils in series with each other. This gives maximum output from the two coils. Electrically they are not ‘one coil’ but two with opposing polarities.
Now assuming we wish to configure those coils in parallel or switch-off one coil, then we use a ‘dual-sound’ series/parallel or COIL SPLIT switch. Which is what is occurring here – the coils are being SPLIT, not ”tapped…”
A ‘Tap’ is an extra connection at some point in a coil’s winding. very rare on guitar pickups; most widely used on amplifier output and mains transformers (any transformer really…). where several voltages can be either ‘tapped-in’ or ‘tapped-off’ the primary or secondary windings of the transformer – eg: A mains transformer = various AC voltages ‘tapped-in’ to primary – 110v – 120v – 220v – 240v and various AC voltages ‘tapped-off’ – 300v – 0 – 300v – 150v – 6v . RF and IF transformers also have ‘tapings’ to filter ranges of frequencies. Theoretically, there is no limit to the amount of ‘taps’ that could be incorporated into one single winding. This is not the case with a coil split. Some custom single-coil pickups similar to the P-90 can be wound ‘deep’ and have a ‘tap’ placed halfway along the single winding – used to ‘tap-off’ less output, or reduce impedance.
And… the ‘Holy Grail’ of HB pickup wiring codes is missing two more ‘brand’ pickups = Entwistle and Tesla – general colour codes for G&B and other main Asian manufacturers would complete the archive.
I could use some help with a little bot of complex guitar wiring (or at least complex to me).
Tyler. This article is very informative! I’m confused about wind directions though.
Your diagrams show: Starting with the (white) hot lead the wire wraps the screw bobbin in a clockwise direction and ends at the green lead. The green lead connects to the slug bobbin red lead and wraps the slug bobbin in a clockwise direction and ends at the black lead. This indicates the the direction from hot to ground is clockwise on both coils.
Aren’t humbuckers wired in this manner: screw coil start (hot)>clockwise>screw coil finish>slug coil finish>counter clockwise>slug coil finish (ground)? This results in one coil hot to ground is clockwise and the other coil is counterclockwise. This along with magnets placed so that coils have opposite polarities results in humbucking.
Don’t just tighten the nut outside the jack open plate hold jack inside too tighten correctly Marshall is correct cleaner out put generates long lasting equipment be picky
Have a marshal mg30fx amp. Getting some back feed from the amp. Have a Epiphone Les Paul classic. Will a ground pad help? Every once in a while I will get a little sap when I grab the guitar. Have a new house with good wiring. The input jack on the amp is not tight. Marshal said this is ok. Need some help. Thanks