How Do I Check My String Spacing?
String Spacing is a time-old question we get asked all the time – 49.2mm, 49.5mm, 50mm, 52mm – which one is right for my guitar? What about Bass guitars? Today, […]

A Push-Pull Pot can add a ton of versatility to your guitar! They are a great way to add a switch, or other cool mods without modifying your guitar too much. You can use them to reverse the phase, split a Humbucker, or trick your guitar out in a fresh way. They can be a little tricky to wrap your head around, but once you get the basics, they are easy to understand.
A Push-Pull Pot, in its most basic definition, is a Potentiometer, attached on top of a Switch.
We refer to the switch as a DPDT (Double Pole, Double Throw) Switch. ‘DPDT’ means the switch has two separate “poles”, or sides to it.
If you’re not familiar with how pots work, we recommend going back to Part 1 and check out our article on pots here.
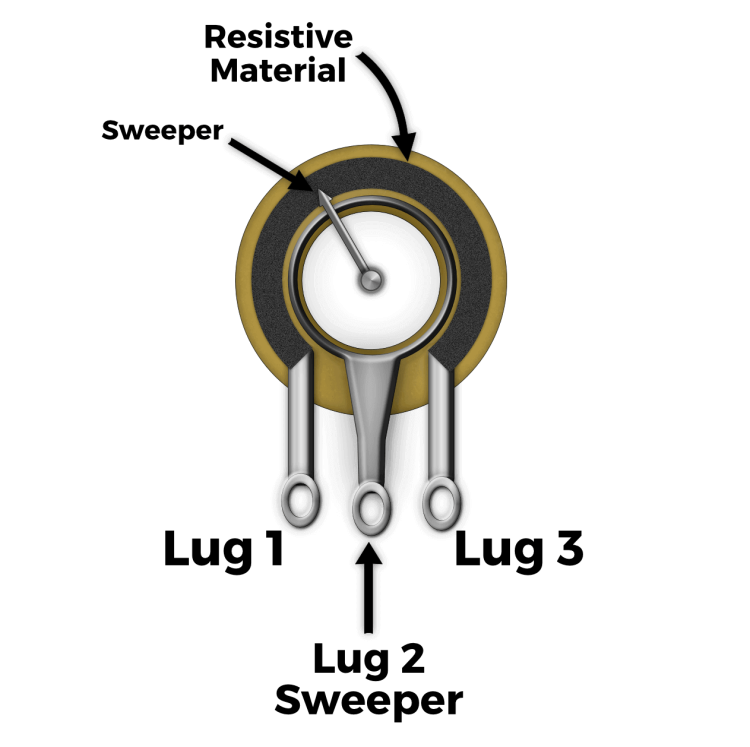
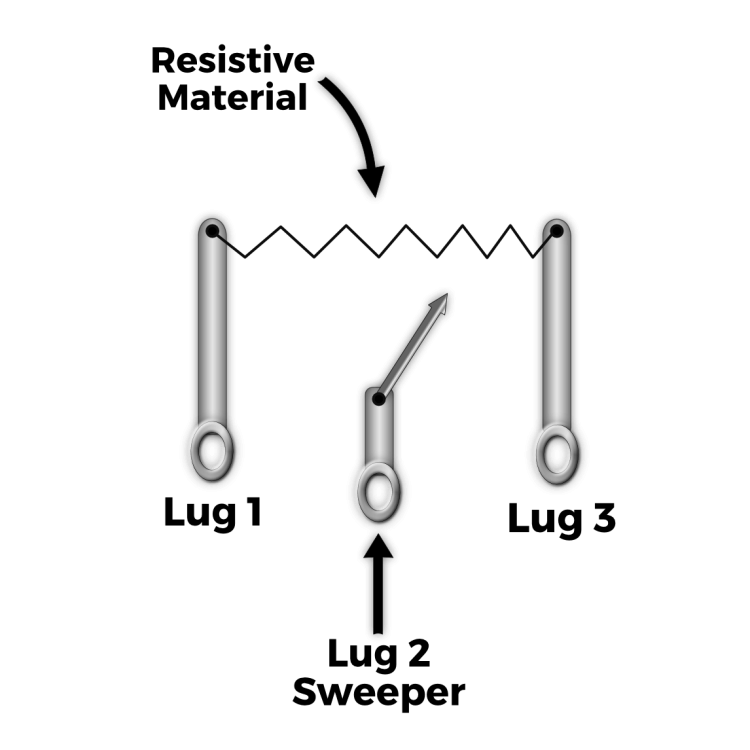
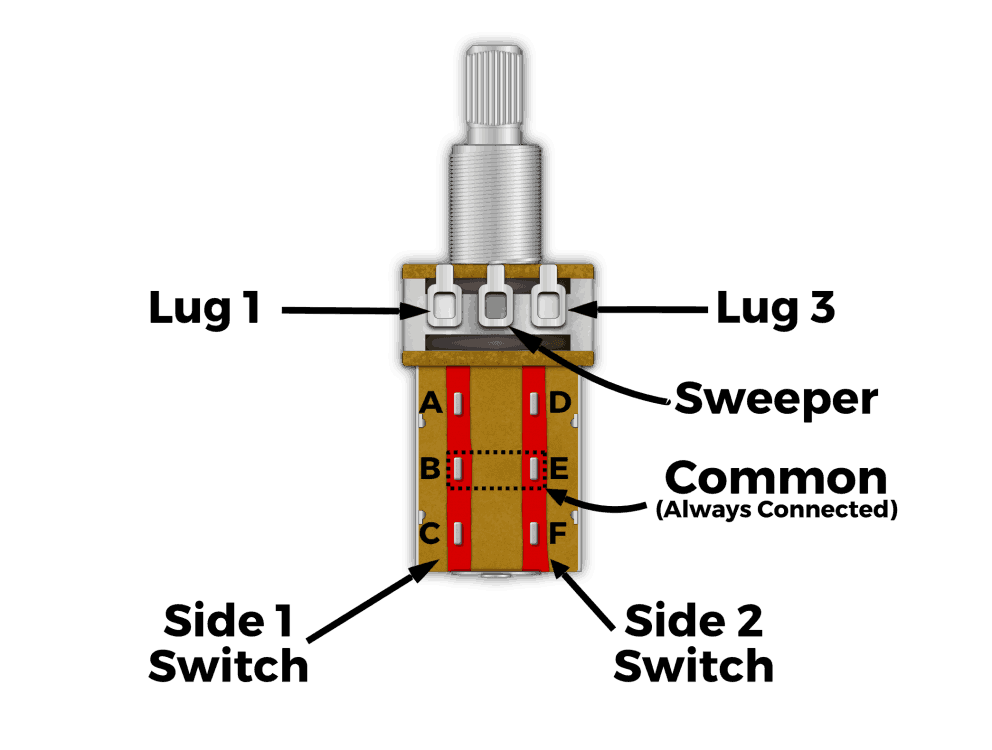
There are two components of a Push-Pull Pot: the Pot and the Switch. Even though they look combined, they are actually separate. As described in our previous article, the Pot is a variable resistor. It has a resistance strip and a sweeper to choose the resistance. Lug 1 is the start of the resistance strip, and Lug 3 is the end. Lug 2, or the middle lug, is the sweeper.
The other part of the Push-Pull pot is the Switch. The DPDT switch has two sides. Side 1 (A – B – C) is entirely independent of Side 2 (D – E – F).
We refer to the center lugs, B and E, as the “common” or inputs of the switch – they stay connected all the time. See below for an illustration of the Commons:
There are two separate sides of the switch (hence the ‘double’ in Double Pole, Double Throw). We can call them Side A & Side B. The Selector connects the different terminals on each side. Check it out:
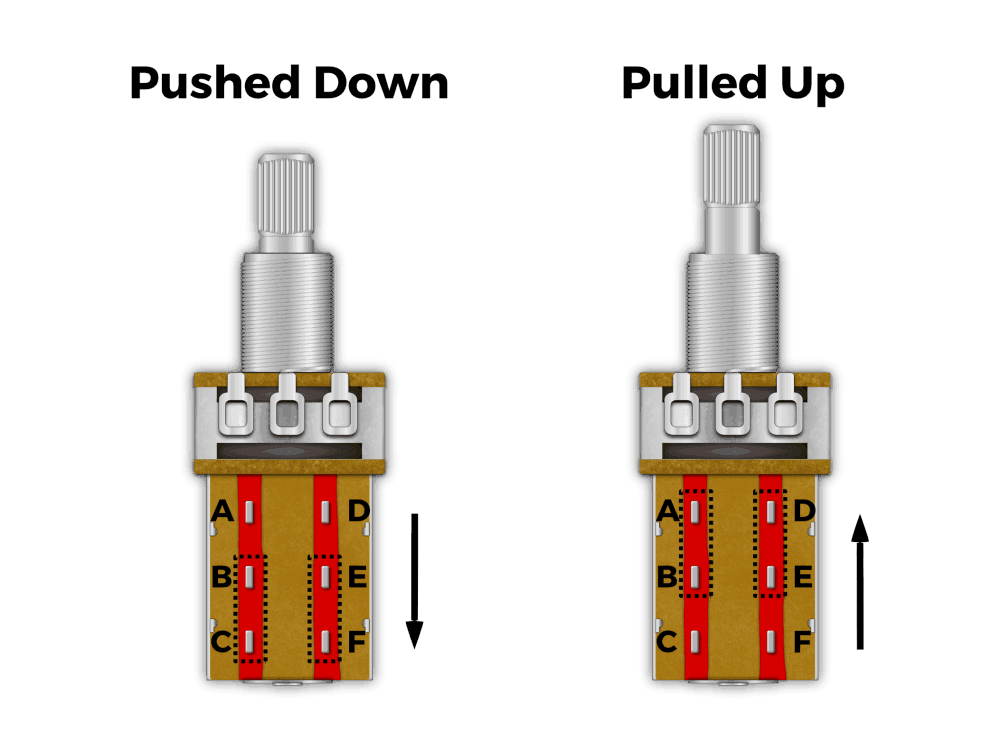
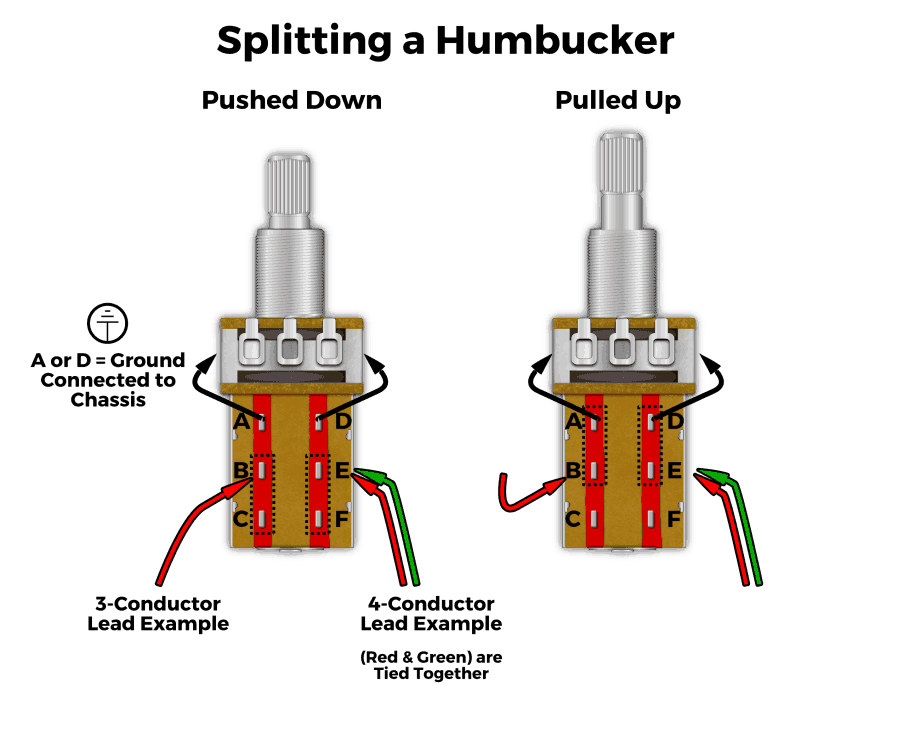
When pushed down, the Selector is selecting the bottom four lugs (B-C-E-F).
When pulled up, the Selector slides up and is now selecting the top four lugs (A-B-D-E).
Coil Splitting is just one of the many things you can do with a push-pull pot and is a great place to start our understanding of them. You can use Coil Splitting to turn a Humbucker into a Single Coil by sending one of its coils to ground.
For illustration, we drew this out for you below. We used both sides of the switch to illustrate two points:
Coil Splitting can sound great on higher output humbuckers, like our Modern P.A.F., and our High Output Humbucker. But what if you have a low-output humbucker, like our Pure P.A.F.? Fear not. You can “Partially Split” the coil, with our Partial Tap Resistor.
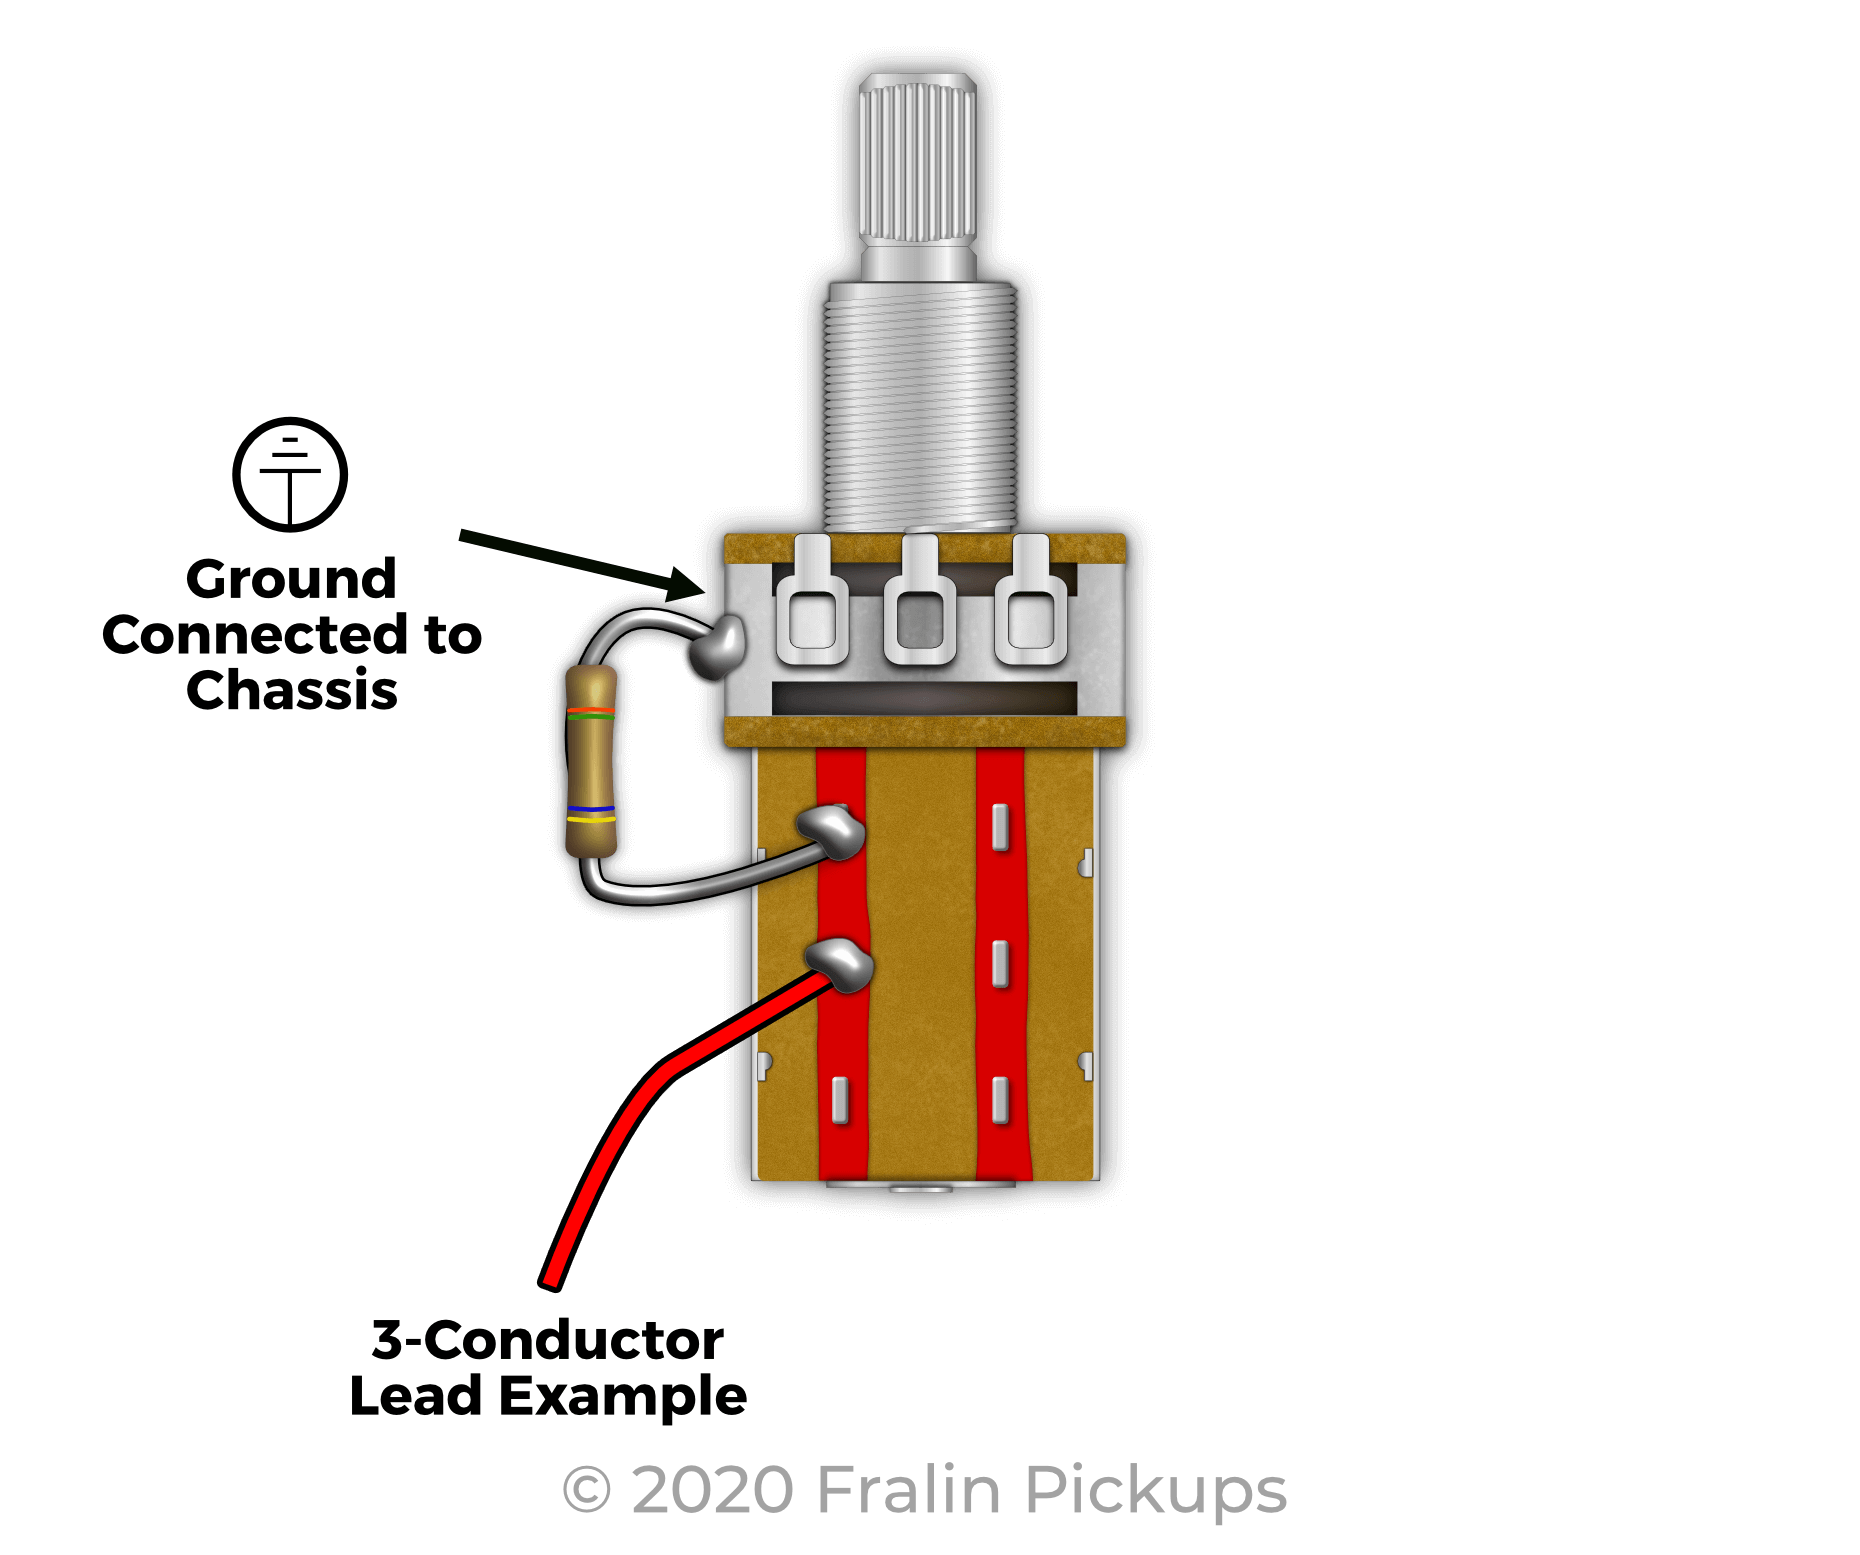
When you pull up on the push-pull pot, B connects to A, and your Slug Coil will be sent to ground, only this time, it goes through a resistor. This prevents the whole signal from being grounded by putting a partial short across the coil, instead of a full short. In turn, you’re getting a stronger single-coil sound from your humbucker when split.
Phase Reversing is a neat little trick when you want to reverse the coil direction of your pickup.
Some find this sonically pleasing, mainly when used with a Blender Pot, which will roll in the pickup’s phase – pretty cool! To do this, you need 2-Conductor Wire. Remember to ground the Shield (Bare). Here’s how to wire this up:
When the switch is in the down position, White connects to White (Terminals E > F), Black connects to Black on Terminals B > C. When pulled up, The phase reverses!
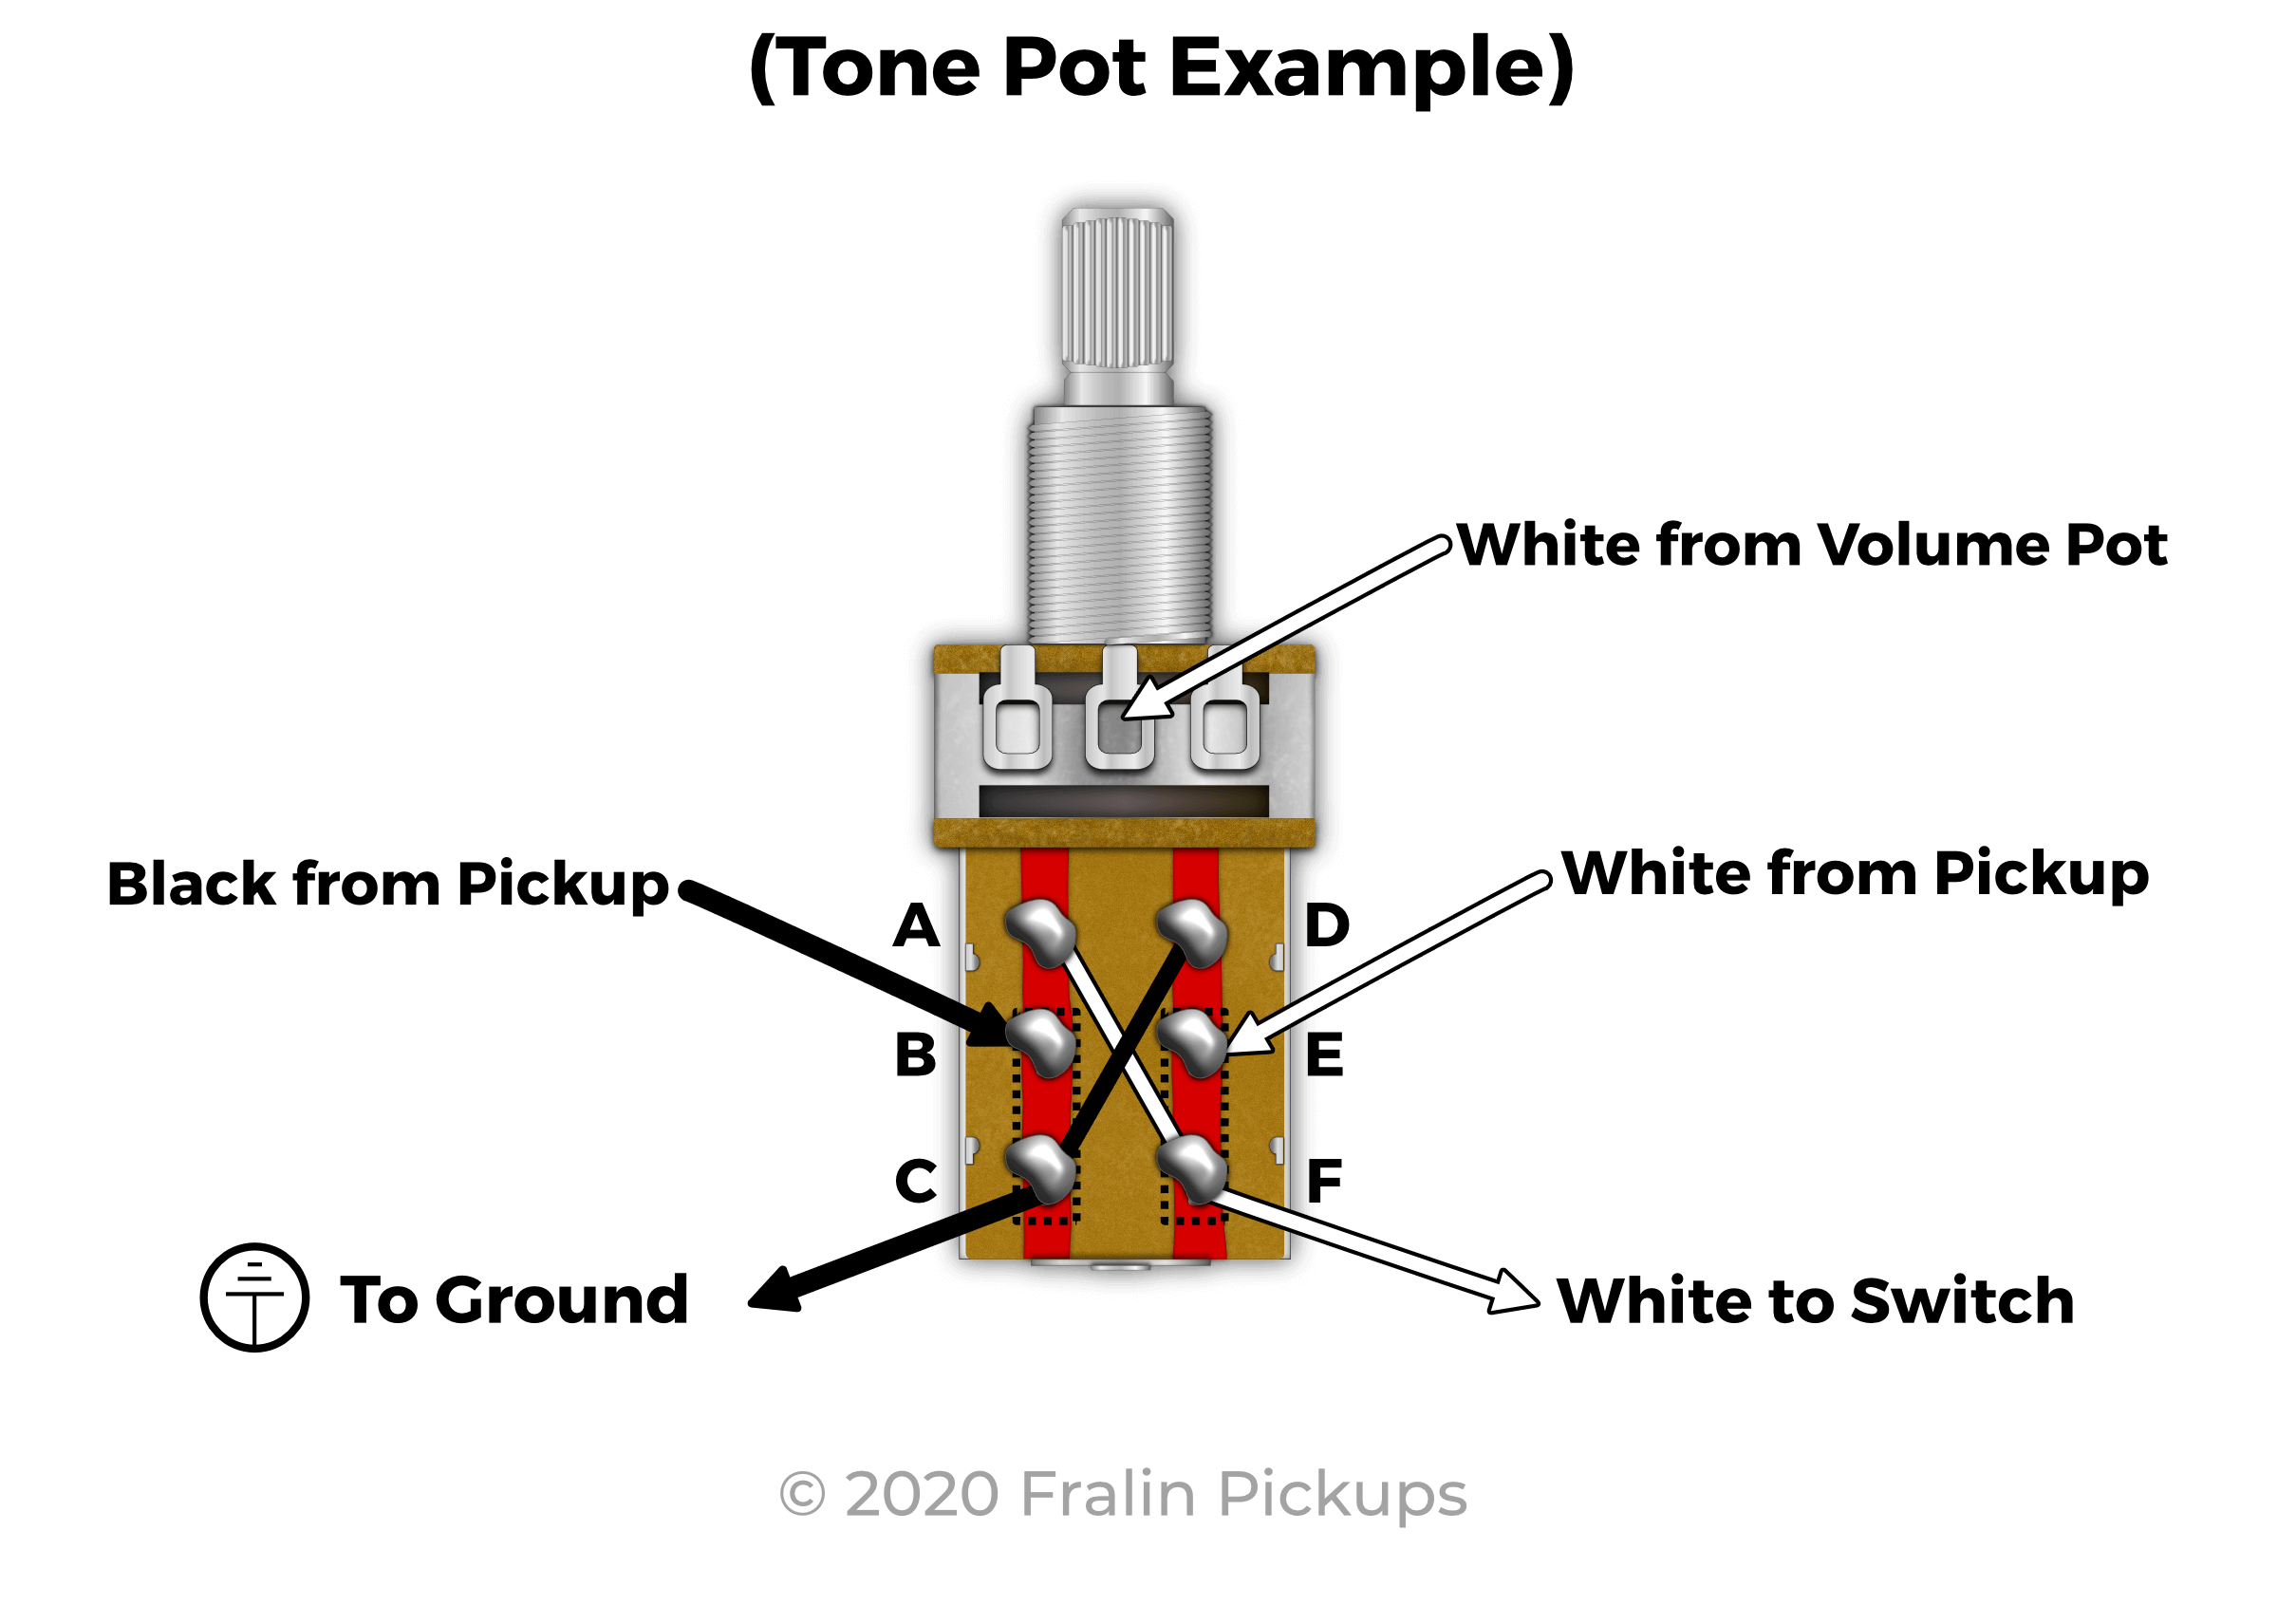
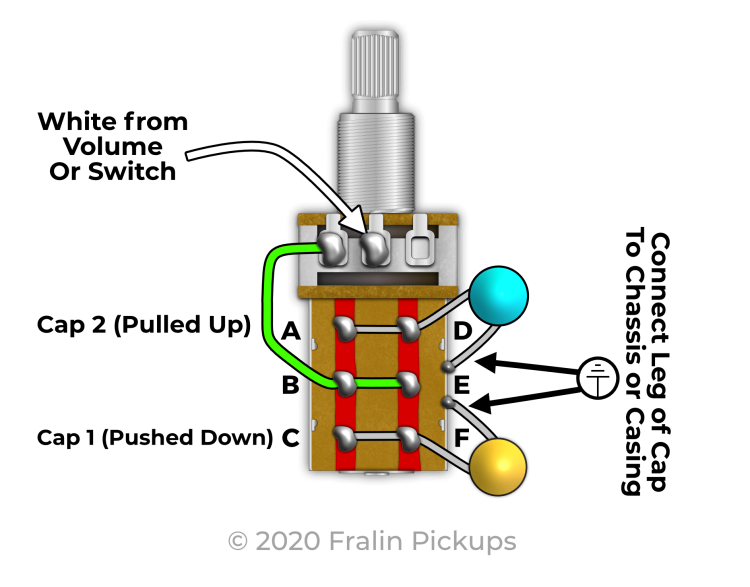
This mod is pretty cool! With this mod, you can use two different tone caps with one push-pull pot. When pushed down, you can have to say, a .02mfd Cap, and when pulled up, you can have a Fralin Magic Cap, or vice-versa!
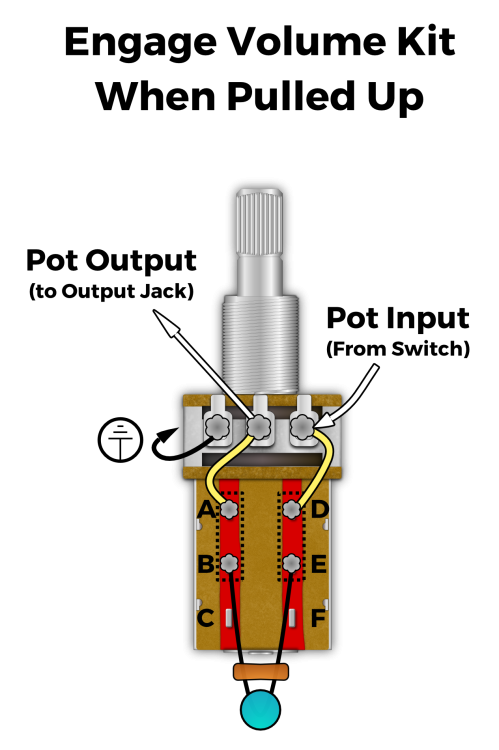
Our Fralin Volume Kit is a great Treble Bleed circuit. If you’re not familiar, the Volume Kit keeps your high frequencies intact as you roll the volume down.
Country, Blues, and Rock guitarists love this as it keeps their crisp highs when they roll down the volume. But what if you need more versatility? Here’s how you can engage it by pulling up on the Push-Pull Pot: When pushed down, your volume knob will act like normal – it will bleed treble to ground. Pulling up on your Push Pull Pot sends your signal through the Volume Kit – your guitar keeps its shimmer!
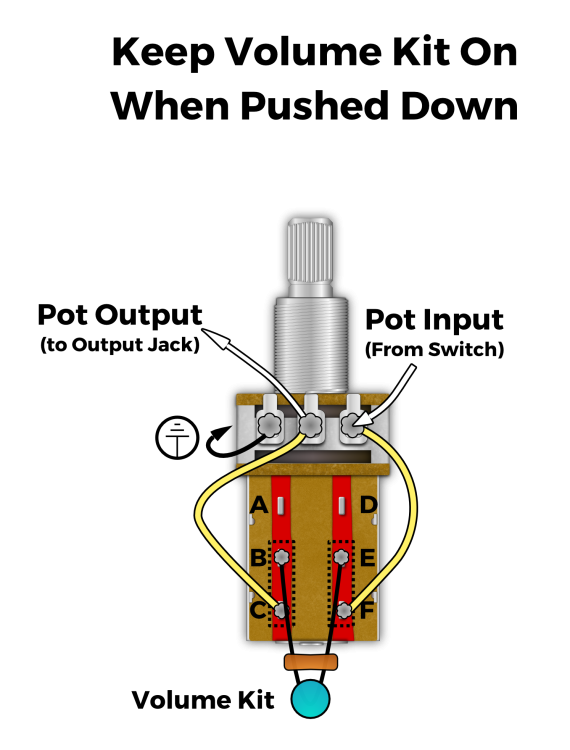
If you want to reverse this, simply move the Connector Wires (two cream wires in the photo above) to Lugs C & F. This will remove the Volume Kit when you pull up.
The “Bright Switch” is a simple mod that adds a little extra Treble to your signal.
The Bright Switch works by removing your Volume Pot and Tone Pot from your signal path, which always “load” your signal. Mostly, it’s connecting your guitar’s pickups directly to the output jack. It’s a pretty crazy difference – your guitar sounds bigger, brighter, and louder.
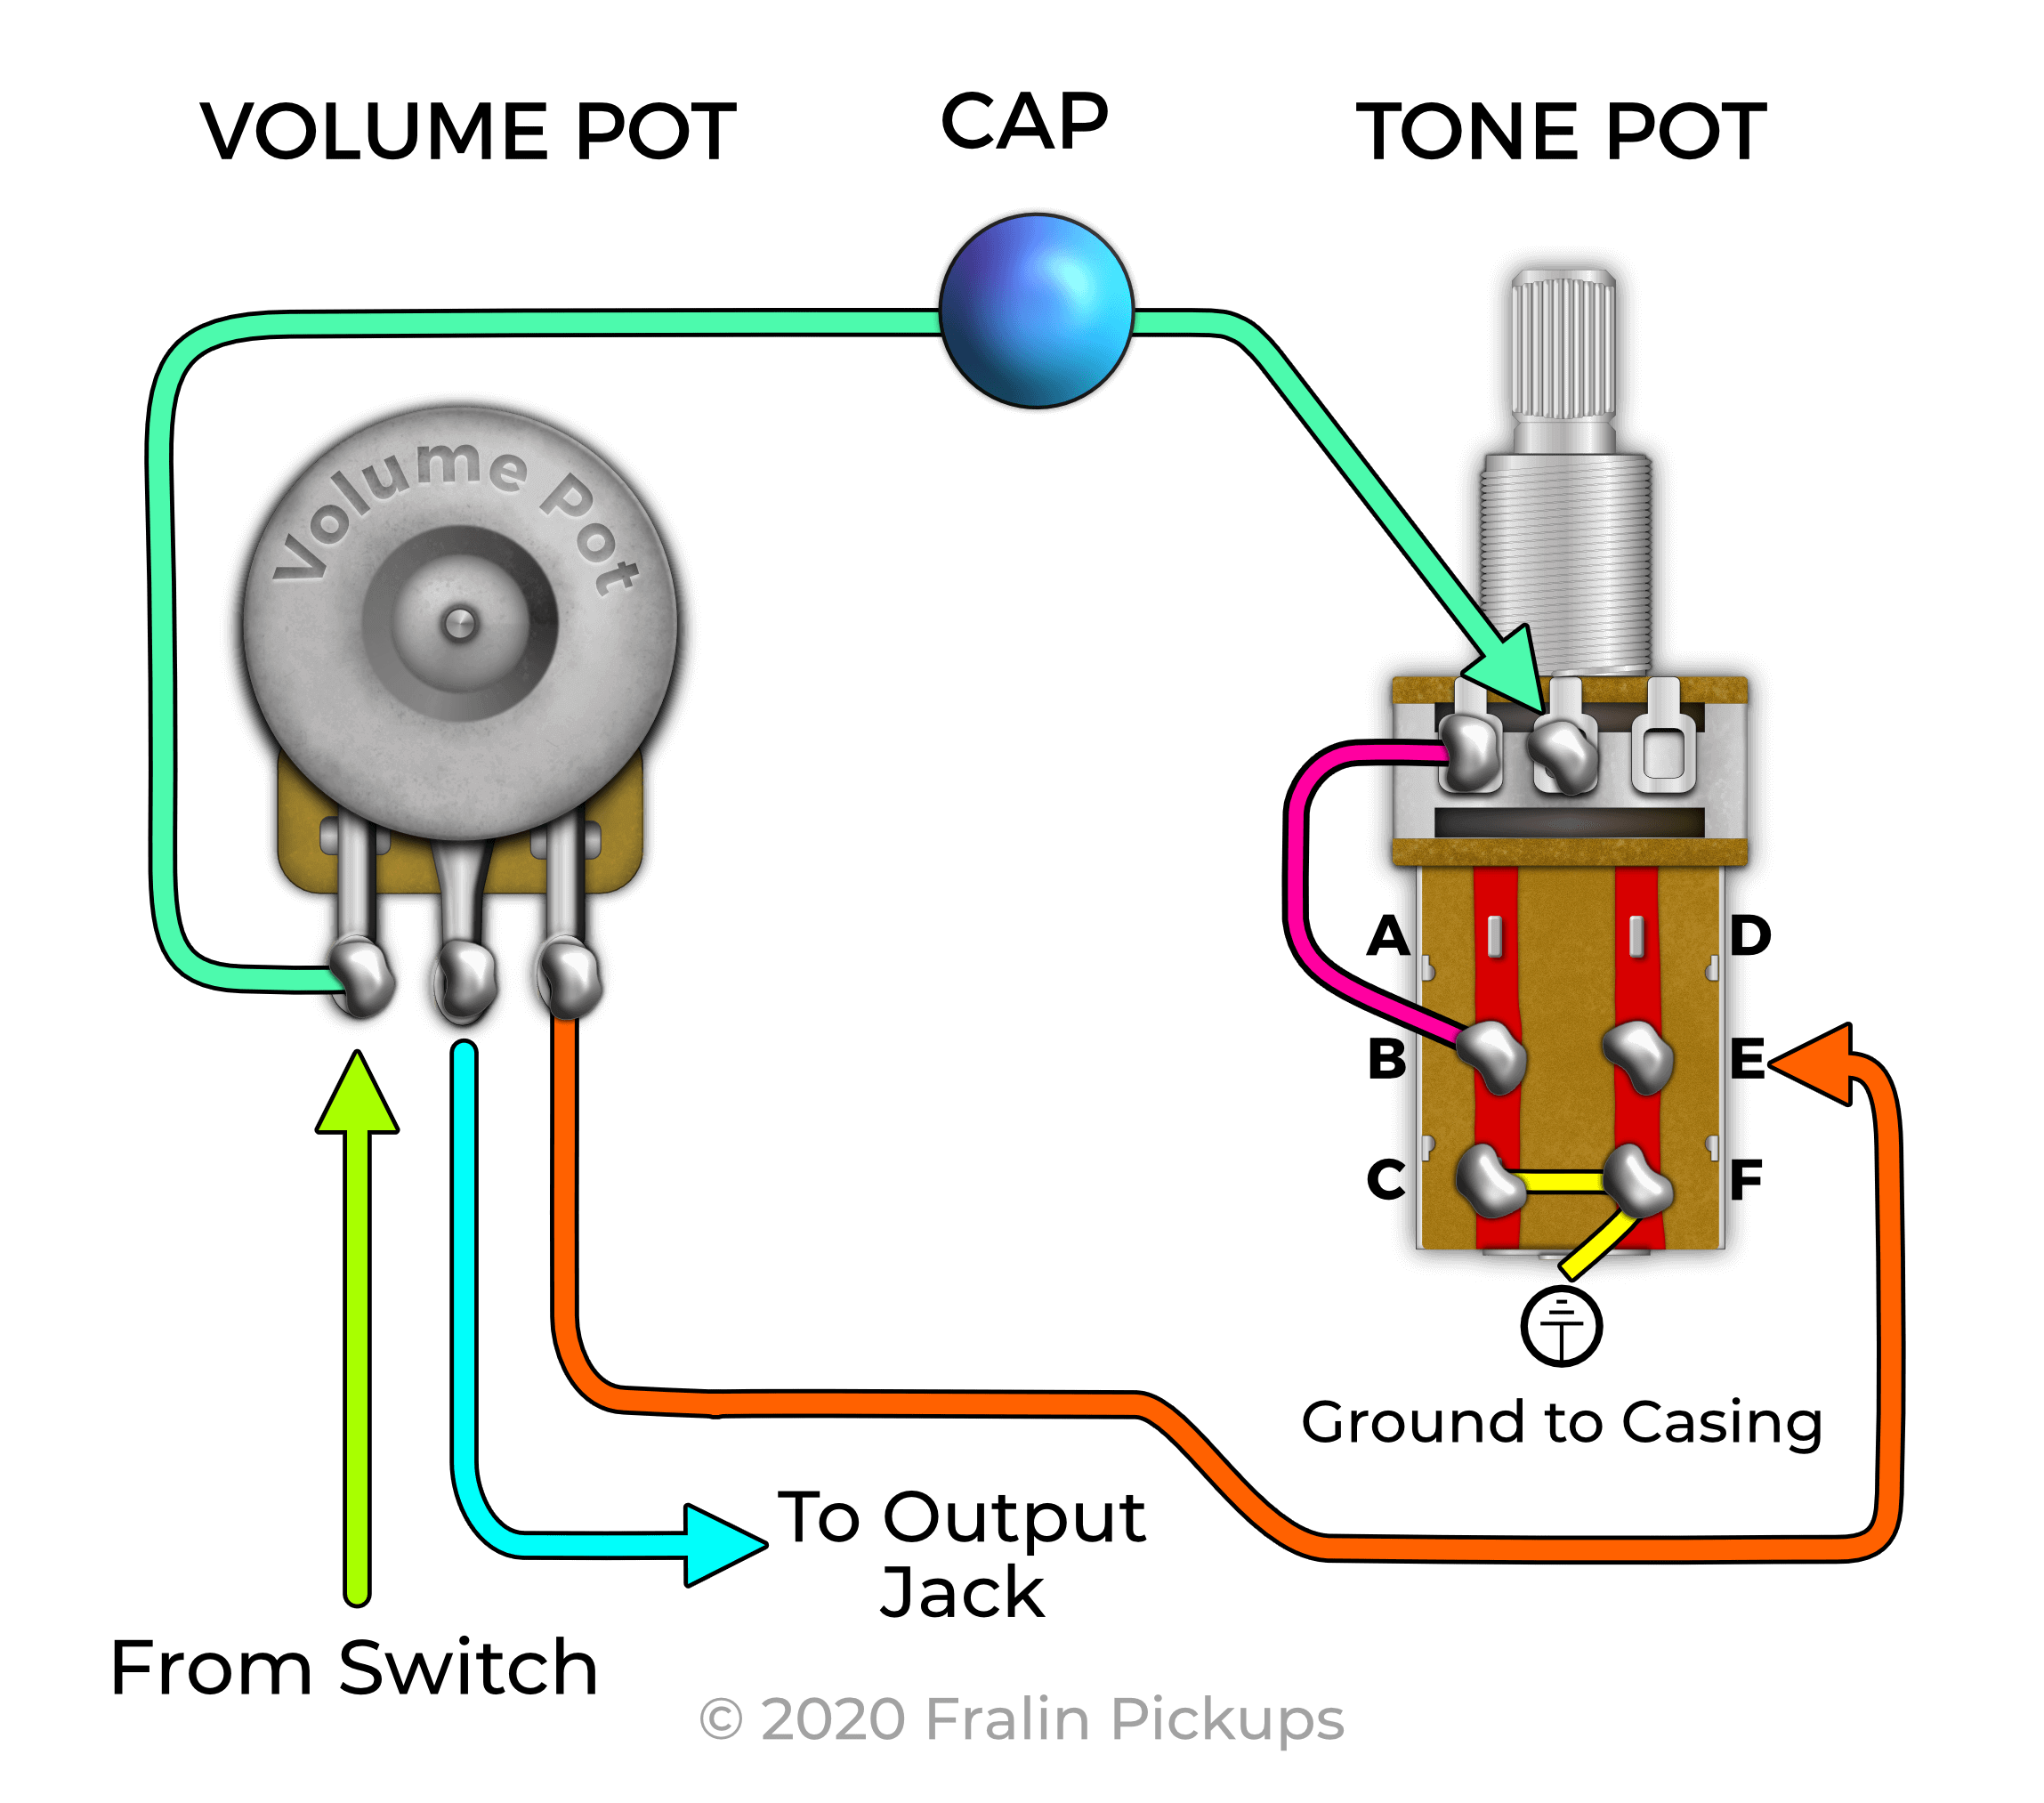
The Bright Switch has more parts involved, thus it is a bit more complicated. When your Push-Pull pot is down, all the wiring is the same as a Strat or a Tele. The Signal enters Lug 1 of the Volume Pot, and Lug 1 is also connected to the input of the Tone Pot.
When the Push-Pull Pot is down, Lug 3 and the Cap are both connected to Ground. They connect to ground via connecting to terminals C & E of the Push-Pull pot.
When the switch is up, the ground lifts off of the tone pot and the volume pot. This allows your signal to connect directly to the output jack, with no Load.
Note: Pickups and other electronics get grounded to the back of the volume pot, just like normal. The 3rd Lug just isn’t connected.
Changing your humbuckers from Series to Parallel works well for some humbuckers, especially some higher output humbuckers. You can get some of that “Strat Quack,” and it opens up a whole new dimension for your humbucker. To accomplish this mod, you’ll need a humbucker with a 4-conductor lead. Please note that the color codes are for Fralin Humbuckers only.

Red connects to green Green when the switch is down. This is a regular “series” humbucker operation. By pulling up on the switch, Red is now connected to White, and Green is now connected to Black. The “hots” connect, and the “starts” connect together – giving you your parallel.
Before we wrap up, here are a few things we want to clear up.
You can use anywhere on the Pot’s chassis to ground a signal. So, when grounding wire, you can run it to the metal housing that houses the DPDT switch, or the side of the Pot itself. A neat little trick is to ground wire on the bottom tab at the very bottom of the Switch. (See the image at the top of the page to see what we’re talking about here).
CTS® has a new type of Push-Pull pot, which can make wiring a little easier. CTS made these contact points easier to reach so that you can fit this pot in more guitars. However, if you’re not familiar with how it’s all connected, it can be a little confusing. Here’s what it looks like:
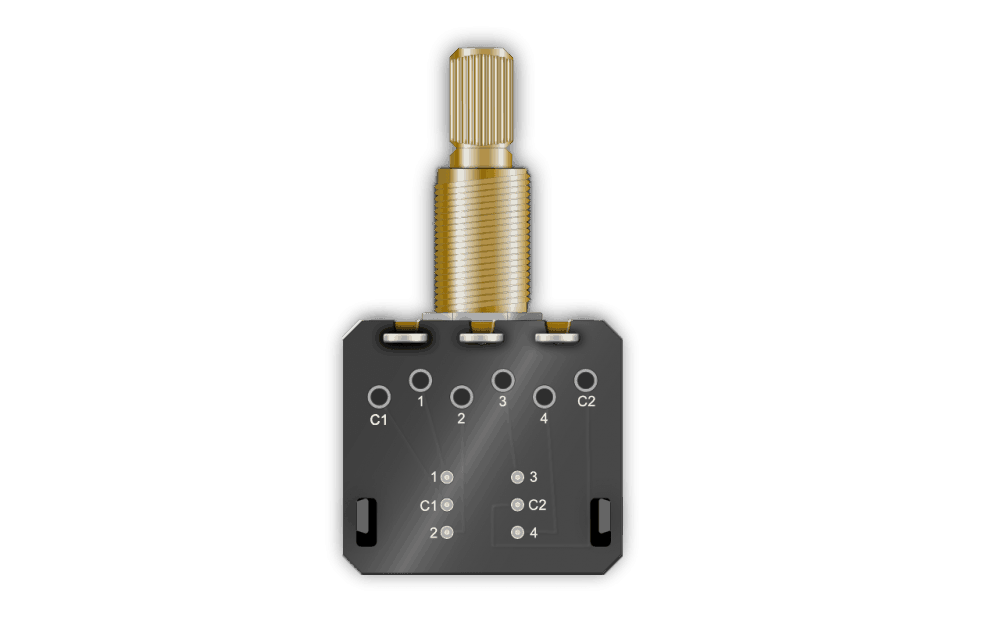
Instead of running your jumper wires to small lugs, you can run them to full-size holes. The order is a little different, but all the concepts are the same.
Well, that’s all for now. I hope that this article has been helpful and informative. We have Push-Pull pots available on our website here. Now, grab some and get to modding!

183 Comments For This Post
Want to chime in to the conversation? Please do so! Please respect others.
Interesting: I have a offset style with 2 P90 and 1 single coil, 2 dtdp and a 3-way switch. I would like to wire them so that the 3 way switches between the P90 and when you pull volume then it adds singlecoil. the tone would be so that down is is activated and pulled it is bypassing tone. what would be the best way to wire this?
Great article.
Have a Fender Precision Bass Junior with a single volume knob. Do you happen to have a diagram for a Push/Pull Volume/Tone?
Thanks
Hey Pat, we don’t have that option, but you could use a concentric pot, like a Jazz Bass. Wiring Diagram.
Please note that you’d have to change a few things about this wiring. In the diagram, the pickup solders to Lug 2 (the middle lug), and the Output is Lug 1 (far left lug). You’d need to reverse these two.
About your bright mod what of tone cap to use.
We always recommend a 0.02mfd unless you are looking for something specific.
I’m adding an on-board effect to a guitar. I assume that I can treat the push pull pot as any DPDT. Switch to add a true bypass.
I’m trying to get separate volume/tone controls for SC tele w/3-way switch. EX: using 2 Push/Pull pots, down position would be volume only for each pickup, up would be tone only for each pickup. The middle switch position should have many V/T combinations. What I’ve tried is sort of right, but doesn’t work the way it should. Any help?
I recently read that EVH disconnected the tone pot from his neck pick up to make it less muddy and tried it on my SG and love the difference. I have always found most bridge positions on any guitar I have owned to sound to bright.
I wanted to try leaving the neck volume a 500k pot and turn the tone pot into a 250k volume pot and use a push pull on that. So would be the 500k front pot operating with the push pull on the 250k pot down and then with the push pull up, it then switches to the 250k pot.
Then the same on the bridge pick up.
Can this be done with push pulls?
Cheers, Glen
Tyler,
Hello and thanks for such console explanations. Great diagrams. My question is a fun one. I’m lost on this. I’m building a cigar box guitar for a pro player. He wants a Humbucker and wants a volume pot with a treble bleed I know how to do this. He also wants 2 push pull pots. One to split coil with .047 cap on in solid side. Then he wants one push pull to act as a “tone king” for single side of Humbucker. With a .033 cap and a .022 cap. I’m lost on wiring this and I hope you can help. This guitar could bring me some good sales. Thank you very much for your help.
Regards,
Joe
I was seeking to use a push pot for a type #3 in your illustrations: bright switch.
I am working on a three single coil Stratocaster and have installed three volume push pots 500K and three 500k tone pots.
My intention, is to have each volume and tone on one pickup with a tone pot bypass for each.
Therefore my wiring configuration would be substantially different than the one in your diagram.
Would you be willing to help me out with the proper diagram?
Reply to: [email protected]
Huge Thanx!
I will return a picture of it to you when it is complete!
I had an idea to replace my tone pot with a push pull.
The idea was to have a pair of diodes on one function
to use as a distortion unit and the other a capacitor.
Well, the diode distortion deal didn’t work. It of course
did work when mounting It on the pento lugs but then
defeats the purpose of push-pull function. Any ideas?
Thanks
Awesome short course. This is for passive circuitry I suppose.
Now throw in a 3 way toggle and an active preamp EQ with a separate output jack for the activated humbucker circuitry is
Fab article ..thank you! ..i have nec and middle fralin woodstock pickups..i love them and wouldn’t change. However what Fralin would be the nearest to Hs2 Hs3? I have (the old) duncan hotrails atm for versatility as a teacher, but i miss the real strat bridge sound sooo much. Is there a Fralin that can be a bit ‘halfway house’ ? ie slightly less noisy with a smidgeon more power without sounding ‘hot strat’? I’m a tech, and i should know ? but just asking the main man. Many thanks.