Using Resistors In Guitars – 101
When you think of tone shaping, a couple of items might come to mind. We all use pickups, capacitors (tone caps), and pots as tone shapers. However, using Resistors in a guitar can open up new tonal possibilities as well.
A Resistor is a device with a measurable amount of resistance. Simply put, a Resistor impedes the flow of or “resists” electricity. One way to think of a resistor is by using the ‘Pipe analogy.’
Imagine a pipe with free-flowing water in it. Then, imagine that the water has to go through a much smaller gauge pipe where the flow is “resisted.” This analogy describes how a resistor works in simple terms: it creates a higher point of resistance in the flow of electricity.
I’m sure you’re thinking “Cool. But, how does a resistor affect my guitar?” We’re glad you asked! Today, we’re going to illustrate some basic examples of how to use resistors in a guitar.
PARTIAL SPLIT RESISTOR:
One of the most basic examples of resistors in a guitar is with our Partial Split Resistor. The Partial Split Resistor gives low-output humbuckers a stronger single-coil tone when split. This is a common problem when splitting your humbucker – not all humbuckers are equal.
Removing one coil from a lower-output humbucker, like our Pure P.A.F., leaves you with a weak-sounding single-coil tone. Using a resistor can make all the difference. For an in-depth article on coil-splitting, head to our article here.
HOW TO WIRE IT UP:
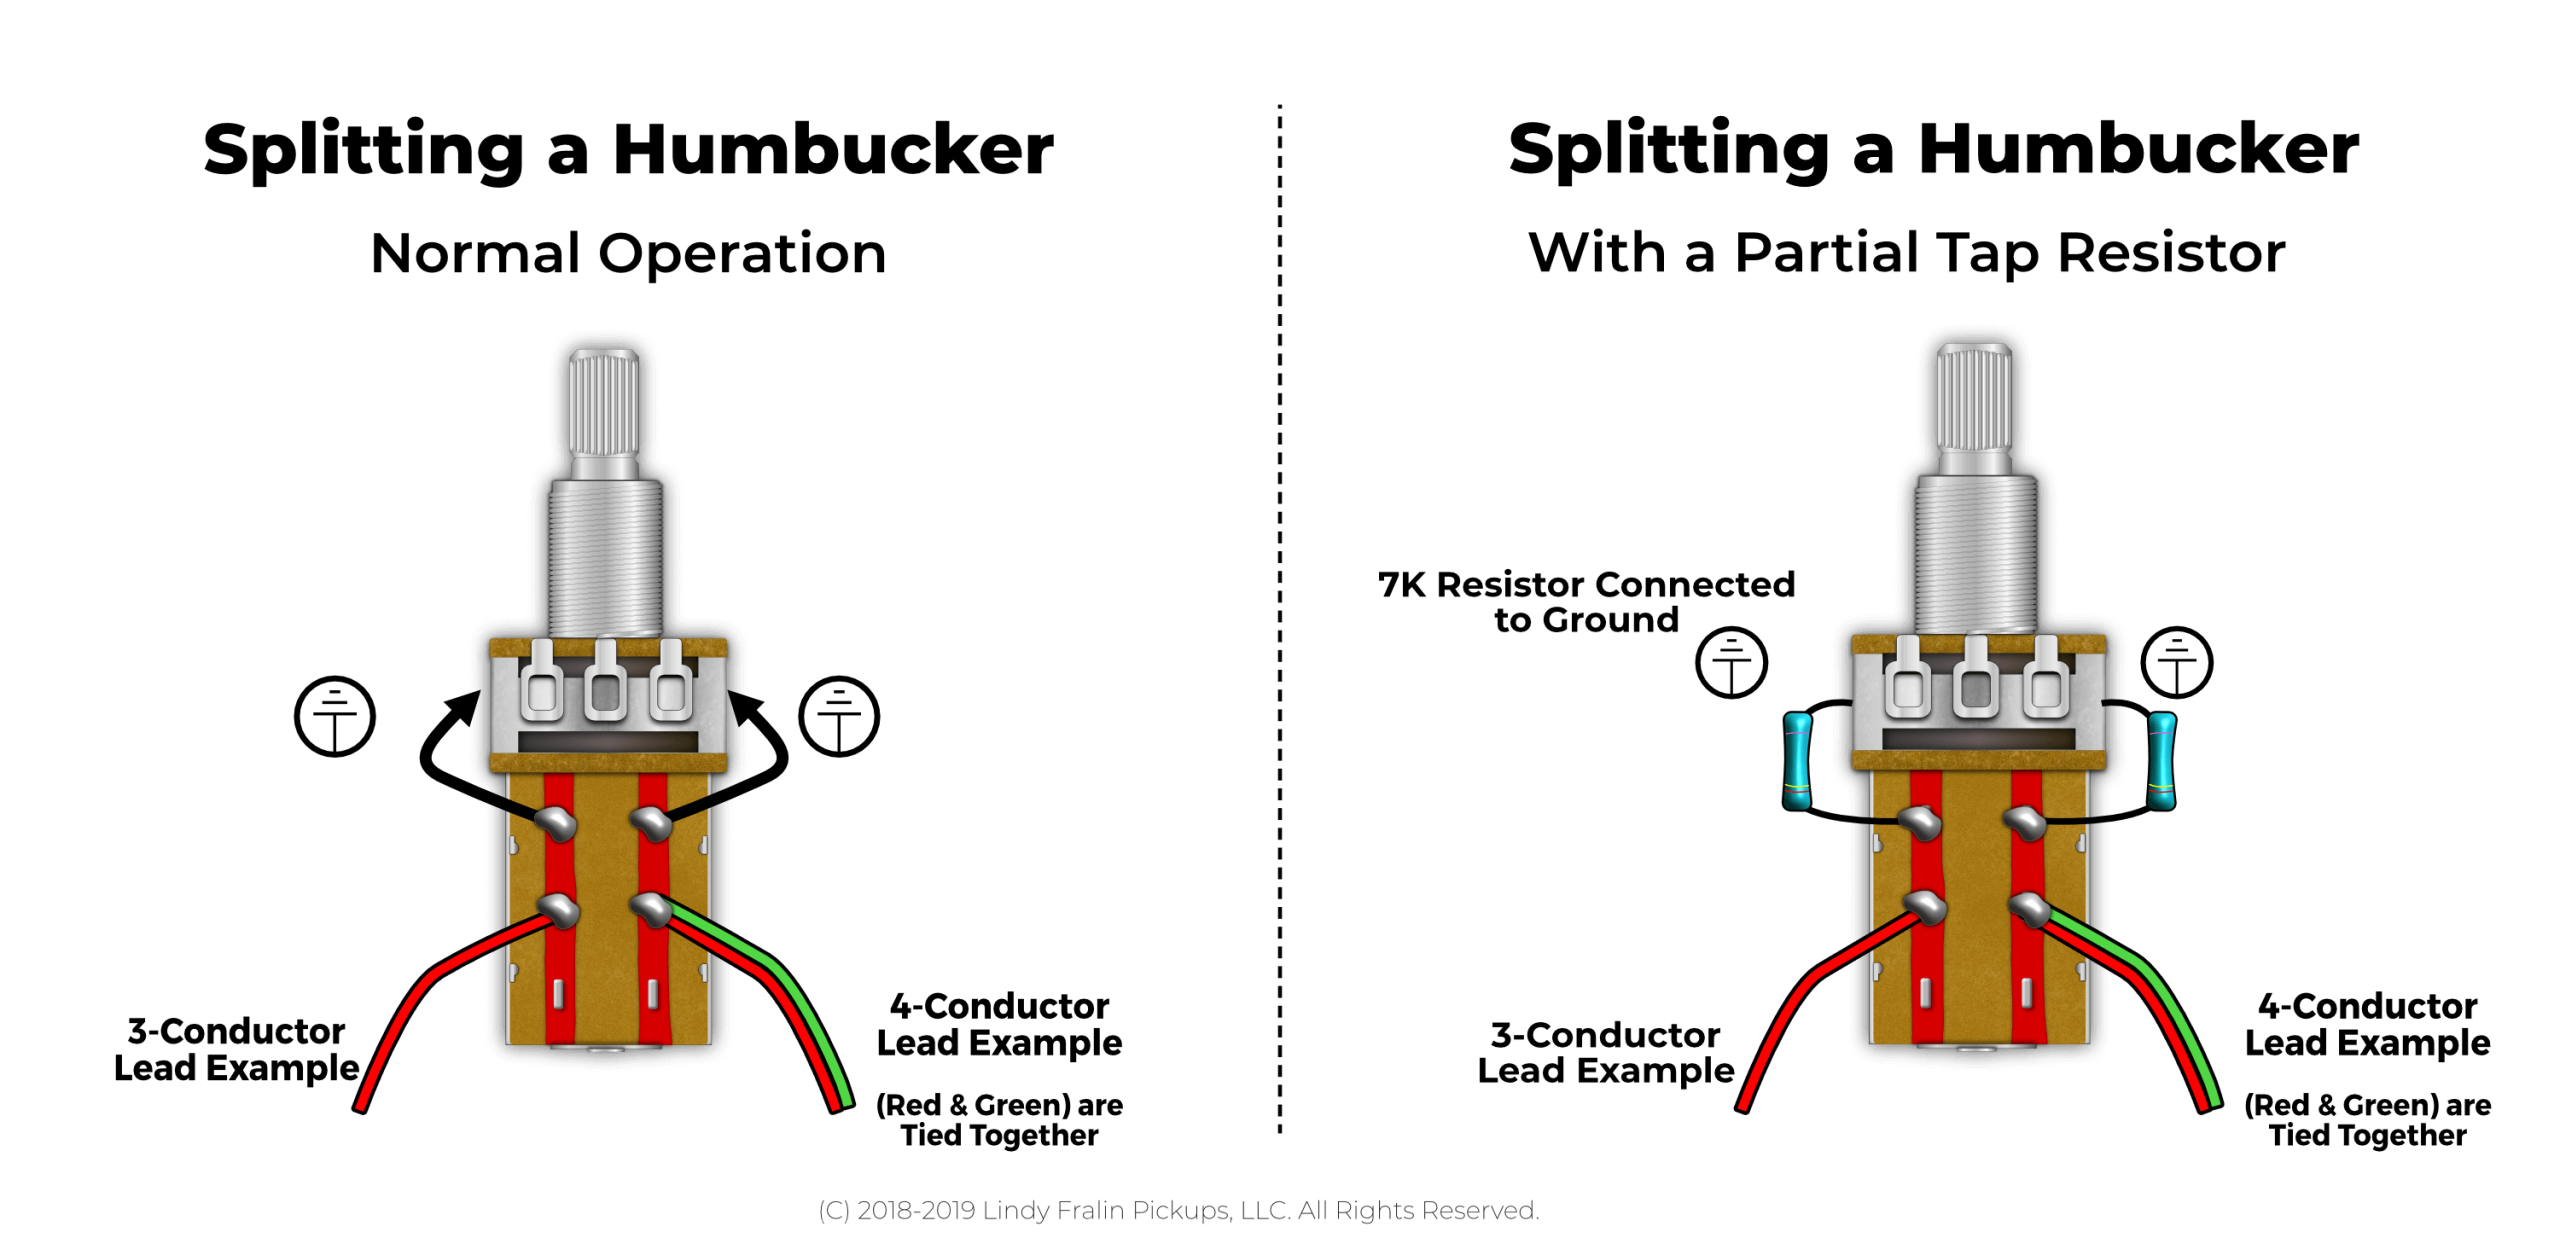
Using a Partial Tap Resistor is an easy way to explain resistors in a guitar. It takes the place of whatever you’re using to connect to ground. Instead of using wire as your ground connection, use a resistor instead. Using one will give you a stronger coil tapped tone when you pull up. See below for an illustration to help you wire it up.
HOW IT WORKS:
Simple. A Resistor is “Resisting” the flow of electricity, so, when you pull up, instead of sending 50% of the Humbucker to ground, it will only send, say, 33% of it. This allows you to have a stronger single-coil tone when pulled up.
FAKING OUT YOUR SINGLE COILS WITH RESISTORS:
Alright “faking out” seems a little vindictive. However, when you have a Telecaster with a Humbucker in the Neck and a Single Coil in the bridge, it can be tough to make those two pickups play nicely together (read our in-depth article on this topic here).
WHEN TO DO IT:
Let’s set the stage: You have a Telecaster with a Humbucker in the neck and a Single Coil in the Bridge. The Humbucker needs a 500K pot to sound good, and Single Coil sounds best on 250K pots. You only have one volume pot – how can you compromise? Put a Resistor From The Bridge Pickup Hot To Ground.
HOW TO WIRE IT UP:
HOW DOES IT WORK?
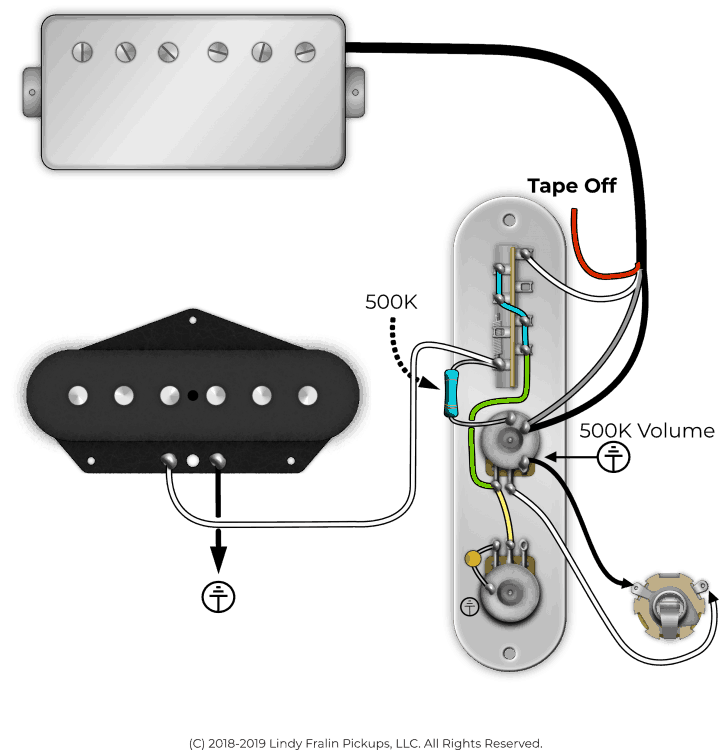
Let’s explain this using a simple formula. When you use two resistors in Parallel, one side of each resistor connects to the same location. For example, your Volume Pot is a resistor: 250K, 500K, these are resistance values.
One side of the pot is a “hot,” or “input,” and one side of the pot is Ground. If you attach a resistor from the “Hot” of a pickup, and one leg to “ground,” you’re putting that resistor in Parallel. See below for the equation of using 2 Resistors in Parallel:
As you see, if you put a 500K resistor in parallel with a 500K pot, the Bridge Pickup will “see” a 250K pot. This is great for your Telecaster as it you’ll have a great sounding Neck Humbucker and a perfect-sounding Bridge Single Coil.
NOTE:
The above formula works well when you’re on your Neck pickup and Bridge Pickup only. However, when you get in the Middle Position, you’re adding yet another resistor. Your Neck Pickup (500K) Your Bridge Pickup (500K) and the Parallel Resistor (~470K). When you combine your neck and bridge using this resistor trick, the middle position will see a 163K pot, making it darker than usual.
-
Resistors$4
TRANSFORM YOUR POTS:
In our last example, you can use a resistor in a guitar to change your pot value. This is handy when you only have a 500K pot on hand, but you need a 250K pot. If you have a ~500K Resistor, you can make this happen! See below for a diagram on how to wire this up:
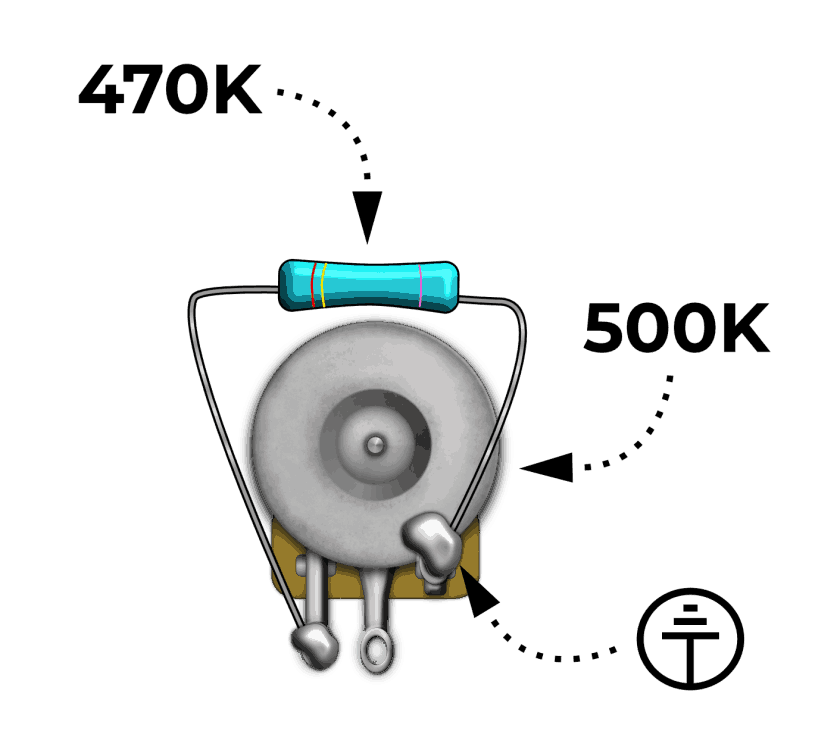
In the above image, you have a 470K resistor in Parallel with your Volume Pot. The pot value’s resistance is 500K, and your Resistor is 470K – with a combined resistance of 242K. Pretty neat!
You can use this trick to take a bit of high-end off of your pots as well. Let’s say you have a 500K pot, and your pickups are just a little too bright on them: you can add a 1Meg resistor like the image above, and you’ve turned your 500K pot into a 333K pot. This will tame some of the highs.
Thank you for reading. There are lots of great articles out there to learn how resistors work, and what you can use them for. There is a multitude of ways to add a resistor to your guitar’s kit. How do you do it?
Hello, Scott.
You can calculate the total resistance here:
https://www.allaboutcircuits.com/tools/parallel-resistance-calculator/
(The formula and a diagram are on the same page.)
As far as I can see you can get at maximum a resistance equivalent to the smaller of the two resistors – literally the current goes the way of, well, least resistance. So you can’t increase the value of a pot this way, just decrease it. The higher you chose the parallel resistor’s value, the closer you get to the original value of the pot.
Hope this helps.
Hi, David.
Looking at the image for the resistor in parallel to the lugs of a pot to change its value, I would assume the following:
One needs to bridge the lugs you are using (typically left/middle or middle/right for most volume and tone pots) with a resistor to change the pot total resistance. I’m not sure the diagram above is fully correct in this way, I would actually try that out first – see if the version in the diagram above works for various pot uses (volume, tone) or if it’s actually better to bridge the lugs in use. From my understanding the pot’s resistance applies between the lugs you use, so a resistor needs to be parallel to that.
If my assumption is correct, I would try the following:
Lead a wire from one of the lugs your are using to the middle position of one of your DPDT switch parts of your push/pull or push/push.
Decide which sound is your default. I’m assuming the normal taper resistance is default. So on the down position of the switch wire nothing. This means the circuit you’re making is not connected to anything in the down position and will function as before.
For the up position, wire a resistor of desired value and connect it to the other lug.
This should enable one to switch between original resistance value of the pot and the parallel version, I think. The logic applied is the same as for the typical coil split mod. In a coil split mod, the two wires connecting the north and south finish (and hence putting the two coils in series) are both put on the middle position. In the down position, nothing is wired. This means they only connect to each other, and you get the original circuit. In the up position, you put a connection to ground, which connects both wires to ground, which basically means the north coil (IIRC) is connected on one side to output and on the other to ground, or alternatively, you could see it is as shunting everything from the south coil directly to ground.
The trick in wiring these DPDTs is “breaking circuits” in some positions. You can have additional wires leading to “nowhere,” it won’t change the circuit. At least that’s how I’ve come to understand them, I’m not trained in electronics in any way. But if you analyze for example how a typical phase reversal mod works with crossed wires the principle becomes apparent.
I’m actually going to try this potential version of the mod I just suggested myself to see if it works, wiring in some crocodile clamps for the resistor part and trying various values to see how the sound of the respective guitar changes.
PS – You could use this mod to apply the change to two pots at the same time since a DPDT switch offers two independent sides. So, you could do a paired volume and tone pot together and switch them both, which works for guitars with master volume and master tone and using one of them as push/pull or for guitars using pairs of volume and tone for each pickup (like Les Pauls with 4 knobs, one volume/tone pair for each pickup) – in the 4 pot version you could then change either both volume pots, both tone pots, or even only one pickup’s tone/volume pair.
Useful article – as they all are – and I really appreciate the care taken so that they’re inclusive of other brands.
My query is regarding the resistors – may seem dumb but does it matter which way ‘round they’re connected? If so, which is the right way?
Cheers!
What’s the formula for calculating the final resistance value?
I wanted to make a regulatable 250-500K potentiometer, so i thought to put two 250K-pots in series by not grounding the right cnnct. of the (lgrthmc.) Vol-pot 1 directly to its own housing, but instead to connect there the second (and this time linear) 250K-pot, with its middle-contact, and from this pot (#2) i connect then the right contact to its housing. Eventually, it’s like a resistor between the right contact and mass.
The Tone-pot shall connect (via capacitator at middle-cntct.) to “out” of Vol-pot 1 (i was told that’s 50s style). Do i miss something technically or could this function correctly?
Your mods work Great! Thanks for sharing Tyler !!!
In theory, couldn’t you add a resistor in-line to you pick-up wire to add resistance? Lets say you have a 250k pot, but you like the tone of 500k. Couldn’t you add a 250k resistor in line to increase the resistance to 500k on the high side of the wipe at full output?
Hi! Maybe I am wrong but in the “TRANSFORM YOUR POTS” diagram, the two resistors are not in parallel. The pot resistor is connected in series, but the 470k resistor is connected to the ground, not to the output hot point.
The set push pull seems to work (going from 500k to 250k) but there isn’t much of a difference. It’s not worth wasting a push pull for that. I just changed the pot to the dual cap setup and that really doesn’t make a lot of difference either.
Not really worth it with a humbucker….I’m going to do a series, parallel, split mini toggle in the next few weeks….the dual caps may make a difference for the single coil mode. I added a .047 cap to the hot line of a bridge pickup in series to the three way switch and it made a difference cleaning up a muddy pu. cut the low freqs nicely…100htz, 200 htz…..
I need to cut the signal on the LP jr. It breaks up too much on the clean channel.
I may try to do the 7k boost for single coil mode when I do my series, parallel, single coil mode. Hopefully I can get the resistor on the single coil and maybe the parallel position without effecting series.
These mods are interesting. I think the mod to make a 500k pot into 250k is not very useful on the tone pot…..maybe I’ll soldier a resistor over the volume pot to see if it makes a bigger difference…..if it does I may put a push pull on the volume too. If it works I can use the .022 cap from my tone mod with the vol pot at 250k. I’d think it would be easier to use a spst to turn the 500k resistor on and off….going between 500k and 250k on the volume pot.
Hi David,
I agree with your findings I have had similar results. Have you tried the partial split resistor? That is interesting.
All the best.
Hi Folks,
I have a epiphone LP Jr. with a humbucker. I am putting in a dpdt on/on/on mini toggle switch to get series, parrallel, single coil. I know I can reduce the 500k tone pot to 250k with a 500k resistor. I want to use a push pull tone control to turn this 500k resistor on and off. Essentially going from a 500k pot to a 250k pot when I use the push pull switch.
I’ve looked every where for a diagram to wire the push pull. I know it’s not rocket science.
I just want to turn the 500k resistor that’s in parallel, on and off. Do you have a diagram or can you tell me which pads to connect where. Thanks.
I think I may have figured out my question with one of your diagrams.
…. Engage Volume Kit When Pulled Up…..
Use this wiring and replace the cap with a 500 k resistor. Then it will change the pot from a 500k to a 250k
David.
The Epiphone Les Paul Junior is a great guitar to play and modify. I share your passion. Push on! Please let us know your results.
All the best
I tried everything tonight…. spent a couple hours….this is really frustrating me. I had the push pull working as a regular tone control but it would go from 500k to 250 k when I pulled it.
I know it’s a simple thing….they talk about changing a pot from 500k to 242k by adding a 470k resistor….it’s right above this blog…..the last example. I think I need to use the push pull switch as a spdt switch…..maybe just use the 3 pins to the right and that’s it.
All I need is an on off switch….the other resister is hooked up like the example above with a switch in series with it. I pull the push pull switch and it closes the circuit and adds the extra resistance in parallel….I push it down and it opens the circuit and allows the pot to work normally.
Help somebody!!! I just need a simple explanation for this push pull.
i believe I could do it with a simple spst but I don’t want to use a mini toggle
I tried everything tonight…. spent a couple hours….this is really frustrating me. I had the push pull working as a regular tone control but it wouldn’t go from 500k to 250 k when I pulled it.
I know it’s a simple thing….they talk about changing a pot from 500k to 242k by adding a 470k resistor….it’s right above this blog…..the last example. I think I need to use the push pull switch as a spdt switch…..maybe just use the 3 pins to the right and that’s it.
All I need is an on off switch….the other resister is hooked up like the example above with a switch in series with it. I pull the push pull switch and it closes the circuit and adds the extra resistance in parallel….I push it down and it opens the circuit and allows the pot to work normally.
Help somebody!!! I just need a simple explanation for this push pull.
i believe I could do it with a simple spst but I don’t want to use a mini toggle
I think I figured it out…i haven’t hooked it up yet but tested with a meter.
This is for a “Tone Control” pot….not volume pot!!!
Hold switch with stem away from you….looking at pins.
Pot lugs 1,2,,3….left to right
1. run wire from lug 1 to pot ground
2. Put one side of cap on lug 1 then other side run to pot ground
Pins are a,b,c on left side and d,e,f on right side (a and d are the pins furthest away from you)
3. If you want to get 500k and 250k with the push pull pot then
4. put a 500k resistor on pins A and D
5. Put a wire on pin B to pot ground
6. put a wire from pin E to lug 3 of pot
7. Attach wire from volume pot to lug 2 on pot (same as if you were wiring a regular tone control)
I haven’t put it in my guitar yet but tested it with a meter….put meter on lug 2 of pot and ground. I can read 500k when down….250k when pulled up.
I think this will work…..I have a strat that has Hot stack humbuckers neck/ bridge and single coil middle……I have mini toggles for the neck and bridge pickup….humbucker North/single coil/ Hum south.
This mode should work well with this…I can switch to 250k when I go single coil…..not sure how much it will effect it just using only a 250k tone pot but…..that’s for the experts to tell.
It may be better to switch between two different caps. We’ll see soon.