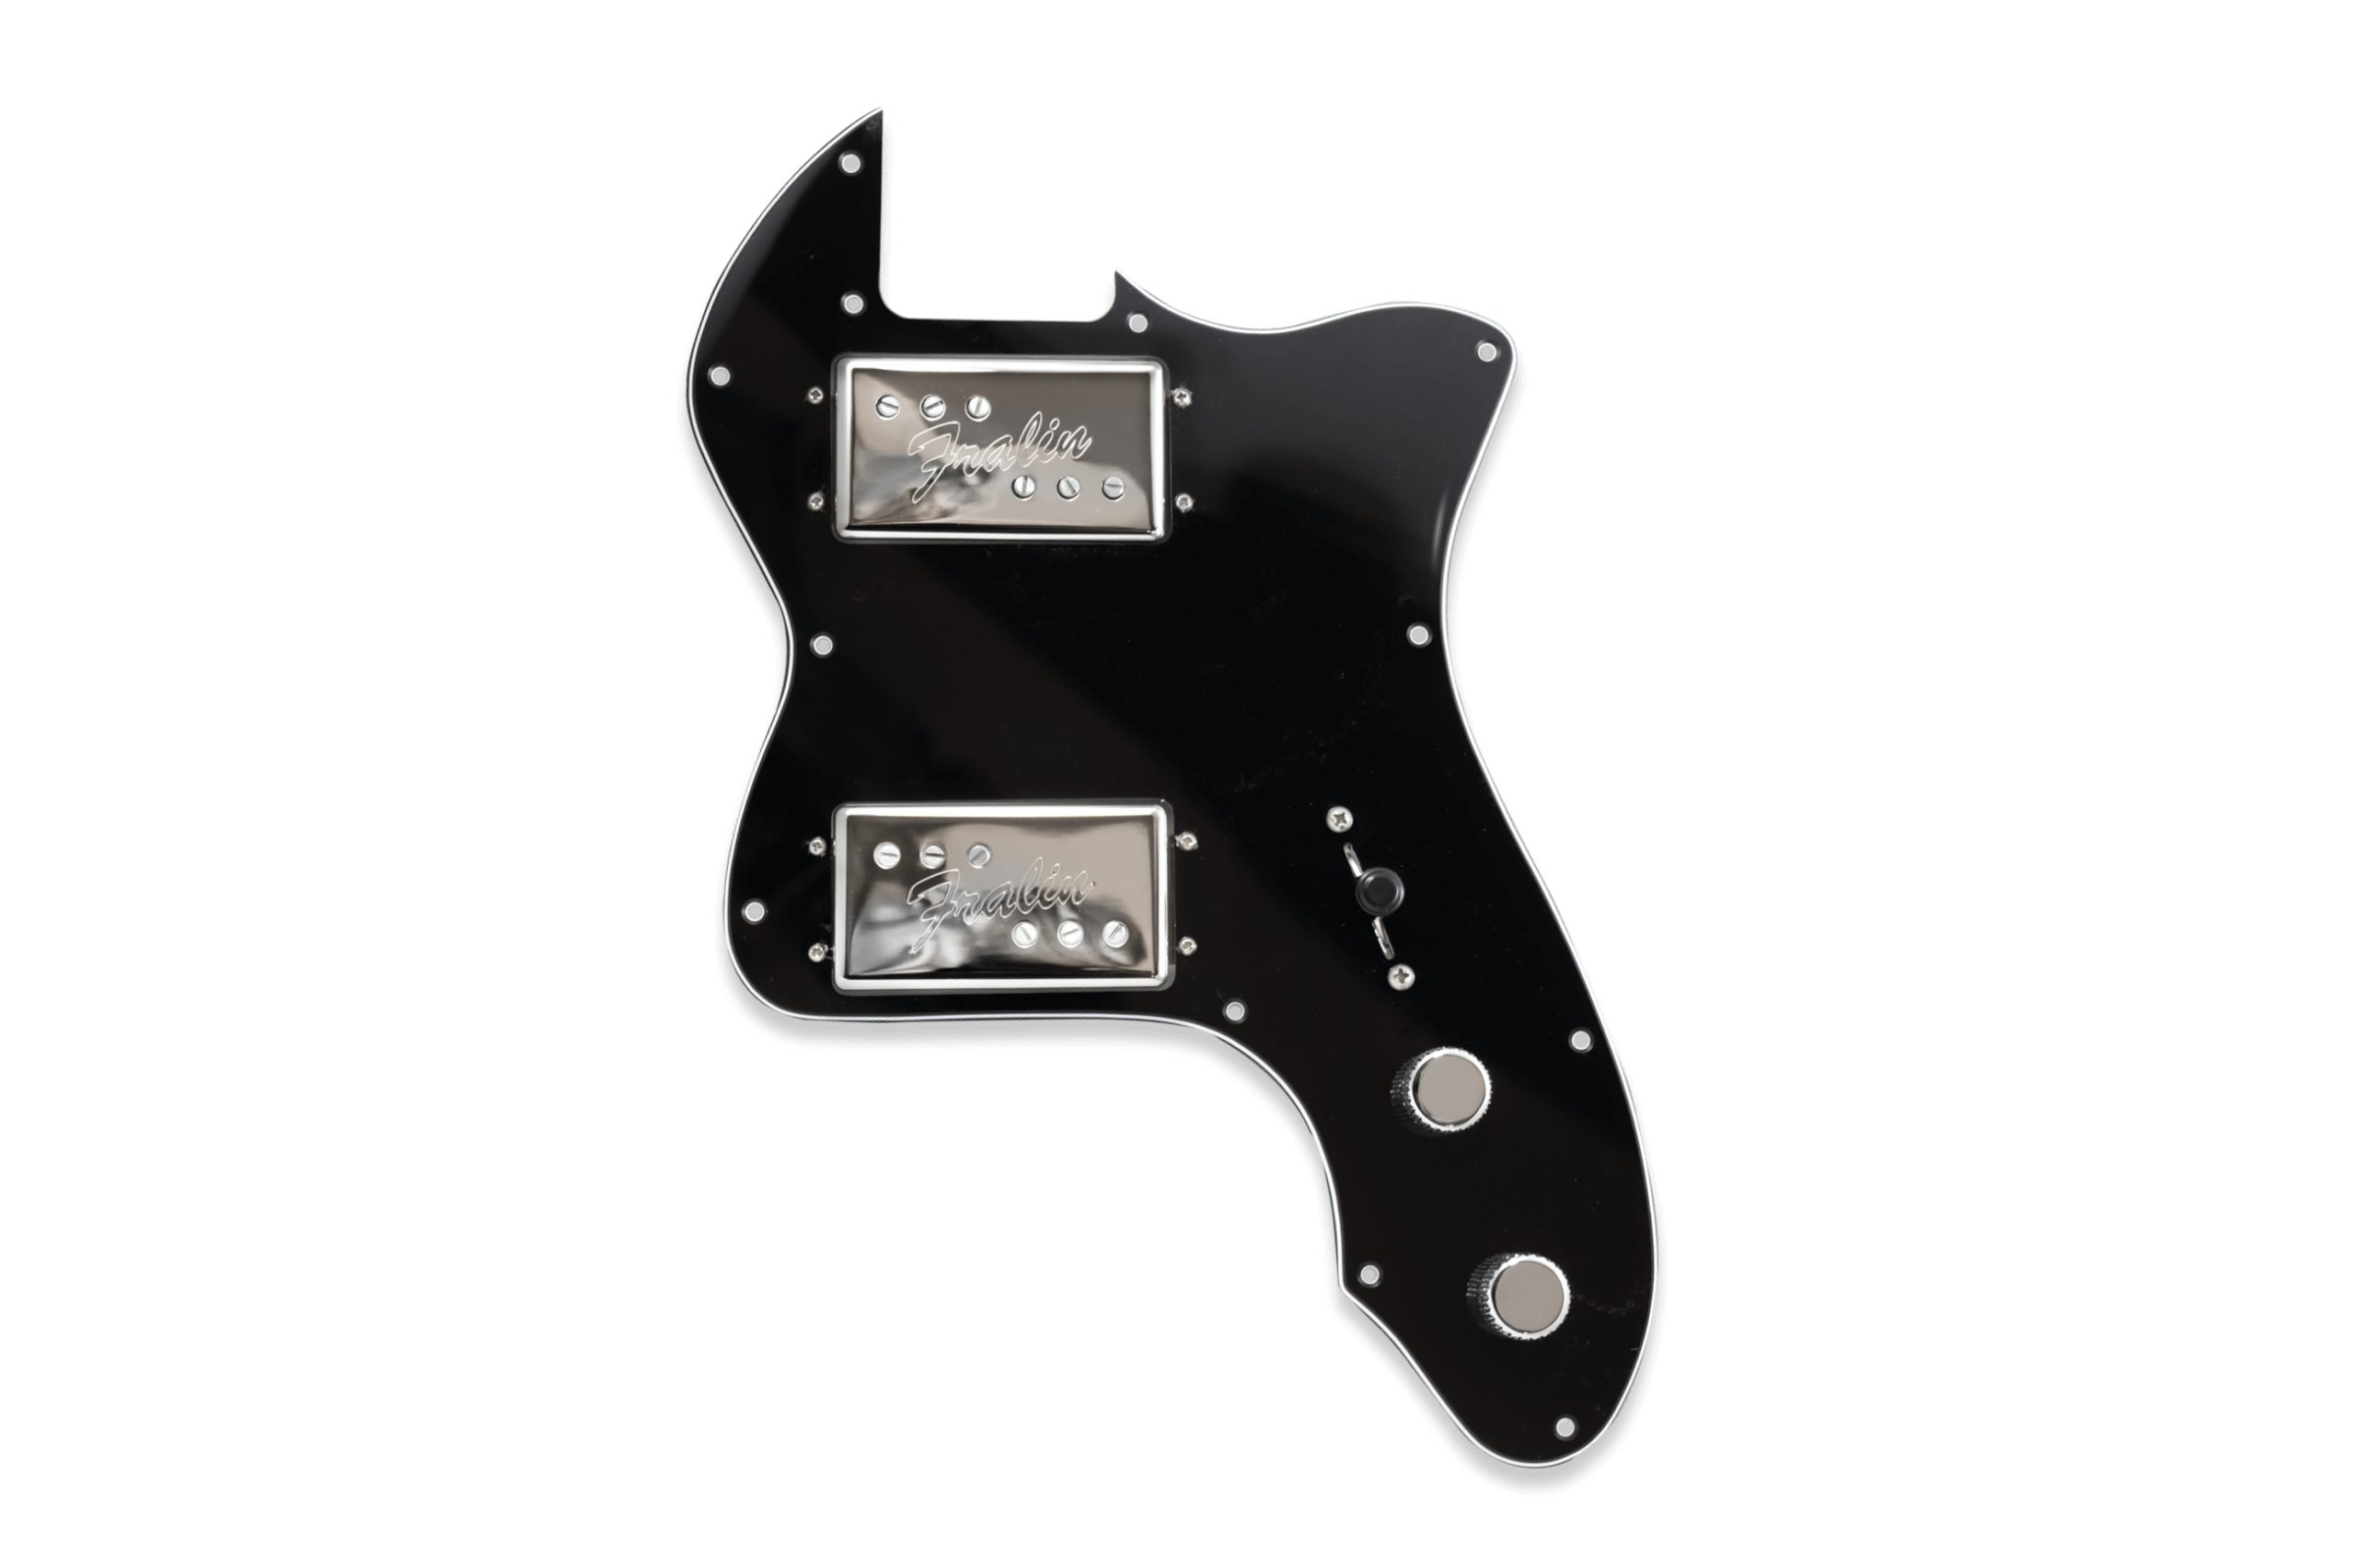

Prewired Telecaster Thinline ’72 Pickguard
Tele Thinline '72 - Maxed Out
$450
Premier Pro Upgrade Available
Create a unique Telecaster Thinline ’72 Pickguard tailored to your preferences rather than a generic one! Built with our Wide Range Humbuckers, CTS® Pots, a CRL 3-Way Switch, and our custom Tone Caps, rest assured that your Prewired Tele Thinline ’72 Pickguard is built with the best of the best.
Quick Links
Jump to Sound Clips and more info
Prewired Telecaster Thinline '72 Pickguard Info:
Want to learn more about our Prewired Telecaster Thinline '72 Pickguard? Here's all the information you'll need:
Features
Create a unique Telecaster Thinline ’72 pickguard tailored to your preferences rather than a generic one! Built with our Wide Range Humbuckers, CTS® Pots, a CRL Blade Switch, and our custom Tone Caps, rest assured that your Prewired Tele Thinline ’72 Pickguard is built with the best of the best.
At Fralin Pickups, we’re always trying to make you sound better. Our Lindy Fralin Prewired Telecaster Thinline Pickguard offers the best tone and highest quality available. We use our world-famous pickups with the best ingredients we can get. We hand-wire your Tele pickguard with painstaking attention to detail.
Furthermore, you can customize your pickguard exactly how you want it! With our Telecaster Thinline ’72 Pickguard, you can have the famous Fralin tone and a dead-simple installation. Only one wire needs to be soldered!
Features:
- The ultimate “Build Your Own” Telecaster Thinline ’72 Pickguard
- USA-Made pickups & electronics for superior quality
- Drop-in Prewired Pickguard for super-simple installation
- Hand-wired with USA-Made vintage cloth lead for a traditional look
- Fully customizable – from appearance to function
- Hand-assembled signed and dated by our pickguard craftsman
- 10-year warranty on materials and craftsmanship
Sound
Sound Samples for Prewired Telecaster Thinline ’72 Pickguard:
About this Sound Clip:
All sound samples are played from Neck Position First and Bridge Position Last.
Tonal Graph For Prewired Telecaster Thinline ’72 Pickguard:
The tonal graph below for our Prewired Telecaster Thinline ’72 Pickguard features Lows, Midrange, Highs, and general Output.
Attack: Dynamic & Full
Tech Specs:
| SPECIFICATION | VALUE |
|---|---|
| Pot Manufacturer: | CTS® |
| Pot Value: | 500K (Recommended) |
| Switch Manufacturer: | CRL® |
Installation Instructions
Congratulations on your purchase of Fralin's Prewired Telecaster Pickguard! We've made installation super simple. If you're uncomfortable soldering or working on guitars, simply bring this pickguard and your guitar to an experienced luthier for a professional installation.
This installation guide covers our Prewired '72 Deluxe Pickguard, Prewired Thinline '72 Pickguard and Prewired Custom '72 Pickguard.
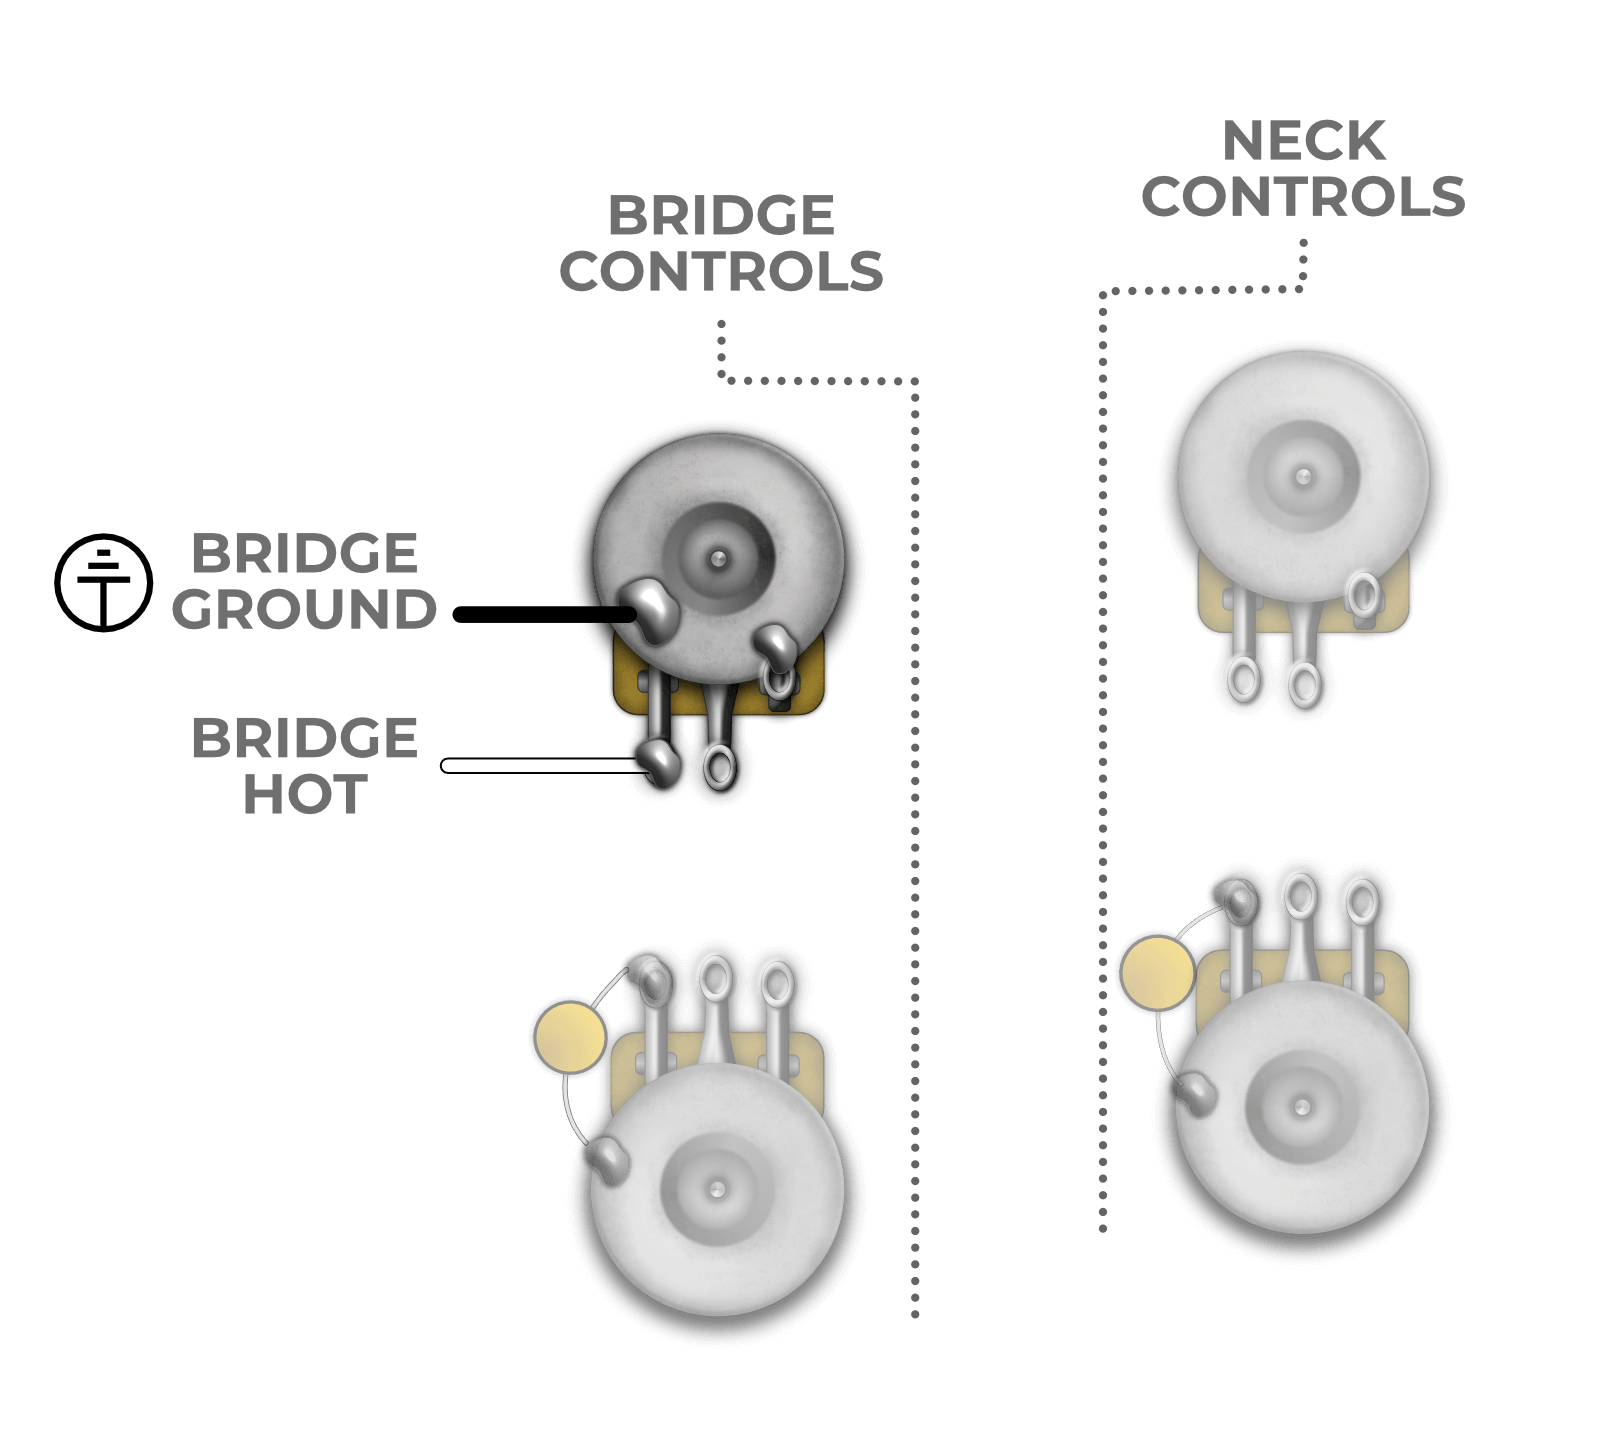
Installation Overview
After removing your existing pickguard from your instrument, you'll need to solder at least two wires on the new pickguard. Each pickguard features one White and two Black wires. Here's where they go:

Note: For the Prewired Custom '72, see the note below.
Installation Steps & Tools Needed:
You'll need the following tools to install the Prewired Pickguard:
- Soldering Iron & Solder (We use Kester 60/40)
- Phillips head screwdriver (For removing pickguard and output jack mount)
- Wire cutters (for trimming excess wire, if needed)
- 1/2" Hex Nut Driver (for uninstalling and installing the output jack)
Step 1: Prep guitar for installation
- Remove the strings from your guitar
- Unscrew the Jack Mount plate to expose the output jack
- Use the 1/2" Hex Nut Driver to unscrew the hex nut while holding the output jack from the back to uninstall the output jack from the plate
- Unsolder the leads connecting the output jack (if replacing the jack, simply snip the leads off)
Step 2: Remove the Existing Pickguard
Next, simply unscrew all pickguard screws and put in a safe place. The pickguard should wiggle free and lift out of the guitar.
Cut or unsolder any of the ground connections holding the pickguard in the guitar. You will need to solder these connections back on the new pickguard.
With all the Ground connections removed from the pickguard, you may now remove the existing pickguard from your guitar.
Step 3: Install the New Pickguard
With the old pickguard out of the way, we can now proceed to install the new pickguard! It's a good idea to lay the pickguard down to make sure everything fits and the holes line up. If the mounting holes do not line up, mark the new location and drill a 1/16" pilot hole for the new screw location. This is a simple, non-invasive way to make sure the new pickguard fits perfectly. Wire it up according to the image above.
Install the Jack to the Jack Plate, wire it up, screw everything back in, and plug the guitar in before stringing it up to make sure everything works.
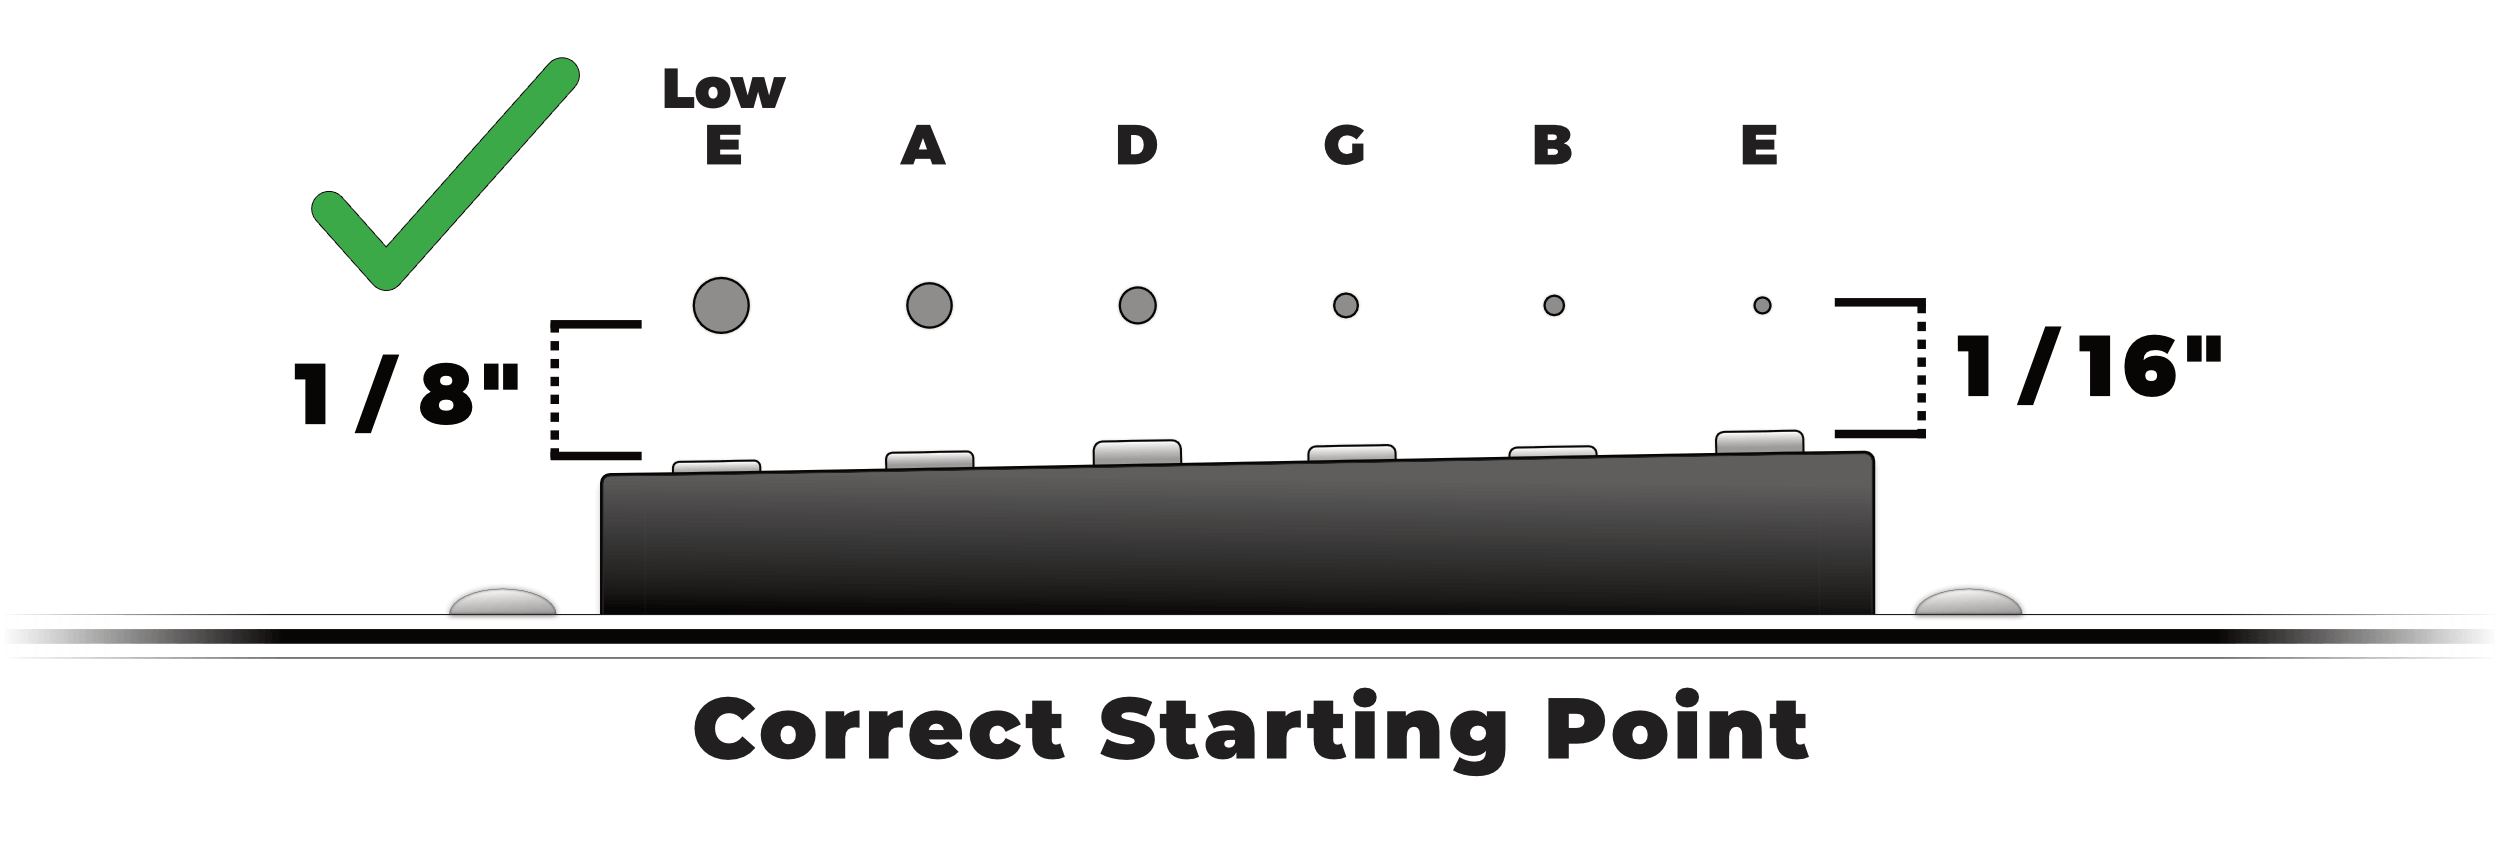
Final Step: Adjust Pickup Heights
Finally, adjust the height of your pickups to the appropriate height. We have a whole guide for you to follow here. Here's a cheat sheet to get it up and running quickly:
Prewired Custom '72 Installation
For the Prewired Custom '72 Pickguard, you'll need to solder the Bridge pickup independently of the pickguard. When the string are off, remove the Bridge assembly and install the Bridge Pickup according to this wiring diagram:
Prewired Telecaster Thinline ’72 Pickguard FAQ's
Product FAQ's
People frequently ask these questions about our Prewired Telecaster Thinline ’72 Pickguard. If you have a question that you don't see listed here, click "Ask" in the Quick Links section above.
-
Which Tone Cap do I select?
We always recommend 0.022mfd as the Tone Cap value. A larger capacitance value means more roll-off, a lower capacitance value means less roll-off.
-
Can I return this pickguard?
No – all pickguards are built to order, and are non-returnable.
-
Can you coil-split the Wide Range humbuckers?
While it’s possible, we don’t recommend it. There are two main reasons why:
- The Wide Range Humbucker consists of two low-wind coils. These coils by themselves don’t produce a usable output.
- Half of the Coil’s magnets are under the cover, without the ability to adjust them easily. This will yield an unbalanced tone.
Need Guidance?
Contact our Prewired Craftsman Directly
Builders Love Our Prewired Telecaster Thinline ’72 Pickguard
These are just some of our talented builders that use our Prewired Telecaster Thinline ’72 Pickguard
Customer Reviews
2 Genuine Reviews for Prewired Telecaster Thinline ’72 Pickguard
-
Great sounding! Went into a Squier Classic Vibe Thinline. No real hassles getting it installed; just some minor adjustments to fit. Tone Pot sounds good. Volume Pot IMO, drops too rapidly. Contacted Fralin to ask about it but got no response. Otherwise it would have been 5 stars.
-
The pickups sound great, but the prewired pickguard came with the wiring to the control switch reversed (with selector to the right, neck p/u was engaged, with selector to the left, neck pickup was engaged). So I had to re-solder the leads. Surprised at the poor quality-control here. Also, the p/u height adjustment screws were too long for my mexican-made thinline tele and I had to clip a good 1/8″ off of them.
-
Hey Dan, I deeply apologize for the inconvenience. I’ve spoken to our QC team and we’ve worked out a way to make sure this doesn’t happen in the future. Again, I deeply apologize for the inconvenience on this.
-
Add a review
Leave a review for our Prewired Telecaster Thinline '72 Pickguard
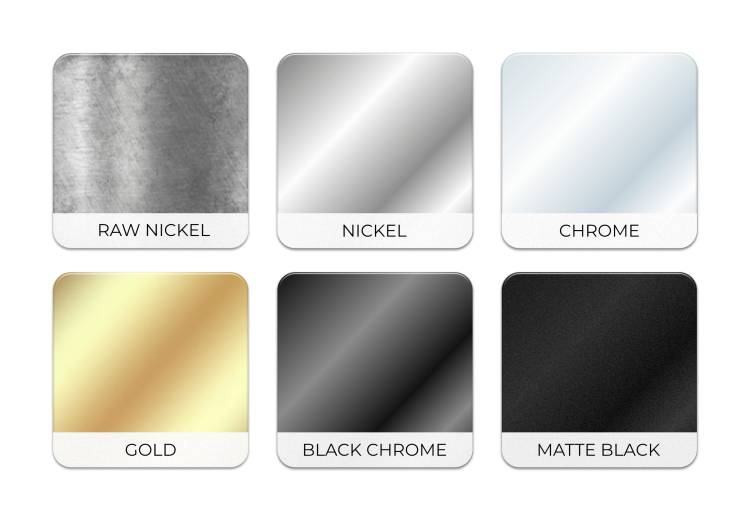
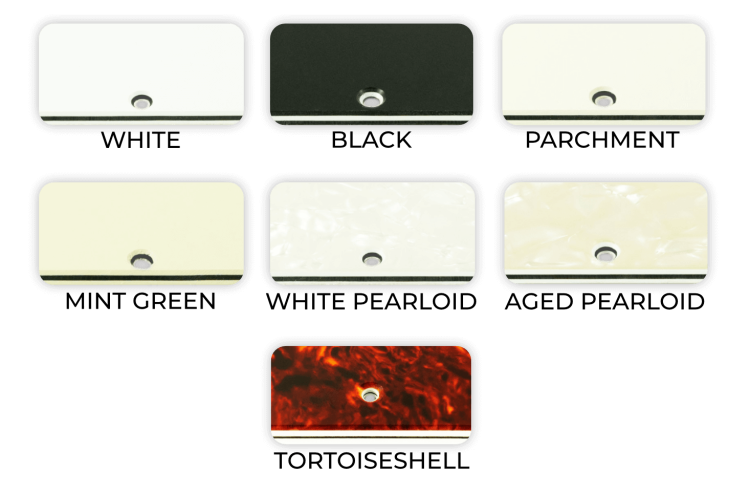
NOTES ON COLOR:
- Please note that while we strive to provide the most accurate color representation possible, different computer monitors, manufacturer dye lots, and other circumstances may prevent the color from matching perfectly.
- Since we cannot guarantee color matching, we cannot provide a return to you if you are unhappy with the color matching of our Prewired Telecaster Thinline ’72 Pickguard.
HARNESSES:
- Our parts and wire lengths are designed to work seamlessly with our Prewired Telecaster Thinline ’72 Pickguard. Due to various guitar and instrument designs, we cannot guarantee that our parts will fit properly, and due to this, we do not offer Wiring Harnesses.