
Les Paul Harness Install Guide
Tools Needed:
- Soldering Iron & Quality Solder (We use Kester 60/40)
- 1/2″ Nut Driver
- Cable Cutters
- Screwdriver
- Masking Tape and pen (for labeling wires)
Difficulty:
Moderate difficulty. We recommend taking this harness to an experienced luthier if you are uncomfortable with soldering and working with guitar electronics. If you’re comfortable, installation should be a breeze.
Installation Steps
Before You Begin: It’s important to think about the scope of the install before digging in to your guitar. Ask yourself a few questions:
- Are you replacing the pickups?
- Are you replacing the switch?
If you’re replacing the pickups and the switch, it’s important to note what order they go back in the guitar. Always install the item furthest away from the control cavity first, before installing the harness.
For example:
- If you’re replacing the switch, you’ll need to temporarily pull the pickups out of the guitar to guide the switch through the body.
- If you’re replacing the pickups and the switch, take everything out first, then install the switch, then pickups, then harness last.
This will make your install easier as it’s much easier to install items through the wire rout when they are out of the instrument.
Okay, with that out the way…here we go!
Step 1: Prep and Remove Existing Harness
This step, we will remove the existing harness from your guitar and prep for the installation of the new harness. We don’t want to get our wires mixed up, so the key is to unsolder each wire one at a time and label it so we can stay organized.
- Remove the backplate with a screwdriver to expose the electronics
- Unsolder the Neck pickup from the Neck Pickup Volume Pot and label it with some tape
- Unsolder the Bridge pickup from the Bridge Pickup Volume Pot and label it with some tape
- Unsolder the Output Jack’s Ground and Hot wire
- With all wires unsoldered, remove the speed knobs on the guitar and use a 1/2″ nut driver to loosen the hex nuts. Remove the hex nuts and remove the existing harness.
Step 2: Install New Harness
During this step, we want to make sure that our harness fits in perfectly. Our harnesses are guaranteed to fit Gibson® Les Pauls. Epiphones will fit as well, but due to different countries of origin, some finessing may be required – don’t worry – it’s designed to have some give.
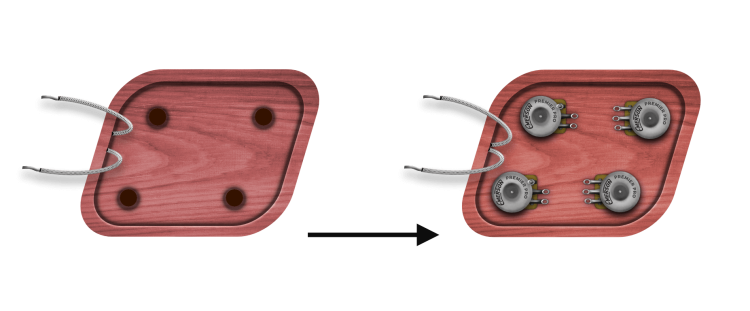
- Remove the hex nuts and washers from the pots and remove the harness from our harness board.
- Keeping the lock washer on the bottom of the pot, install each pot and split a flat washer and hex nut to secure the harness.
Step 3: Wire Pickups
This step, we will solder the pickup’s leads to their corresponding Volume Pot. For both Pickups, we solder the pickup’s ground to the casing, and the pickup’s hot lead to the Middle Lug. Start with the Neck Pickup.

Once soldered, move on to the Bridge Pickup:

Step 4: Wire the Output Jack
The last step is to solder the output jack. Take the White from the Switch and solder to the terminal below. Ground the other tab. Important: reversing this connection will make everything sound awful, so take your time with this connection. If you need additional information, check out our article on the subject here.

Once everything is soldered up, I recommend performing the tap test on each pickup to an amp turned on low. Test each volume pot and tone pot while lightly tapping on the pickup’s screws. Once confirmed working, Replace the back plate and output jack plate, string it up,